Milspec Teardown: ID-2124 Howitzer Data Display

It’s time once again for another installment in “Milspec Teardown”, where we get to see what Uncle Sam spends all those defense dollars on. Battle hardened pieces of kit are always a fascinating look at what can be accomplished if money is truly no object. When engineers are given a list of requirements and effectively a blank check, you know the results are going to be worth taking a closer look.

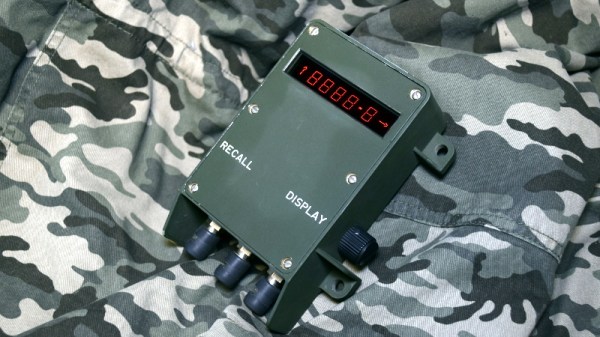
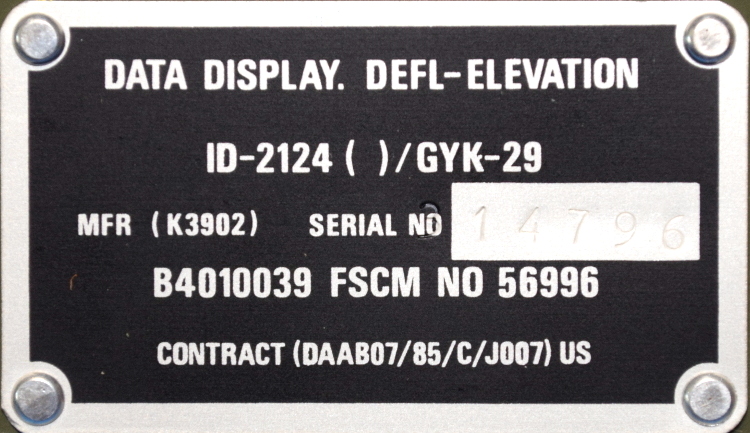
Today, we have quite a treat indeed. Not only is this ID-2124 Howitzer Deflection-Elevation Data Display unit relatively modern (this particular specimen appears to have been pulled from service in June of 1989), but unlike other military devices we’ve looked at in the past, there’s actually a fair bit of information about it available to us lowly civilians. In a first for this ongoing series of themed teardowns, we’ll be able to compare the genuine article with the extensive documentation afforded by the ever fastidious United States Armed Forces.

For example, rather than speculate wildly as to the purpose of said device, we can read the description directly from Field Manual 6-50 “TACTICS, TECHNIQUES, AND PROCEDURES FOR THE FIELD ARTILLERY CANNON BATTERY”:

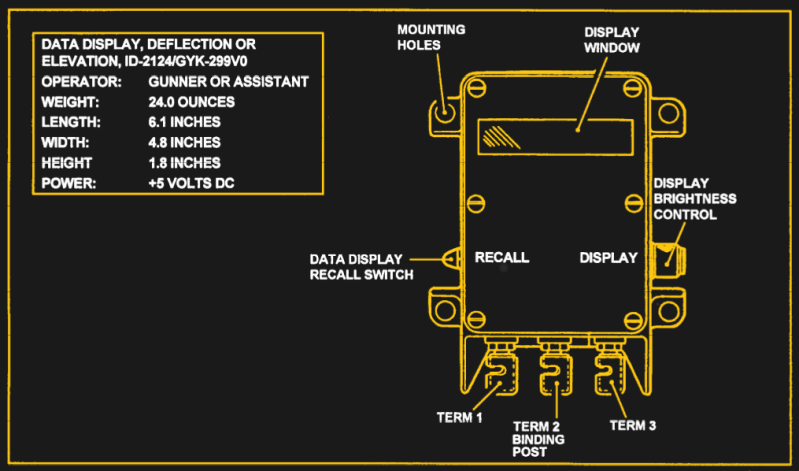
The gun assembly provides instant identification of required deflection to the gunner or elevation to the assistant gunner. The display window shows quadrant elevation or deflection information. The tenths digit shows on the QE display only when the special instruction of GUNNER’S QUADRANT is received.

From this description we can surmise that the ID-2124 is used to display critical data to be used during the aiming and firing of the weapon. Further, the small size of the device and the use of binding posts seem to indicate that it would be used remotely or temporarily. Perhaps so the crew can put some distance between themselves and the artillery piece they’re controlling.

Now that we have an idea of what the ID-2124 is and how it would be used, let’s take a closer look at what’s going on inside that olive drab aluminum enclosure.

Continue reading “Milspec Teardown: ID-2124 Howitzer Data Display”

Desktop Radio Telescope Images The WiFi Universe

It’s been a project filled with fits and starts, and it very nearly ended up as a “Fail of the Week” feature, but we’re happy to report that the [Thought Emporium]’s desktop WiFi radio telescope finally works. And it’s pretty darn cool.

If you’ve been following along with the build like we have, you’ll know that this stems from a previous, much larger radio telescope that [Justin] used to visualize the constellation of geosynchronous digital TV satellites. This time, he set his sights closer to home and built a system to visualize the 2.4-GHz WiFi band. A simple helical antenna rides on the stepper-driven azimuth-elevation scanner. A HackRF SDR and GNU Radio form the receiver, which just captures the received signal strength indicator (RSSI) value for each point as the antenna scans. The data is then massaged into colors representing the intensity of WiFi signals received and laid over an optical image of the scanned area. The first image clearly showed a couple of hotspots, including a previously unknown router. An outdoor scan revealed routers galore, although that took a little more wizardry to pull off.

The videos below recount the whole tale in detail; skip to part three for the payoff if you must, but at the cost of missing some valuable lessons and a few cool tips, like using flattened pieces of Schedule 40 pipe as a construction material. We hope to see more from the project soon, and wonder if this FPV racing drone tracker might offer some helpful hints for expansion.

Continue reading “Desktop Radio Telescope Images The WiFi Universe”

Start Tracking Satellites With This Low-Cost Azimuth-Elevation Positioner

Tracking satellites and the ISS is pretty easy. All you really need is an SDR dongle or a handheld transceiver, a simple homebrew antenna, and a clear view of the sky. Point the antenna at the passing satellite and you’re ready to listen, or if you’re a licensed amateur, talk. But the tedious bit is the pointing. Standing in a field or on top of a tall building waving an antenna around gets tiring, and unless you’re looking for a good arm workout, limits the size of your antenna. Which is where this two-axis antenna positioner could come in handy.

While not quite up to the job it was originally intended for — positioning a 1.2-meter dish antenna — [Manuel] did manage to create a pretty capable azimuth-elevation positioner for lightweight antennas. What’s more, he did it on the cheap — only about €150. His design seemed like it was going in the right direction, with a sturdy aluminum extrusion frame and NEMA23 steppers. But the 3D-printed parts turned out to be the Achille’s heel. At the 1:40 mark in the video below (in German with English subtitles), the hefty dish antenna is putting way too much torque on the bearings, delaminating the bearing mount. But with a slender carbon-fiber Yagi, the positioner shines. The Arduino running the motion control talks GS232, so it can get tracking data directly from the web to control the antenna in real time.

Here’s hoping [Manuel] solves some of the mechanical issues with his build. Maybe he can check out this hefty dish positioner for weather satellite tracking for inspiration.

Continue reading “Start Tracking Satellites With This Low-Cost Azimuth-Elevation Positioner”

See Satellites With A Simple Radio Telescope

Have you got a spare Dish Network antenna lying about? They’re not too hard to come by, either curbside on bulk waste day or perhaps even on Freecycle. If you can lay hands on one, you might want to try this fun radio telescope build.

Now, don’t expect much from [Justin]’s minimalist build. After all, you’ll be starting with a rather small dish and an LNB for the Ku band, so you won’t be doing serious radio astronomy. In fact, the BOM doesn’t include a fancy receiver  – just a hacked satellite finder. The idea is to just get a reading of the relative “brightness” of a radio source without trying to demodulate the signal. To that end, the signal driving the piezo buzzer in the sat finder is fed into an Arduino through a preamp. The Arduino also controls stepper motors for the dish’s azimuth and elevation control, which lets it sweep the sky and build up a map of signal intensity. The result is a clear band of bright spots representing the geosynchronous satellites visible from [Justin]’s location in Brazil.

Modifications are definitely on the docket for [Justin], including better equipment that will allow him to image the galactic center. There may be some pointers for him in our coverage of a tiny SDR-based radio telescope, or from this custom receiver that can listen to Jupiter.

Continue reading “See Satellites With A Simple Radio Telescope”

Junkyard Dish Mount Tracks Weather Satellites

There’s a magnificent constellation of spacecraft in orbit around Earth right now, many sending useful data back down to the surface in the clear, ready to be exploited. Trouble is, it often takes specialized equipment that can be a real budget buster. But with a well-stocked scrap bin, a few strategic eBay purchases, and a little elbow grease, a powered azimuth-elevation satellite dish mount can become affordable.

The satellites of interest for [devnulling]’s efforts are NOAA’s Polar-orbiting Operational Environmental Satellites (POES), a system of low-Earth orbit weather birds. [devnulling] is particularly interested in direct reception of high-definition images from the satellites’ L-band downlink. The mount he came up with to track satellites during lengthy downloads is a tour de force of junkyard build skills.

The azimuth axis rotates on a rear wheel bearing from a Chevy, the elevation axis uses cheap pillow blocks, and the frame is welded from scrap angle iron and tubing. A NEMA-23 stepper with 15:1 gearhead rotates the azimuth while a 36″ linear actuator takes care of elevation. The mount has yet to be tested in the wind; we worry that sail area presented by the dish might cause problems. Here’s hoping the mount is as stout as it seems, and we’ll look forward to a follow-up.

It would work for us, but a 4-foot dish slewing around in the back yard might not be everyone’s taste in lawn appurtenances. If that’s you and you still want to get your weather data right from the source, try using an SDR dongle and chunk of wire.

Continue reading “Junkyard Dish Mount Tracks Weather Satellites”

Track Satellites With A 2-axis Antenna Positioner

Ham radio operators are curious beasts. They’ll go to great lengths to make that critical contact, and making sure their directional antennas are pointing the right way can be a big part of punching through. Of course there are commercial antenna rotators out there, but hams also like to build their own gear, like this Raspberry Pi-controlled 2-axis rotator.

[wilho]’s main motivation for this build seems to have been the sad state of the art in commercial 2-axis rotators, which seems firmly mired in the 90s. Eschewing the analog pot sensors on DC brushed motors that seem to dominate the COTS market, [wilho] went with steppers and stout gearboxes for the moving gear. Feedback on the axes comes from 10-bit absolute encoders, and an MPU9250 9-axis IMU makes sure he knows exactly where the antenna is pointing with respect to both compass heading and elevation. A mast-mounted Rasp Pi controls everything and talks through a REST API to custom software that can return the antenna to custom set-points or track the moon, satellites, or the ISS. It’s a very impressive bit of kit that’s sure to drive your home-owners association bonkers.

For another 2-axis antenna positioner, check out 2015 Hackaday Prize finalist SATNOGS.

Continue reading “Track Satellites With A 2-axis Antenna Positioner”