Desktop Radio Telescope Images The WiFi Universe

It’s been a project filled with fits and starts, and it very nearly ended up as a “Fail of the Week” feature, but we’re happy to report that the [Thought Emporium]’s desktop WiFi radio telescope finally works. And it’s pretty darn cool.

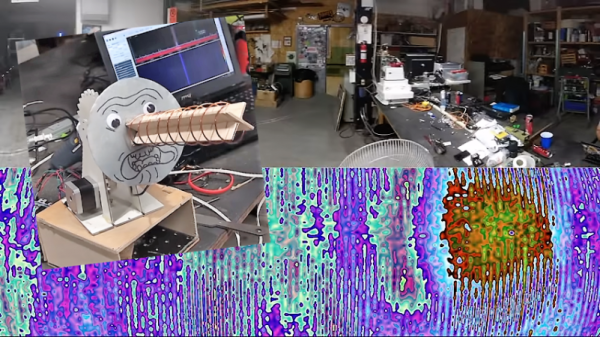
If you’ve been following along with the build like we have, you’ll know that this stems from a previous, much larger radio telescope that [Justin] used to visualize the constellation of geosynchronous digital TV satellites. This time, he set his sights closer to home and built a system to visualize the 2.4-GHz WiFi band. A simple helical antenna rides on the stepper-driven azimuth-elevation scanner. A HackRF SDR and GNU Radio form the receiver, which just captures the received signal strength indicator (RSSI) value for each point as the antenna scans. The data is then massaged into colors representing the intensity of WiFi signals received and laid over an optical image of the scanned area. The first image clearly showed a couple of hotspots, including a previously unknown router. An outdoor scan revealed routers galore, although that took a little more wizardry to pull off.

The videos below recount the whole tale in detail; skip to part three for the payoff if you must, but at the cost of missing some valuable lessons and a few cool tips, like using flattened pieces of Schedule 40 pipe as a construction material. We hope to see more from the project soon, and wonder if this FPV racing drone tracker might offer some helpful hints for expansion.

Continue reading “Desktop Radio Telescope Images The WiFi Universe”

Learn Something About Phase Locked Loops

The phase locked loop, or PLL, is a real workhorse of circuit design. It is a classic feedback loop where the phase of an oscillator is locked to the phase of a reference signal using an error signal in the same basic way that perhaps a controller would hold a temperature or flow rate in a physical system. That is, a big error will induce a big change and little errors induce little changes until the output is just right. [The Offset Volt] has a few videos on PLLs that will help you understand their basic operation, how they can multiply frequencies (paradoxically, by dividing), and even demodulate FM radio signals. You can see the videos below.

The clever part of a PLL can be found in how it looks at the phase of two signals. For signals to be totally in phase, they must be at the same frequency and also must ebb and peak at the same point. It should be clear that if the frequency isn’t the same the ebbs and peaks can’t line up for any length of time. By detecting how much the signals don’t line up, an error voltage can be generated. That error voltage is used to adjust the output oscillator so that it matches the reference oscillator.

Of course, it wouldn’t be very interesting if the output frequency had to be the same as the reference frequency. The clever trick comes by dividing the output frequency. For example, a 100 MHz crystal oscillator is difficult to design. But taking a voltage-controlled oscillator at 100 MHz (nominal) and dividing its output by 100 will give you a signal you can lock to a 1 MHz crystal oscillator which is, of course, trivial to build.

Continue reading “Learn Something About Phase Locked Loops”

Trackball Gets Bolt-On Button Upgrade

The question of whether to use a mouse versus a trackball is something of a Holy War on the level of Vi versus Emacs. We at Hackaday want no part of such things, use whatever you want, and leave us out of it. But we will go as far as to say that Team Trackball seems to take things mighty seriously. We’ve never met a casual trackball user: if they’ve got a trackball on their desk then get ready to hear all about it.

With that in mind, the lengths [LayeredDesigns] went to just to add a couple extra buttons to his CST trackball make a bit more sense. Obviously enamored with this particular piece of pointing technology, he designed a 3D printed “sidecar” that you can mount to the left side of the stock trackball. Matching the shape of the original case pretty closely, this add-on module currently hosts a pair of MX mechanical keys, but the plans don’t stop there.

[LayeredDesigns] mentions that all the free room inside the shell for this two-button modification has got him thinking of what else he could fit in there. The logical choice is a Teensy emulating a USB HID device, which could allow for all sorts of cool programmable input possibilities. One potential feature he mentioned was adding a scroll wheel, which the Teensy could easily interface with and present to the operating system.

We’ve seen our fair share of 3D printed keyboards and keyboard modifications, but we can’t say the same about the legendary trackball. Ones made of cardboard, sure. Pulled out of a military installation and hacked to add USB? You bet. This project is just more evidence of what’s possible with a 3D printer, a caliper, and some patience.

[via /r/functionalprint]

This Weekend: The East Coast RepRap Festival

Are you around Philly, Baltimore, or DC, and looking for something fun to do this weekend? Great news, because Saturday sees the start of the first inaugural East Coast RepRap Festival in Bel Air, Maryland. Eh, we’ll grab some Bohs and boil up some crabs. It’ll be a great time.

Regular readers of Hackaday should have heard of MRRF, the Midwest RepRap Festival, and the greatest 3D printer convention on the planet. There’s a reason it’s so good: it’s not a trade show. It’s simply everyone in the business and a ton of cool people heading out to the middle of Indiana one weekend per year and simply dorking out. All the heavy hitters were at MRRF last year, from [Prusa], to E3D, to [Brook] of Printrbot. The 3D Printing YouTubers made it out, and the entire event was simply a thousand or so people who were the best at what they do just hanging out.

Want evidence a highly unorganized conference of 3D printing enthusiasts can be great? Here’s a working MakerBot Cupcake. Here’s full-color printing with cyan, magenta, yellow, black, and white filament. How about an infinite build volume printer? There are roundtables, demos, and talks. This is the state of 3D printing, and it inexplicably happens in the middle of nowhere every year.

This weekend, the East Coast RepRap Festival is launching. This is not an event organized by SeeMeCNC, the hosts of the Midwest RepRap Festival. This is an independent event, and we have no idea how it’s going to turn out. That said, the schedule of events looks great with 3D printed pinewood (douglasfirfill?) derbies, and of course, the event space will be filled with strange and exotic homebuilt printers. The big names will be there, and it looks like this may be the beginning of something great.

Hackaday is going to have some boots on the ground this weekend, and we’re going to be showing off the greatest and the best from ERRF. Tickets are still available, and it looks like this is shaping up to be a great weekend.

A CNC Plasma Cutter Table, From The Shop Floor Up

Some projects are simple, some focus on precision and craftsmanship, and some are more of the quick-and-dirty variety. This home-built CNC plasma cutter table seems to follow a “go big or go home” philosophy, and we have to say we’re mighty impressed by the finished product.

For those who follow [Bob]’s “Making Stuff” YouTube channel, this build has been a long time coming. The playlist below has eight videos that cover the entire process from cutting the first tubes of the welded frame to the initial test cuts with the finished machine. [Bob] took great pains to make the frame as square and flat as possible, to the extent of shimming a cross member to correct a 0.030″ misalignment before welding. He used good-quality linear rails for each axis, and hefty NEMA 23 steppers. There were a few false starts, like the water pan that was going to be welded out of five separate pieces of steel until the metal shop guys saved the day with their press brake. In the end, the machine turned out great; with a build cost of $2000 including the plasma cutter it’s not exactly cheap, but it’s quite a bargain compared to similar sized commercial machines.

We think the video series is a great guide for anyone looking to make a CNC plasma table. We’ve seen builds like this before, including [This Old Tony]’s CNC router. Watching these builds gives us the itch to get into the shop and start cutting metal. Continue reading “A CNC Plasma Cutter Table, From The Shop Floor Up”

Hexabitz, Modular Electronics Made Easier

Over the years there have been a variety of modular electronic systems allowing the creation of complex circuits by the interconnection of modules containing individual functions. Hexabitz, a selection of interlocking polygonal small PCBs, is just such a system. What can it bring to the table that others haven’t done already?

The problem facing designers of modular electronics is this: all devices have different requirements and interfaces. To allow connection between modules that preserves all these connections requires an ever-increasing complexity in the inter-module connectors, or the application of a little intelligence to the problem. The Hexabitz designers have opted for the latter angle, equipping each module with an STM32 microcontroller that allows it to identify both itself and its function, and to establish a mesh network with other modules in the same connected project. This also gives the system the ability to farm off computing tasks to individual modules rather than relying solely upon a single microcontroller or single-board computer.

An extremely comprehensive array of modules can be had for the system, which lends it some interesting possibilities, however, it suffers from the inherent problem of modular electronic systems, that it is less easy to incorporate non-standard functions. If they can crack a prototyping module coupled with an easy way to tell its microcontroller to identify whatever function is upon it, they might have a winner.

Analog Discovery 2 As A Vector Network Analyzer

A while back, I posted a review of the Analog Discovery 2, which is one of those USB “do everything” instruments. You might recall I generally liked it, although I wasn’t crazy about the price and the fact that the BNC connectors were an extra item. However, in that same post, I mentioned I’d look at the device’s capabilities as a network analyzer (NA) sometime in the future. The future, as they say, is now.

What’s an NA?

In its simplest form, there’s not much to an NA. You sweep a frequency generator across some range of frequencies. You feed that into some component or network of components and then you measure the power you get out compared to the power you put in. Fancy instruments can do some other measurements, but that’s really the heart of it.

The output is usually in two parts. You see a scope-like graph that has the frequency as the X-axis and some sort of magnitude as the Y-axis. Often the magnitude will be the ratio of the output power to the input power as a decibel. In addition, another scope-like output will show the phase shift through the network (Y-axis) vs frequency (X-axis). The Discovery 2 has these outputs and you can add custom displays, too.

Why do you care? An NA can help you understand tuned circuits, antennas, or anything else that has a frequency response, even an active filter or the feedback network of an oscillator. Could you do the same measurements manually? Of course you could. But taking hundreds of measurements per octave would be tedious and error-prone.

Continue reading “Analog Discovery 2 As A Vector Network Analyzer”