Simple MicroPython Game Is A 30 Minute Game Dev Course

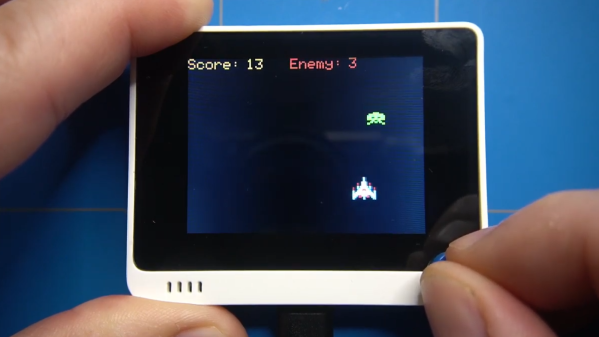
Sometimes, it’s really useful to watch a project’s parts come together one piece at a time in order to get a complete understanding and mental picture of the whole, and we found that to be the case with this simple, retro-inspired sample game from [ezContents]. (Video, embedded below.) The code is on GitHub but if you’re at all interested in what goes on behind the scenes in a game like that, don’t miss the video.

In the video, each game element and function is illustrated, showing exactly what gets done and why. This part is collision detection (click to enlarge.)

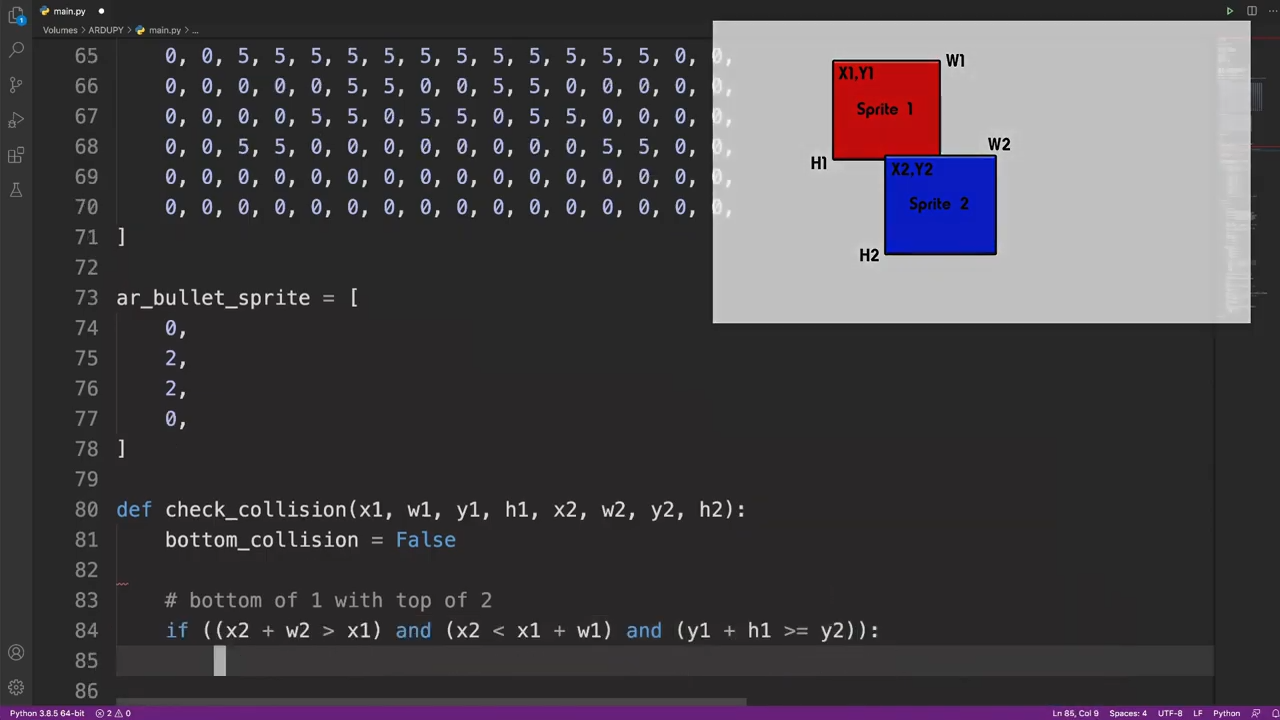
These sprite-based games are mostly about moving a small graphical object (a sprite) around a screen in response to user input, and managing what happens when collisions are detected between the player’s sprite and other sprites like enemies, projectiles, and so forth. The development process is wonderfully documented and demonstrated in a video, as each separate part of functionality gets built and explained one piece at a time.

The simple game is made using ArduPy (which is MicroPython combined with Arduino APIs) using Seeed Studios’ Wio Terminal, a small microcontroller development board with integrated screen, sensors, and button inputs including a little directional clicker that [ezContents] uses as a joystick.

The video of the whole process is embedded below; give it a watch and you’ll maybe come away with inspiration, but you’ll definitely have a much better understanding of how these types of games are developed, even if you’re not using the same hardware or development environment.

Continue reading “Simple MicroPython Game Is A 30 Minute Game Dev Course”

Retro Game Bow Tie

[Greg] loves hacking his bow ties. Back in high school, he added some bright RGB LEDs to the bow tie he wore to prom and even won the male best-dressed award. Recently he decided to try another bow tie hack, this time giving his tie some retro arcade game feels.

He decided to use an ATtiny85 and to experiment doing some more lower-level programming to refresh his skills. He wrote all his libraries from scratch which really helped him learn a lot about the ATtiny in the process. This also helped him make sure his code was as efficient as possible since he had quite a bit of memory constraints using the ATtiny85 (only 512 bytes of RAM).

He designed the body of the bow tie with wood. He fit all the electronics inside the body while allowing the ATtiny to protrude out of the body giving his bow tie some wanted hacker aesthetic. Of course, he needed to access the toggle switch to play the game, so he made a slot for that as well.

Nice addition to the electronics bow tie collection on Hackaday. Really aesthetic design if you ask us. And you know how much we love retro games.

Continue reading “Retro Game Bow Tie”

Galaga Cabinet Is Out Of This World

Like many of us, [Alex] spent a large part of his childhood feeding coin after coin into one arcade game or another. Galaga is one of his all-time favorites, and he has wanted to build a Galaga cabinet for a long time. Once his workshop was ready for the job, it was time to cross it off the list.

The cabinet is built to 4/5 scale. This is a great size because he gets the stability and feel of a full-size machine, but it’s much easier to move it around. As you might expect, there’s Pi in the cabinet.  The display is an old TV that [Alex] found in a Dumpster. And although it works great, it would go into standby instead of powering off along with everything else. To get around this, [Alex] built an automatic remote control with an IR LED and an Arduino Diecimila. After a five-second wait, it sends the power-on code to the TV and switches the input. The TV is supposed to be in portrait mode for Galaga, but this proved to be a challenge. Changing the orientation at the Pi level resulted in poor performance and choppy sound, so he changed it at the game execution level.

We are continually impressed by the diversity of [Alex]’s builds and the care that goes into them. Who could forget his beautiful sidewalk graffiti machine or the time he showed us how to photograph stuff that’s not there? Make the jump to see a brief demonstration followed by a two-part build video.

Continue reading “Galaga Cabinet Is Out Of This World”

Most Beautiful Mini-Galaga-Pi Ever!

The problem with click-bait titles, besides the fact that they make the reader feel cheated and maybe a little bit dirty for reading the article, is that they leave us with nothing to say when something is truly outstanding. But the video of [Tiburcio de la Carcova] building up a mini-Galaga cabinet (complete with actual tiny CRT screen from an old portable 5″ TV) is actually the best we’ve ever seen.

Plywood is laser-cut. Custom 3D printed parts are manufactured and assembled, including the joysticks and coin door. Aluminum panels are cut on a bandsaw and bent with a hand brake. Parts are super-glued. In short, it’s a complete, sped-up video of the cutting-edge of modern DIY fab. If that’s not enough reason to spend four minutes of your time, we don’t know what is.

[Tiburcio] has also made a mini Space Invaders, and is thinking of completing the top-20 of his youth. Pacman, Asteroids, and Missile Command are next. We can’t wait.

There are (ahem) a couple of Raspberry-Pi-powered video game emulators on Hackaday, so it’s a little awkward to pick one or two to link in. We’ll leave you with this build that also uses a small CRT monitor to good effect albeit in less-fancy clothing.

Continue reading “Most Beautiful Mini-Galaga-Pi Ever!”

Reverse Engineering Galaga To Fix The No-Fire Cheat

We didn’t know there was a cheat to Galaga, but [Chris Cantrell] did. And so he did what any curious hacker would do — reverse-engineer the game to diagnose and eventually fix the bug.

Spoilers ahoy! Go read the website first if you’d like to follow [Chris]’s reversing efforts in the order that they actually happened.

The glitch is triggered by first killing most of the bees. When only six are left, they go into a second pattern where they swoop across the screen and wrap around the edges. While swooping, sometimes the bees will fire a shot when they’re at coordinates with X=0. Now two facts: there’s a maximum of eight missiles on the screen at any given time, and the position X=0 was reserved by the software to hide sprites that don’t need updating.

The end result is that eight missiles get stuck in a place where they never drop and don’t get drawn. No further shots are fired in the entire game. You win.

So that’s the punchline, but everyone knows that a good joke is in the telling. If you’re at all interested in learning reverse engineering, go read [Chris]’s explanations and work through them on your own.

And here’s our generic plug for Computer Archaeology:

Ancient video games run on MAME or similar emulators are the perfect playground for learning to reverse engineer; you can pause the machine, flip a bit in memory, and watch what happens next. Memory was expensive back then too, so the games themselves are small. (It’s not like trying to reverse engineer all however many jiggabytes of Microsoft Office.) The assembly languages for the old chips are small and well-documented, and most of the time you’ve also got a good dissasembler. What more could you ask for?

A walkthrough tutorial?  We’ve just given you one.

Oh and PS: If you get past level 255, the game freaks out.

Continue reading “Reverse Engineering Galaga To Fix The No-Fire Cheat”

Galaga Mini-Cabinet Using A Nintendo DS

galaga-cabinet-from-nintendo-ds

We’re not showing you the finished version of this tiny Galaga arcade cabinet because it doesn’t really testify to the awesome that was packet into this hack. In regards to the features the build is just nuts!. The user controls were customized to look like the real thing, and the attention to detail would make craftsmen from the gilded age of dollhouses proud.

Update: [eLRIC] left a link to an even better forum thread build log as a comment. Among other thing it fully details the joystick modifications.

The machine is driven by a Nintendo DS, which donates its upper screen as the cabinet display. In the image to the right you can see that the lower display is still accessible through an opening in the back of the cabinet. The joystick is a small multi-directional switch which was altered by adding the red ball. It was also housed in a custom metal bracket that includes a washer to limit the movement of the stick. Also shown on the right are the lights for the marquee as well as the two coin-slots.

Check out the video after the break to see the game play. Despite its size it still seems really playable, but if you need something larger you could model your own build off of this project.

Continue reading “Galaga Mini-Cabinet Using A Nintendo DS”