Charger Caddy Shows What 3D Printers Were Meant For

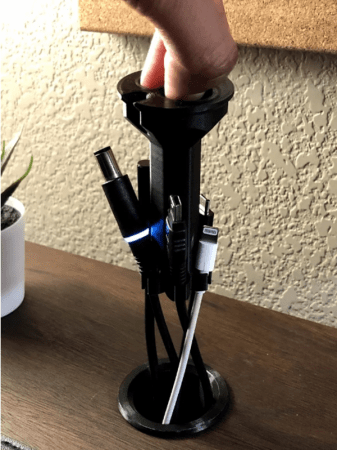
As computers became more popular in the late 80s and into the 90s, they vastly changed their environments. Of course the technological changes were obvious, but plenty of other things changed to accommodate this new technology as well. For example, furniture started to include design elements to accommodate the desktop computer, with pass-through ports in the back of the desks to facilitate cable management. While these are less common features now there are plenty of desks still have them, this 3D printed design modernizes them in a simple yet revolutionary way.

While these ports may have originally hosted thick VGA cables, parallel printer cables (if they would fit), and other now-obsolete wiring, modern technology uses simpler, smaller solutions. This doesn’t mean that they aren’t any less in need of management, though. This print was designed to hold these smaller wires such as laptop chargers, phone chargers, and other USB cables inside the port. A cap on the top of the print keeps everything hidden until it is lifted by hand, where a cable can be selected and pulled up to the top of the desk.

While it might seem like a simple project at first, the elegance of this solution demonstrates excellent use of design principles and a knack for integrating slightly older design decisions with modern technology. If you have a 3D printer and a cable management port on your desk, the print is available on Thingiverse. Not every project needs a complicated solution to solve a problem, like this automatic solar tracker we recently saw which uses no complicated electronics or algorithms to reliably point itself at the sun.

Drill Thrice, Solder Once

If you design printed circuit boards, then you will have also redesigned printed circuit boards. Nobody gets it right the first time, every time. Sometimes you can solder a scrap of 30gauge wire, flip a component 180°, or make a TO-92 transistor do that little pirouette thing where the legs go every-which-way. If you angered the PCB deities, you may have to access a component pad far from an edge. [Nathan Seidle], the founder of Sparkfun, finds himself in this situation, but all hope is not lost.

Our first thought is to desolder everything, then take a hot iron and tiny wires to each pad. Of course, this opens up a lot of potential for damage to the chip, cold joints, and radio interference. Accessing the pin in vivo has risks, but they are calculated. The idea is to locate the pin, then systematically drill from the backside and expose the copper. [Nate] also discovers that alcohol will make the PCB transparent so you can peer at the underside to confirm you have found your mark.

In a real, “fight fire with fire” idea, you can rework with flex PCBs or push your PCB Fu to the next level and use PCBs as your enclosure.

Punch Those Hole-Drilling Blues Away With A Homebrew Punching Tool

Four times the holes, four times the trouble. With the fate of repetitive motion injury looming due to the need to drill 1,200 holes, [bitluni] took matters into his own hands and built this nifty DIY hole punch for light-gauge sheet metal.

A little backstory will probably help understand why [bitluni] needs so many holes. Back in May, he built a ping pong ball LED video wall for Maker Faire Berlin. That had 300 LEDs and came out great, but at the cost of manually drilling 300 holes in sheet steel with a hand drill. Looking to expand his wall of balls to four times the original size, [bitluni] chose to spend a few days building a punch to make the job more appealing. The business end, with solid bar stock nested inside pieces of tubing, is a great example of how much you can get done without a lathe. The tool is quite complex, with a spring-loaded pilot to help guide the punching operation. When that proved impractical, [bitluni] changed the tool design and added an internal LED to project crosshairs from inside the tool.

The tool itself is mounted into a sturdy welded steel frame that allows him to cover the whole aluminum sheet that will form the panel of his LED wall. It’s pretty impressive metalwork, especially considering this isn’t exactly in his wheelhouse. And best of all, it works – nice, clean holes with no deformation, and it’s fast, too. We’re looking forward to seeing the mega-LED wall when it’s done.

Continue reading “Punch Those Hole-Drilling Blues Away With A Homebrew Punching Tool”

Drilling Perfectly Centered Holes

If you’ve ever been caught in the situation of needing to drill a clean straight hole down the center of a bolt or rod, you’ve probably tried and ended up with a broken bit or tilted hole, and a ton of cursing to boot.

[Vik] let us know about this nifty trick for drilling ‘down the middle’ using a simple hobby drill press and vice. He claims it’s ‘physics guiding the bit’ but in reality its just crafty use of a chuck. Either way the quick trick works, and will hopefully save a lot of hackers some headaches in the future.

Let us know in the comments if you have any simple quick tips that you use when you’re out in the shop.