Build That Catan Board You Designed

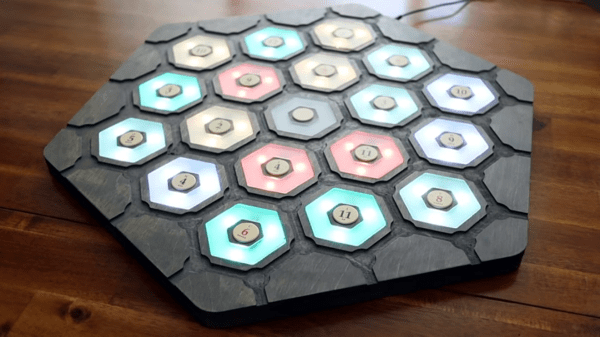
A couple of months ago, we posted about the one day design [Sam March] did of an electronic Settlers of Catan board. Now he’s released a video with the second half. His first video was about the design of the game, specifically the electronic components. In this video, [Sam] takes us through the physical build of the board.

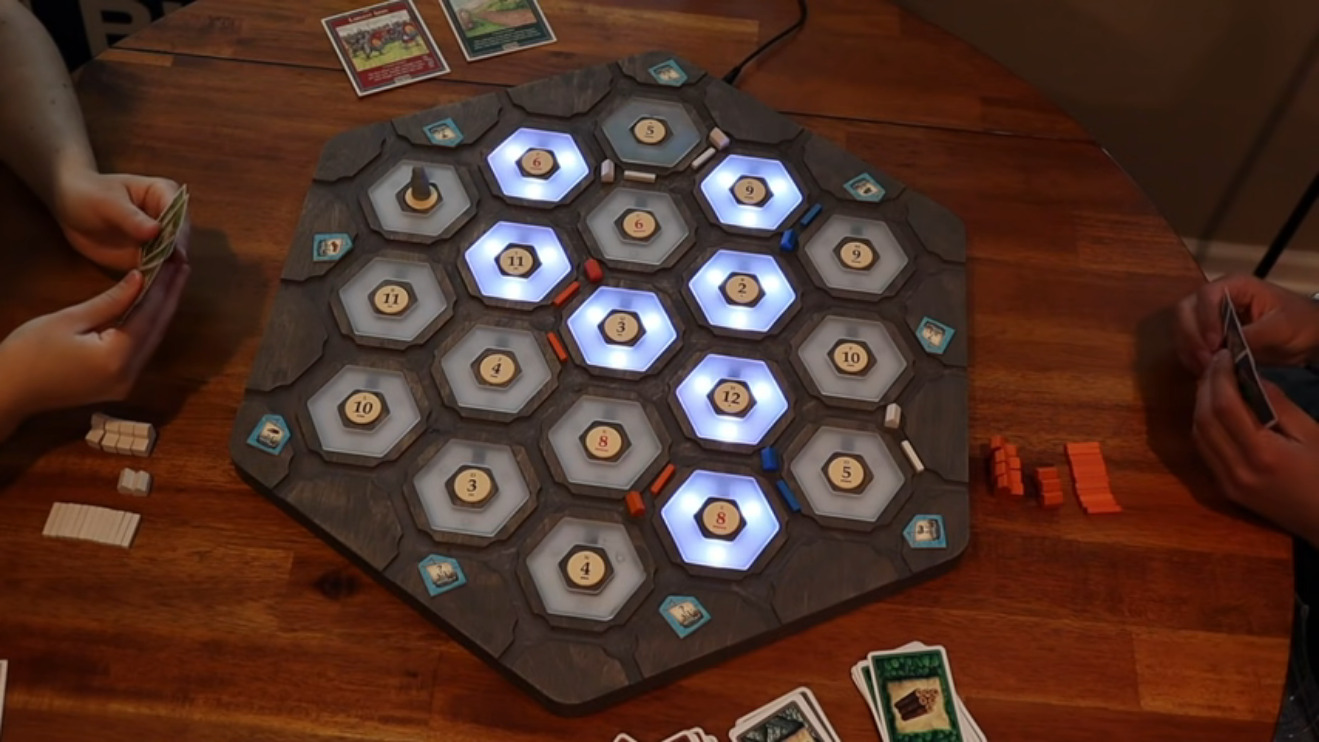
A couple of visits to his local maker space allows him to cut both the wooden parts of the board, as well as the acrylic hexes that go on top of each piece. Even with a CNC machine, there’s still some clean-up that needs to be done. After cleaning up the edges of the wood with a chisel and staining it, it’s time to put the circuit boards in, wire them up and program them. The build includes a dice roller – pushing a button shows the number rolled by lighting up the tiles in the form of the rolled number. The final touch is having some friends over to actually play the game.

Between the design process in the last article and the build process in this one, we get a good look at the way [Sam] designs things from beginning to finished product. Take a look at our previous article on [Sam]’s design as well as some other Catan articles.

Continue reading “Build That Catan Board You Designed”

Rare Radio Receiver Teardown

We’ll admit we haven’t heard of the AGS-38, it reminds us of the shortwave receivers of our youth, and it looks like many that were made “white label” by more established (and often Japanese) companies. [Jeff] found a nice example of this Canadian radio and takes it apart for our viewing pleasure. He also found it was very similar to a Layfayette receiver, also made in Japan, confirming our suspicions.

The radio looks very similar to an Eico of the same era — around the 1960s. With seven tubes, radios like this would soon be replaced by transistorized versions.

Continue reading “Rare Radio Receiver Teardown”

Step ‘n Snack Fanny Pack Motivates With M&Ms

[Sam March] has made a lot of different kinds of things, many of which have appeared on these very pages. Nowadays he wants to get the viewers more involved in his projects, so he started doing a monthly collaboration with YT viewers. Basically, he gives a prompt, and people comment with their wild and crazy ideas on the topic. Whoever has the winning idea gets the finished build. The maiden prompt was ‘fanny pack’, and you can check out the result in the build video (embedded below).

Someone suggested a Reese’s cup-dispensing fanny pack that gives you one cup for every 10,000 steps you take. We like what [Sam] did with that idea, because it’s way more practical — M&Ms are the original travel candy, and this way, you get to eat chocolate way more often. Depending on your sweet tooth, Reese’s Pieces would be a good compromise.

[Sam] figured out that the average human burns one calorie for every 25 steps, and that the average plain M&M is worth four calories, so he built a fanny pack with a step counter that dispenses one M&M for every 100 steps taken using a tiny auger. It’s calorie-neutrality!

You might be wondering if [Sam] made the fanny pack, too, or used something store-bought. The answer is neither: at some point in the build process, a company graciously offered to make a fanny pack with a special compartment in the bottom for the M&M dispenser. If you want to build one of these for yourself, you can get the CAD file for the milled base, the screw, the hopper, and the lid plus the code and also the gerbers on GitHub. We see a place for the sewing pattern, but as of now, the folder is empty. Be sure to check out the build and demo video after the break as [Sam] hits the town in a screaming set of neon workout wear to test the dispenser.

Most of the M&M-based projects we see around here are designed to sort by color. Here’s one that searches for the holy grail — peanut M&Ms that didn’t get a peanut. Continue reading “Step ‘n Snack Fanny Pack Motivates With M&Ms”

Charger Caddy Shows What 3D Printers Were Meant For

As computers became more popular in the late 80s and into the 90s, they vastly changed their environments. Of course the technological changes were obvious, but plenty of other things changed to accommodate this new technology as well. For example, furniture started to include design elements to accommodate the desktop computer, with pass-through ports in the back of the desks to facilitate cable management. While these are less common features now there are plenty of desks still have them, this 3D printed design modernizes them in a simple yet revolutionary way.

While these ports may have originally hosted thick VGA cables, parallel printer cables (if they would fit), and other now-obsolete wiring, modern technology uses simpler, smaller solutions. This doesn’t mean that they aren’t any less in need of management, though. This print was designed to hold these smaller wires such as laptop chargers, phone chargers, and other USB cables inside the port. A cap on the top of the print keeps everything hidden until it is lifted by hand, where a cable can be selected and pulled up to the top of the desk.

While it might seem like a simple project at first, the elegance of this solution demonstrates excellent use of design principles and a knack for integrating slightly older design decisions with modern technology. If you have a 3D printer and a cable management port on your desk, the print is available on Thingiverse. Not every project needs a complicated solution to solve a problem, like this automatic solar tracker we recently saw which uses no complicated electronics or algorithms to reliably point itself at the sun.

Build A Barebones 68000

The 68000 chip was ubiquitous in the computing world well past its heyday in the 1980s. It was used as the basis for many PCs and video game consoles, and even in embedded microcontrollers. Now, one of its niche applications is learning about the internal functions of computers. 68000 builds are fairly common when building homebrew computers from scratch, but projects like these can be complicated and quickly get out of hand. This 68000 project, on the other hand, gets the job done with the absolute minimum of parts and really dives into the assembly language programming on these chips. (Google Translate from Spanish)

[osbox68] built this computer by first simulating its operation. Once he was satisfied with that, the next step was to actually build the device. Along with the MC68008 it only uses two other TTL chips, a respectable 32 kilobytes of ram, and additionally supports a serial port and an expansion bus. A few 74-series chips round out the build including a 74HC574 used for debugging support. With a custom PCB to tie everything together, it’s one of the most minimal 68000 builds we’ve seen that still includes everything needed to be completely functional.

After all, including the TTL and 74XX chips the entire circuit board only uses 10 integrated circuits and a few other passive elements for a completely functional retro computer. [osbox68] also includes complete schematics for building a PCB based on these chips to make construction that much easier. Of course, emulating an old microcontroller instead of using TTL components can save a lot of real estate on a PCB especially if you’re using something like an FPGA.

Fresh Paint Or Patina Of Ages, That’s The Antique Question

The world of antique furniture and the world of hackers rarely coincide, and perhaps the allure of the latest tech is greater for most of us than that of a Chipendale cabinet. But there are times when there are analagous situations in both worlds, so it’s worth taking a moment to consider something.

This late-17th-century dressing box would not be of such value or interest were a restoration to strip it of its patina. Daderot, CC0.

Antique furniture has survived for hundreds of years before being owned by today’s collectors. Along the way it picks up bumps and scrapes, wear, and even the occasional repair. Valuable pieces turn up all the time, having been discovered in dusty attics, cowsheds, basements, and all sorts of places where they may have been misused in ways that might horrify those who later pay big money for them. Thus there is a whole industry of craft workers in the field of furniture restoration whose speciality lies in turning the wreck of a piece of furniture into a valuable antique for the showroom.

The parallel in our community if you hadn’t already guessed, can be found in the world of retrocomputers. They are the antiques we prize, they come to us after being abused by kids and then left to languish in a box of junk somewhere. Their capacitors are leaking, their cases may be cracked or dirty, and they often possess the signature look of old ABS mouldings, their characteristic yellowing. This is caused by the gradual release of small quantities of bromine as the fire retardant contained within the plastic degrades under UV light, and causes considerable consternation among some retrocomputing enthusiasts. Considerable effort goes into mitigating it, with the favourite technique involving so-called Retr0bright recipes that use hydrogen peroxide to bleach away the colour.

Continue reading “Fresh Paint Or Patina Of Ages, That’s The Antique Question”

Hackaday Podcast 129: Super Clever 3D Printing, Jigs And Registration Things, 90s Car Audio, And Smooth LED Fades

Hackaday editors Mike Szczys and Elliot Williams have found a critical mass of projects this week that wouldn’t be possible without 3D printers. There’s an absolutely astounding model roller coaster that is true to the mechanisms and physics of the original (and beholden to hours of sanding and painting). Adding sheet material to the printing process is a novel way to build durable hinges and foldable mechanisms. Elliot picks out not one, but two quadruped robot projects that leverage 3D-printed parts in interesting ways. And for the electronics geeks there’s a server rack stuffed with Raspberry Pi, and analog electronic wizardry to improve the resolution of the WS2811 LED controller. We wrap it all up with discussions of flying boats, and adding Bluetooth audio to old car head units.

Take a look at the links below if you want to follow along, and as always, tell us what you think about this episode in the comments!

Direct download (60 MB or so.)

Places to follow Hackaday podcasts:

Continue reading “Hackaday Podcast 129: Super Clever 3D Printing, Jigs And Registration Things, 90s Car Audio, And Smooth LED Fades”