A Post-Mortem For An Electric Car Charger

[Mastro Gippo] recently purchased a wall mounted charger for his electric car that looked great and had all the bells and whistles he wanted. There was only one problem: the thing burned up on him. Looking to find out how this seemingly high-end piece of hardware gave up the ghost so easily, he took it apart and tried to figure out where things went wrong. While he’s not looking to sling any mud and actually name the company who produced the charger, he certainly has some choice words for whoever green-lit this particular design.

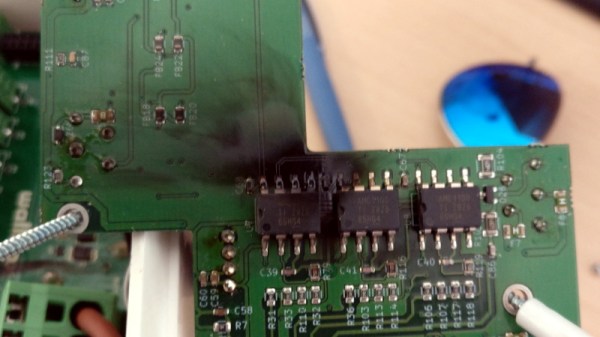
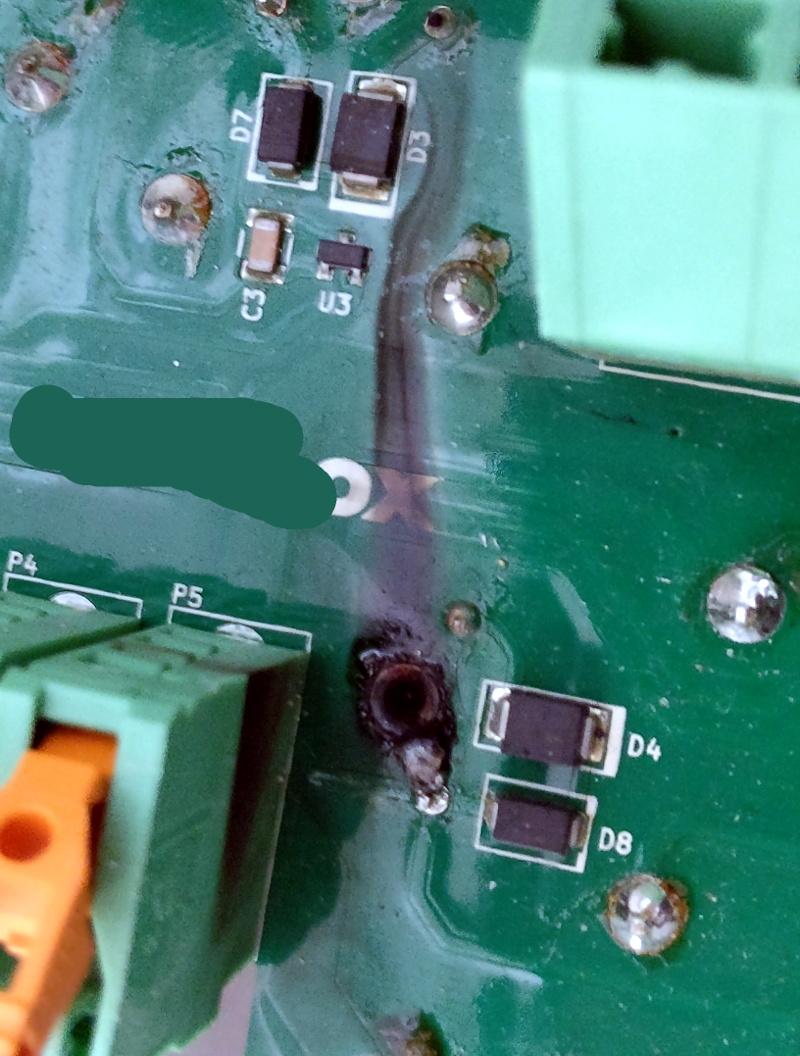
With the charger open, there’s little doubt that something became very toasty inside. A large swath of the PCB has a black char mark on it, and in some places it looks like the board burned right through. After a close examination, [Mastro] is of the opinion that the board heated up to the point that the solder actually liquified on some connections. This conductive flow then shorted out components below it, and things went from bad to worse.

But where did all the heat come from? [Mastro] was stunned to see that a number of the components inside the charger were only rated for 30 amps, despite the label for the product clearly stating it’s good for up to 32A. With components pushed past their limits, something had to give. He wonders how such a device could have made it through the certification process; an excellent question we’d love to know the answer to.

The worst part is, it looks like the designers might have even known there was an overheating issue. [Mastro] notes that there are heatsinks bolted not to a component as you might assume, but directly to the PCB itself. We’ve seen what happens when designers take a cavalier attitude towards overheating components, and the fact that something like an electric vehicle charger was designed so poorly is quite concerning.

Blue Pill Makes Cheap But Powerful Morse Tutor

[W8BH] attended a talk by another ham, [W8TEE] that showed a microcontroller sending and receiving Morse code. He decided to build his own, and documented his results in an 8 part tutorial. He’s using the Blue Pill board and the resulting device sends code with paddles, sends canned text, provides an LCD with a rotary knob menu interface, and even has an SD card for data storage.

All the code is on GitHub. If you are interested in Morse code or in learning how to write a pretty substantial application using the Blue Pill and the Arduino IDE (or any other similar processor), this is a great exposition that is also a practical tool.

Continue reading “Blue Pill Makes Cheap But Powerful Morse Tutor”

A Better Embroidery Machine, With 3D Printing And Common Parts

In concept, an everyday sewing machine could make embroidery a snap: the operator would move the fabric around in any direction they wish while the sewing machine would take care of slapping down stitches of colored thread to create designs and filled areas. In practice though, getting good results in this way is quite a bit more complex. To aid and automate this process, [sausagePaws] has been using CNC to take care of all the necessary motion control. The result is the DIY Embroidery Machine V2 which leverages 3D printed parts and common components such as an Arduino and stepper drivers for an economical DIY solution.

It’s not shown in the photo here, but we particularly like the 3D printed sockets that are screwed into the tabletop. These hold the sewing machine’s “feet”, and allow it to be treated like a modular component that can easily be removed and used normally when needed.

The system consists of a UI running on an Android tablet, communicating over Bluetooth to an Arduino. The Arduino controls the gantry which moves the hoop (a frame that holds a section of fabric taut while it is being embroidered), while the sewing machine lays down the stitches.

[sausagePaws]’s first version worked well, but this new design really takes advantage of 3D printing as well as the increased availability of cheap and effective CNC components. It’s still a work in progress that is a bit light on design details, but you can see it all in action in the video embedded below.

Continue reading “A Better Embroidery Machine, With 3D Printing And Common Parts”

Arduino Traffic Light Sings The Song Of Its People

Getting an old traffic light and wiring it up to do its thing inside your house isn’t exactly a new trick; it’s so common that it wouldn’t normally pass muster for these hallowed pages. Even using one up to show the real-time status of your build or system resource utilization would be pushing it at this point. To get our attention, your traffic light is going to need to have a unique hook.

So how did [Ronald Diaz] manage to get his project to stand out from the rest? Interestingly enough, it’s nothing you can see. His traffic light doesn’t just look the part, it also sounds like the real thing. With far more effort and attention to detail than you’d probably expect, he’s made it so his Australian pedestrian traffic light correctly mimics the complex chirping of the original.

Working from a video of the traffic light on YouTube, [Ronald] was able to extract and isolate the tones he was after. Performing spectral analysis on the audio sample, he was able to figure out the frequency and durations of the eleven individual tones which make up the complete pattern. From the 973 Hz tone that only lasts 25 ms to the continuous 500 Hz “woodpecker”, every element of the sound was meticulously recreated in his Arduino code.

The Arduino Pro Mini used to control the traffic light is not only responsible for playing the tones through a piezo speaker, but as you might expect, for firing off the relays which ultimately control the red and green lamps. With everything carefully orchestrated, [Ronald] can now get that authentic Australian side-of-the-road experience without having to leave the comfort of his own home.

If you’d rather your in-home traffic light be more useful than realistic, we’ve got plenty of prior art for you to check out. This traffic light that tells you how the value of Bitcoin is trending is a great example. Or maybe this one that can tell you if the Internet is down.

Continue reading “Arduino Traffic Light Sings The Song Of Its People”

Workbench Fume Extractor Sucks, But Has A Charming Personality

Shop safety is important regardless of what kind of work you do. For those of us soldering, that means extracting the noxious fumes released by heating up the solder flux used in our projects. [yesnoio] brings to us his own spin on the idea of a fume extractor, and it pulls out all stops with bells and whistles to spare.

The Workbench Assistant bot, as [yesnoio] describes it, is an integrated unit mounted atop a small tripod which extends over the working area where you’re soldering. Inside the enclosure are RGBW lights, an IR camera, and an Adafruit ItsyBitsy M4 Express driving the whole show. Aside from just shining a light onto your soldering iron though, the camera senses thermal activity from it to decide when to ramp up the server-grade fan inside which powers the whole fume extraction part of the project.

But the fun doesn’t stop there, as [yesnoio] decided to go for extra style points. The bot also comes with an amplified speaker, playing soundbites whenever actions such as starting or stopping the fan are performed. These soundbites are variations on a theme, like classic Futurama quotes or R2-D2’s chattering from Star Wars. The selectable themes are dubbed “performers”, and they can be reprogrammed easily using CircuitPython. This is a neat way to give your little desktop assistant some personality, and a fun way to break up the monotony of soldering up all those tiny SMD components on your next prototype.

If even after all this you still need more than just a cute little robotic voice beeping at you to convince you to get a fume extractor for your bench, then maybe some hands-on results could give you that little push you need. And if you’re already convinced and want to build your own, there is no shortage of DIY solutions we’ve seen around here at Hackaday. Check out this one in action after the break!

Continue reading “Workbench Fume Extractor Sucks, But Has A Charming Personality”

Holey Moley: Fixing The Mars InSight Mole

In the early 1990s, NASA experienced a sea change in the way it approached space exploration. Gone were the days when all their programs would be massive projects with audacious goals. The bulk of NASA’s projects would fall under the Discovery Project and hew to the mantra “faster, better, cheaper,” with narrowly focused goals and smaller budgets, with as much reuse of equipment as possible.

The idea for what would become the Mars InSight mission first appeared in 2010 and was designed to explore Mars in ways no prior mission had. Where Viking had scratched the surface in the 1970s looking for chemical signs of life and the rovers of the Explorer program had wandered about exploring surface geology, InSight was tasked with looking much, much deeper into the Red Planet.

Sadly, InSight’s primary means of looking at what lies beneath the regolith of Mars is currently stuck a few centimeters below the surface. NASA and JPL engineers are working on a fix, and while it’s far from certain that that they’ll succeed, things have started to look up for InSight lately. Here’s a quick look at what the problem is, and a potential solution that might get the mission back on track.

Continue reading “Holey Moley: Fixing The Mars InSight Mole”

Punch Those Hole-Drilling Blues Away With A Homebrew Punching Tool

Four times the holes, four times the trouble. With the fate of repetitive motion injury looming due to the need to drill 1,200 holes, [bitluni] took matters into his own hands and built this nifty DIY hole punch for light-gauge sheet metal.

A little backstory will probably help understand why [bitluni] needs so many holes. Back in May, he built a ping pong ball LED video wall for Maker Faire Berlin. That had 300 LEDs and came out great, but at the cost of manually drilling 300 holes in sheet steel with a hand drill. Looking to expand his wall of balls to four times the original size, [bitluni] chose to spend a few days building a punch to make the job more appealing. The business end, with solid bar stock nested inside pieces of tubing, is a great example of how much you can get done without a lathe. The tool is quite complex, with a spring-loaded pilot to help guide the punching operation. When that proved impractical, [bitluni] changed the tool design and added an internal LED to project crosshairs from inside the tool.

The tool itself is mounted into a sturdy welded steel frame that allows him to cover the whole aluminum sheet that will form the panel of his LED wall. It’s pretty impressive metalwork, especially considering this isn’t exactly in his wheelhouse. And best of all, it works – nice, clean holes with no deformation, and it’s fast, too. We’re looking forward to seeing the mega-LED wall when it’s done.

Continue reading “Punch Those Hole-Drilling Blues Away With A Homebrew Punching Tool”