Want Gesture-Tracking? All You Have To Do Is Lift Your Finger.

Watching Tony Stark wave his hands to manipulate projected constructs is an ever-approaching reality — at least in terms of gesture-tracking. Lift — a prototype built by a team from UC Irvine and FX Palo Alto Laboratory — is able to track up to ten fingers with 1.7 mm accuracy!

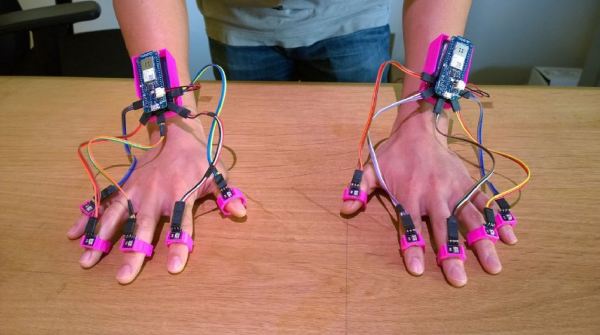
Lift’s gesture-tracking is achieved by using a DLP projector, two Arduino MKR1000s, and a light sensor for each digit. Lift’s design allows it to work on virtually any flat surface; the projected image acts as a grid and work area for the user. As their fingers move across the projected surface, the light sensors feed the information from the image to the Arduinos, which infers the location of each finger and translate it into a digital workspace. Sensors may also be mounted on other objects to add functionality.

So far, the team has used Lift as an input device for drawing, as well as using it to feign gesture controls on a standard laptop screen. The next step would be two or more projectors which would allow Lift to function fully and efficiently in three dimensions and directly interacting with projected media content. Can it also operate wirelessly? Yes. Yes, it can.

While we don’t have Tony Stark’s hologram workstation quite yet, we can still play Tetris, fly drones, and mess around with surgical robots.

DIY I2C Devices With ATtiny85

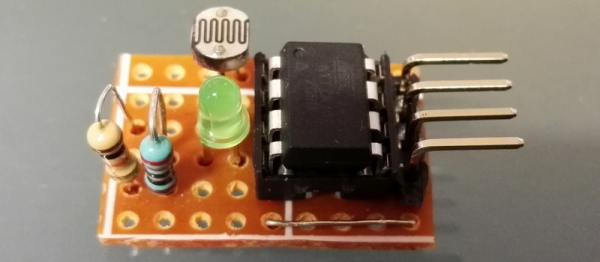
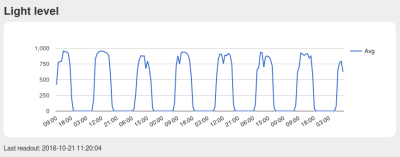
[Pawel] has a weather station, and its nerve-center is a Raspberry Pi. He wanted to include a light sensor but the problem is, the Pi doesn’t have a built-in ADC to read the voltage off the light-dependent resistor that he (presumably) had in his junk box. You can, of course, buy I2C ADC chips and modules, but when you’ve already got a microcontroller that has ADC peripherals on board, why bother?

[Pawel] wired up a tremendously simple circuit, downloaded some I2C slave-mode code, and added an LED for good measure. It’s all up on GitHub if you’re interested.

cropped_shot_2016-10-21-112958
Bright by Day, Dark by Night!

We’re covering this because we rarely see people coding for I2C slave devices. Everyone and their mom uses I2C to connect to sensors, for which the Arduino “Wire” library or “i2c-tools” on the Pi do just fine. But what do you do when you want to make the I2C device? [Pawel]’s project makes use of TinyWireS, a slave-mode SPI and I2C library for AVR ATtiny Arduino projects.

Here, [Pawel] just wanted a light sensor. But if you’re building your own devices, the sky is the limit. What’s the most esoteric I2C sensor that you can imagine? (And is it really the case that we haven’t seen an I2C slave device hack since 2010?)

Hackaday Prize Entry: Germanium Vision

The first digital cameras didn’t come out of a Kodak laboratory or from deep inside the R&D department of the CIA or National Reconnaissance Office. The digital camera first appeared in the pages of Popular Electronics in 1975, using a decapsulated DRAM module to create fuzzy grayscale images on an oscilloscope. For his Hackaday Prize project, [Alexander] is recreating this digital camera not with an easy to use decapsulated DRAM, but with individual germanium transistors.

Phototransistors are only normal transistors with a window to the semiconductor, and after finding an obscene number of old, Soviet metal can transistors, [Alex] had either a phototransistor or a terrible solar cell in a miniaturized package.

The ultimate goal of this project is to create a low resolution camera out of a matrix of these germanium transistors. [Alex] can already detect light with these transistors by watching a multimeter, and the final goal – generating an analog NTSC or PAL video signal – will “just” require a single circuit duplicated hundreds of times.

Digital cameras, even the earliest ones built out of DRAM chips, have relatively small sensors. A discrete image sensor, like the one [Alex] is building for his Hackaday Prize entry, demands a few very interesting engineering challenges. Obviously there must be some sort of lens for this image sensor, so if anyone has a large Fresnel sitting around, you might want to drop [Alex] a line.

The HackadayPrize2016 is Sponsored by:

Flexible Phototransistor Will Make Everything Subtly Better In The Future

University of Wisconsin-Madison is doing some really cool stuff with phototransistors. This is one of those developments that will subtly improve all our devices. Phototransistors are ubiquitous in our lives. It’s near impossible to walk anywhere without one collecting some of your photons.

The first obvious advantage of a flexible grid of phototransistors is the ability to fit the sensor array to any desired shape. For example, in a digital camera the optics are designed to focus a “round” picture on a flat sensor. If we had a curved surface, we could capture more light without having to choose between discarding light, compensating with software, or suffering the various optical distortions.

Another advantage of the University’s new manufacturing approach is the “flip-transfer” construction method they came up with. They propound that their method produces a vastly more sensitive device. The sensing silicon sits on the front of the assembly without any obstructing material in front; also the metal substrate it was built on before flipping is reflective; also increasing the sensitivity.

All in all very cool, and we can’t wait for phone cameras, with super flat lenses, infinite focus, have no low light capture issues, and all the other cool stuff coming out of the labs these days.

The Newest Graphing Calculator Game

Certainly everyone remembers passing time in a boring high school class playing games on a graphing calculator. Whether it was a Mario-esque game, Tetris, or BlockDude, there are plenty of games out there for pretty much all of the graphing calculators that exist. [Christopher], [Tim], and their colleagues from Cemetech took their calculator game a little bit farther than we did, and built something that’ll almost surely disrupt whatever class you’re attempting to pay attention in: They built a graphing calculator whac-a-mole game.

This game isn’t the standard whac-a-mole game, though, and it isn’t played on the calculator’s screen. Instead of phyiscal “moles” the game uses LEDs and light sensors enclosed in a box to emulate the function of the moles. In order to whack a mole, the player only needs to interrupt the light beam which can be done with any physical object. The team made extensive use of the ArTICL library which allows graphing calculators to interface with microcontrollers like the MSP432 that they used, and drove the whole thing with a classic TI-84.

This project is a fun way to show what can be done with a graphing calculator and embedded electronics, and it was a big hit at this past year’s World Maker Faire. Calculators are versatile in other ways as well. We’ve seen them built with open hardware and free software, And we’ve even seen them get their own Wi-Fi.

Continue reading “The Newest Graphing Calculator Game”

PenguinBot Follows Light, Goes Screech In The Night

The Arduino Based Penguin Robot
Ever have one of those weekend projects that takes on a life of its own? [Michael] did, and the result is this PenguinBot. While [Michael’s] wife was away for the weekend he happened upon a broken toy penguin. The batteries had leaked inside, destroying the contacts. Rather than bin the toy, [Michael] made it awesome by turning it into an autonomous robot. [Michael’s] goal was to create a robot that could roam around the house avoiding obstacles, or follow a light source like a flashlight.

He started by pulling out most of the original electronics. Two dollar store toy trains gave their lives and their motors to replace the penguin’s original drive system. An Arduino Pro Mini became PenguinBot’s brain. Sensors consisted of two light sensing CdS cells, an AdaFruit sound sensor, and a MaxBotix ultrasonic sensor. With the ultrasonic sensor mounted on a servo, it can detect obstacles in any direction. The CdS cells and some software will allow PenguinBot to follow lights, like any good photovore robot should.

Click past the break to see PenguinBot in action

Continue reading “PenguinBot Follows Light, Goes Screech In The Night”

Hack It: In-refrigerator Egg Monitoring

Here’s a concept piece that monitors the eggs in your refrigerator. It’s still in development and we don’t think the general public is ready for digital egg monitoring quite yet. But we love the concept and want to hear from you to see if you could develop your own version.

What we know about the device is that — despite the image which makes smart phone proximity seem important — it connects to the Internet from inside your fridge. It will tell you how many eggs you have left, and even tracks the date at which each entered your refrigerator.

So, what’s inside this thing and who can build their own the fastest? We’ll cover some specs and speculate a bit to get you started: There’s a light sensor to detect when the door opens and an LED below each egg to illuminate the oldest. We think the light sensor triggers a microcontroller that uses each of the egg LEDs as a light sensor as well. If the threshold is too low then there is indeed an egg in that cup. We also like the fact that the tray has fourteen slots; as long as you don’t buy eggs until you have just two left you’ll always have room.

If you build one we want to know. We’re thinking 3D printed cups, low-power microcontroller, but we’re kind of stumped on the cheapest WiFi solution. Leave your thoughts in the comments.

[via Reddit via NY Daily News via Mind of Geek]