Tiny PCB Banishes Soldering Fumes, Automatically

A fan to remove fumes is a handy thing to have when soldering, even better is a fan furnished with a filter. Better still is a fan that activates only when the iron is in use, turning off when the iron is in its stand. Now that’s handy!
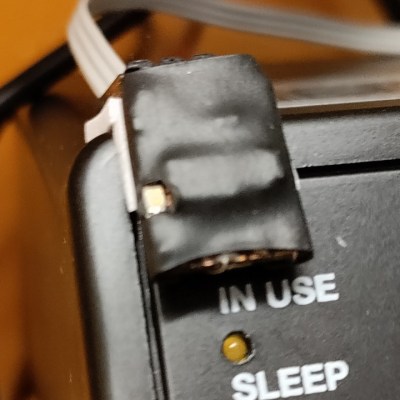
[Petteri Aimonen] made exactly such a device when he noticed his JBC BT-2BWA soldering station could detect when the iron is removed from its stand, and indicate its operating mode via status LEDs. Broadly speaking, when the iron is removed from its cradle the green “in use” LED is on. By turning the fan on whenever that LED is lit (and turning it off when it becomes unlit), fume extraction gets a little more elegant and efficient.

Instead of tapping directly into the soldering station’s hardware to detect the LED’s state, [Petteri] went for a completely noninvasive solution that made good use of a few spare parts and a small bit of copper-clad board. The PCB is nothing more than piece of copper-clad board with lands scratched out with a hobby knife.

This tiny board sits atop the soldering station, parking a photodiode directly above the “in use” LED. The circuit is a simple comparator whose output controls fan power via a MOSFET, and a top-facing LED provides as a duplicate “in use” indicator, since the original is hidden under the tiny board.

Even for one-off designs like this, creating a PCB layout in an EDA program like KiCad is still worth doing because one can use it to scratch out lands on a copper-clad board, a technique with similarities to Manhattan-style circuit construction.

Hackaday Links Column Banner

Hackaday Links: December 18, 2022

By now everyone has probably seen the devastation wrought by the structural failure of what was once the world’s largest free-standing cylindrical aquarium. The scale of the tank, which until about 5:50 AM Berlin time on Friday graced the lobby of the Raddison Blu hotel, was amazing — 16 meters tall, 12 meters in diameter, holding a million liters of saltwater and some 1,500 tropical fish. The tank sat atop a bar in the hotel lobby and was so big that it even had an elevator passing up through the middle of it.

But for some reason, the tank failed catastrophically, emptying its contents into the hotel lobby and spilling the hapless fish out into the freezing streets of Berlin. No humans were killed by the flood, which is miraculous when you consider the forces that were unleashed here. Given the level of destruction, the displaced hotel guests, and the fact that a €13 million structure just up and failed, we’re pretty sure there will be a thorough analysis of the incident. We’re pretty interested in why structures fail, so we’ll be looking forward to finding out the story here.

Continue reading “Hackaday Links: December 18, 2022”

Tell Time Like It’s 1960 With This All-Transistor Digital Clock

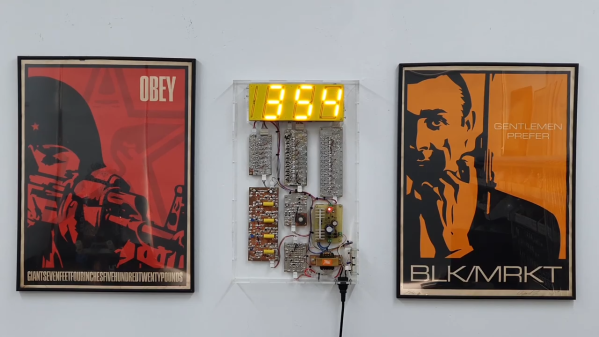
When you’ve got time on your hands, doing something the hard way can be therapeutic. Not that the present situation and the abundance of free time that many are experiencing has anything to do with [Leo Fernekes] all-transistor digital clock build, which he started a year ago with his students. But if you’ve got time to burn, this might be a good way to do it.

[Leo] says one of his design goals with this clock was to do it with the technology commercially available in 1960, which means relying completely on discrete components. And he and his students managed to do just that, with the exception of the seven-segment displays, which were built from the LED filaments from some modern light bulbs. Everything else, though, is as old school as it gets, and really underscores all the complexity that gets abstracted away from timekeeping with modern chips. The video below covers each module in detail, from the Schmitt trigger that cleans up the 50-Hz line frequency to the ring counters and diode matrices used to drive the display. We found the analog stair step dividers used to bring the line frequency down to a more usable pulse train particularly interesting. That clever bit of engineering saved 10 transistors over what would be required for traditional flip-flop dividers.

There’s a lot to learn from this design, and the execution is great too – we’re suckers for Manhattan-style builds, of course. Hats off to [Leo] and his lucky students on a great build.

Continue reading “Tell Time Like It’s 1960 With This All-Transistor Digital Clock”

Vintage Silverstone Bluetooth speaker

Vintage Silvertone Cabinet Gets Bluetooth Treatment

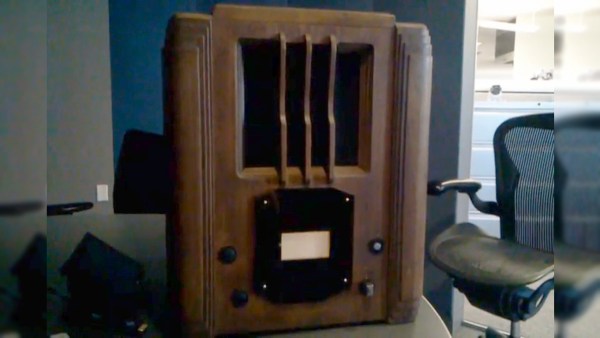
This Bluetooth speaker is full of delightful surprises. The outer shell is an antique radio cabinet, but its practically empty interior is a combination of Dead Bug circuitry and modern BT receiver.

[PJ Allen] found the BT receiver on Groupon and decided to whip up amplifier and threshold detector circuits using only parts he already had in order to make this vintage-looking Bluetooth speaker. The cabinet is from a Silvertone Model 1955 circa 1936. Don’t worry, no antiques were harmed in the making of this hack, the cabinet was empty when he bought it.

LM4871 based amplifiers

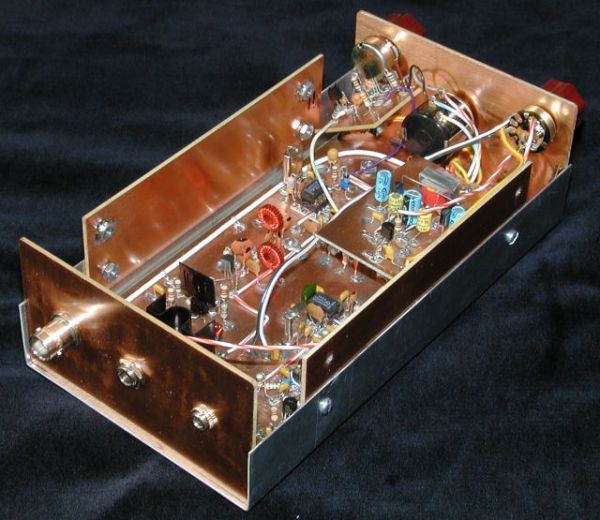
The amplifiers, one per speaker, began life as a circuit from TI’s LM4871  datasheet. Some of the departures came about because he didn’t have the exact component values, even paralleling capacitors to get in the right range. The finished board is a delightful mix of “Dead Bug” and quasi-Manhattan style construction, “quasi” because he carved up the ground plane instead of laying pads on top of it.

Look at the front of the cabinet and you’ll see a rectangular display. Watch the video below and you’ll see that it throbs in time to the music. To do that he came up with a threshold detector circuit which started out based on a circuit from a  Sharp/Optonica cassette tape deck, but to which he made improvements.

Not all cabinets come empty though. Check out this post by our own [Gregory L. Charvat] about restoring these wonderful old radios.

Continue reading “Vintage Silvertone Cabinet Gets Bluetooth Treatment”

Getting Ugly, Dead Bugs, And Going To Manhattan

Back in the 1980s I was a budding electronics geek working in a TV repair shop. I spent most of my time lugging TVs to and from customers, but I did get a little bench time in. By then new TVs were entirely solid-state and built on single PC boards, but every once in a while we’d get an old-timer in with a classic hand-wired tube chassis. I recall turning them over, seeing all the caps and resistors soldered between terminal strips bolted to the aluminum chassis and wondering how it could all possibly work. It all looked so chaotic and unkempt compared to the sleek traces and neat machine-inserted components on a spanking new 19″ Zenith with the System 3 chassis. In a word, the old chassis was just – ugly.

Looking back, I probably shouldn’t have been so judgmental. Despite the decades of progress in PCB design and the democratization of board production thanks to KiCad, OSH Park, and the like, it turns out there’s a lot to be said for ugly methods of circuit construction.

Continue reading “Getting Ugly, Dead Bugs, And Going To Manhattan”

VFD 430 Clock, NYC Style

[Daniel] seems to have a lot of time on his hands for building clocks, and that’s fine by us. For his latest build, he used a vacuum fluorescent display (VFD) to display hours, minutes, and seconds using an MSP430 to drive it.

Like the analog meter clock he built recently, there is no RTC. Instead, [Daniel] used the 430’s watchdog timer to generate 1Hz interrupts from the 430’s 32KHz clock. [Daniel] wanted to try Manhattan-style board construction for this project, so he built each module on a punch-cut stripboard island and super glued them to a copper-clad board. We have to agree with [Daniel] that the bare-bones construction is a nice complement to the aesthetic of the VFD.

[Daniel] set out to avoid using a VFD display driver, but each of the segments require +50V. He ran through a couple of drawing board ideas, such as using 17 transistors to drive them all before eventually settling on the MAX6921 VFD driver. The +50V comes from an open-loop boost converter he built that steps up from 12V.

The time is set with two interrupt-triggering buttons that use the shift register example from TI as a jumping off point. All of the code is available on [Daniel]’s site. Stick around after the break for a quick demo of the clock.

Continue reading “VFD 430 Clock, NYC Style”

Printing Point-to-point Circuits On A 3D Printer

[CarryTheWhat] put up an Instructable on his endeavours in printing circuit boards for solder free electronics. He managed to print a flashlight where the only non-printed parts are a pair of batteries and a couple of LEDs.

The circuit is a weird mix of point to point and Manhattan style circuit construction; after modeling a printed plastic plate, [CarryTheWhat] added a few custom component holders to hold LEDs, batteries, and other tiny electronic bits.

To deliver power to each electronic bit, the components are tied off on blue pegs. These pegs are attached to each other by conductive thread much like wirewrap circuit construction.

Right now, the circuits are extremely simple, but they really remind us of a few vintage ham radio rigs. While this method is most likely too complex to print 3D printer electronics (a much desired and elusive goal), it’s very possible to replicate some of the simpler projects we see on Hackaday.

[CarryTheWhat] put the models and files up on GitHub if you’d like to try out a build of your own.