A Studio Condenser Microphone For A Constrained Budget

As the Internet has turned so many of us into content creators, we’ve seen the quality of webcams and microphones steadily increase to the point at which even a fairly modestly-equipped YouTuber now captures their wisdom at a quality far exceeding that you might have found in some broadcast studios not so long ago. Still, decent quality costs money, and for that reason [Spirit532] has built his own high quality condenser microphone for less expenditure.

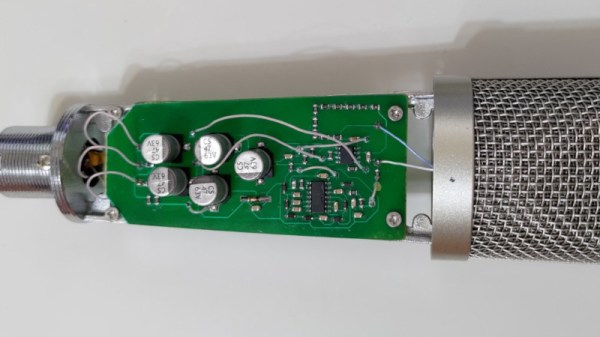
The capsule and body are off-the-shelf items — what he’s produced is the bias voltage supply and preamplifier. In both cases these are the interesting parts of a condenser microphone, so their circuit bears a second look.

The condenser microphone takes a diaphragm and turns it into one side of a capacitor. If you apply a charge to this capacitor, the voltage over it changes minutely with the capacitance as the diaphragm vibrates. Thus to have a usable audio signal level a high-voltage bias supply is required to provide the charge, and a very high impedance preamplifier circuit  to catch the signal without draining the capacitor.

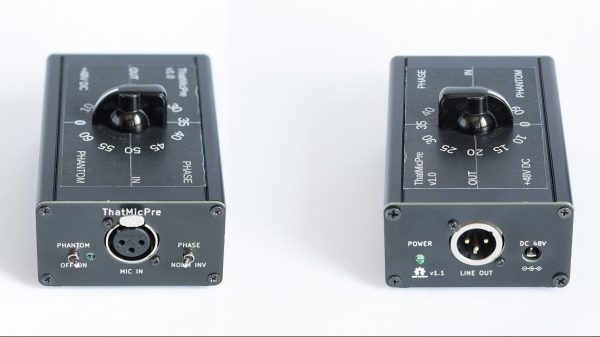
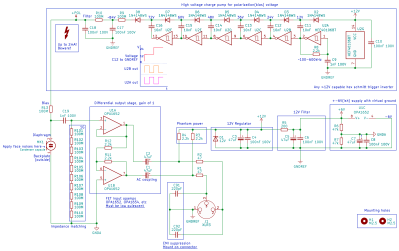
His bias supply is a charge pump using a string of diodes and capacitors fed by a chain of CMOS inverters, with an RC filter and resistor chain to provide that super-high impedance. The preamplifier meanwhile is a unity gain high-impedance op-amp with an inverting stage to provide a balanced connection. For good measure the circuit also includes a phantom power supply.

This is an interesting project for anyone with an interest in audio. if you’re further interested in condenser microphones, how about also looking at electret microphones?

A Simple High-Fidelity DIY Mic Pre Amp

If you’re doing any serious work with microphones, you’ll typically find yourself in want of a dedicated preamp. [ojg] needed just such a thing for acoustic measurement duties, and set about working up a cheap DIY design by the name of ThatMicPre.

The design is based around the THAT1510 preamp IC, known for its good frequency response and low harmonic distortion and noise. The design is also compatible with THAT1512, SSM2019, and INA217 chips as well. [ojg] gave the design switch-controlled gain levels, providing greater accuracy than a potentiometer adjustment, and the ability to supply phantom power for mics that require it. The PCB is designed to rely on through-hole parts and common connectors for easy assembly.

The design is open source, and has already been built by others on the DIYAudio forums. Built into a simple case, it looks like a handsome and well-built piece of audio equipment. We’ve featured quite a few unique preamps over the years, and if you’ve been building your own, we’d love to see those too!

Homebrew Binaural Microphone Lets You Listen Like A Human

We humans may not have superpowers, but the sensor suite we have is still pretty impressive. We have binocular vision that autofocuses and can detect a single photon, skin studded with sensors for touch, heat, and pain, and a sense of smell that can detect chemicals down to the parts per trillion range. Our sense of hearing is pretty powerful, too, allowing us to not only hear sounds over a 140 dB range, but also to locate its source with a fair degree of precision, thanks to the pair of ears on our heads.

Recreating that binaural audio capture ability is the idea behind this homebrew 3D microphone. Commercially available dummy head microphones are firmly out of the price range of [LeoMakes] and most mortals, so his was built on a budget from a foam mannequin head and precast silicone rubber ears, which you can buy off the shelf, because of course you can.

Attached to the sides of the foam head once it got the [Van Gogh] treatment, the ears funnel sound to tiny electret cartridge microphones. [Leo] learned the hard way that these little capsule mics can’t use the 48-volt phantom power that’s traditionally pumped up the cable to studio microphones; he fixed that problem with a resistor in parallel with the mic leads. A filtering capacitor, an RC network between the cold line and ground on the balanced audio line, and a shield cleverly fashioned from desoldering braid took care of the RF noise problem.

The video after the break shows the build and test results, which are pretty convincing with headphones on. If you want to build your own but need to learn more about balanced audio and phantom power, we’ve got a short primer on the topic that might help.

Continue reading “Homebrew Binaural Microphone Lets You Listen Like A Human”

The Hot And Cold Of Balanced Audio

A few summers of my misspent youth found me working at an outdoor concert venue on the local crew. The local crew helps the show’s technicians — don’t call them roadies; they hate that — put up the show. You unpack the trucks, put up the lights, fly the sound system, help run the show, and put it all back in the trucks at the end. It was grueling work, but a lot of fun, and I got to meet people with names like “Mister Dog Vomit.”

One of the things I most remember about the load-in process was running the snakes. The snakes are fat bundles of cables, one for audio and one for lighting, that run from the stage to the consoles out in the house. The bigger the snakes, the bigger the show. It always impressed me that the audio snake, something like 50 yards long, was able to carry all those low-level signals without picking up interference from the AC thrumming through the lighting snake running right alongside it, while my stereo at home would pick up hum from the three-foot long RCA cable between the turntable and the preamp.

I asked one of the audio techs about that during one show, and he held up the end of the snake where all the cables break out into separate connectors. The chunky silver plugs clinked together as he gave his two-word answer before going back to patching in the console: “Balanced audio.”

Continue reading “The Hot And Cold Of Balanced Audio”

Generating Pink Noise

[Miceuz] just finished his first surface mount electronics project. It’s a pink noise generator that is used for testing audio equipment (scroll down that link for the English version of his writeup).

Pink noise is somewhere in between red noise and white noise. Didn’t realize there were more colors than just white when it comes to noise? The benefit of testing with pink noise is that it the power of the audio signal is stable through each octave of sound – white noise increases in power with each additional octave which can damage the tweeters in a sound system.

The goal in this design was to build a noise generator that fit into an XLR connector. [Miceuz] started with an existing design, and altered it to suit his needs. Much like a condenser microphone, the pink noise generator uses phantom power instead of a standalone power source. For instance, the design he based this on required two 9v batteries. The size, the choice of case, and the absence of a battery all spell WIN for this project.