The ‘Scope Of This Kickstarter? Ten Years.

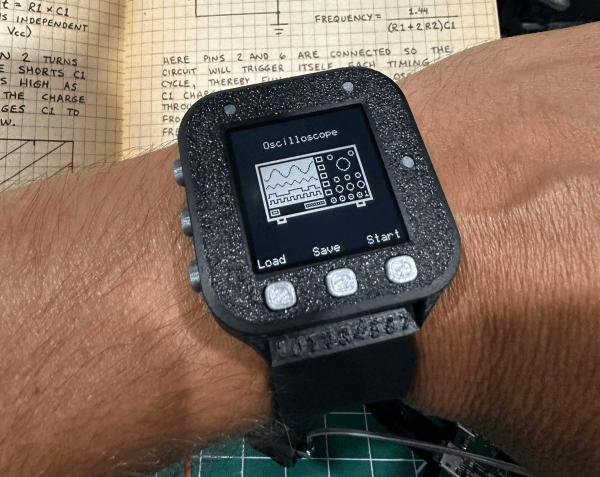
It may have taken ten years to come through on this particular Kickstarter, but a promise is a promise. In late August 2023, backers who had since likely forgotten all about the project started receiving their oscilloscope watches from creator [Gabriel Anzziani]. Whatever the reason(s) for the delay, the watch looks great, and is miles ahead of the prototype pictures.

As you may have guessed, it functions as both a watch and an oscilloscope. The watch has 12- and 24-hour modes as well as an alarm and calendar, and the ‘scope has all the features of the Xprotolab dev board, which [Gabriel] also created: ‘scope, waveform generator, logic analyzer, protocol sniffer, and frequency counter.

Internally, it has an 8-bit Xmega microcontroller which features an internal PDI, and the display is a 1.28″ E ink display. When we covered this ten years ago, the screen was the type of Sharp LCD featured in the Pebble watch. [Gabriel]’s ‘scope watch features eight buttons around the edge which are user-programmable. One of [Gabriel]’s goals was for people to make their own apps.

Of course, the Kickstarter rewards are no longer available, but if you want to build your own small, digital ‘scope, check out this DIY STM32 project.

Image via the Company Formerly Known As Twitter

Rescue An Expensive Servo With Some Reverse Engineering

[Andrew] had a servo damaged by someone connecting the power supply to the wrong pins (whoops) which fried the microcontroller and a logic level shifter. With a bit of reverse engineering, he successfully restored basic servo functionality by writing some new code. The new code implements only basic features, but that’s enough to save the device from the junk bin.

FAULHABER 2232DBHHO ring any bells? Google came up empty.

Why bother reverse engineering a servo? Well, if dollars are reasons then there are many for saving a HerkuleX DRS-0602 from the junk heap; they cost around 320 USD before shipping. Another reason to try is that the microcontroller turned out to be an AVR XMega, which gave [Andrew] confidence in writing some new code.

If you want to understand more about how these servos work, [Andrew] provides good photos of the insides and identifies the major components and their connections and functions. There are some mysteries (such as details of the motor and embedded encoder, which are FAULHABER 2232DBHHO) but [Andrew] figured out enough to write some basic code to allow the servo to work as a standard servo with a UART interface.

Sometimes curiosity drives reverse engineering and repair efforts, sometimes it’s cost, and sometimes it’s both. A $320 servo is certainly worth trying to save, and so are huge observatory telescopes with obsolete servo amps.

Flappy Bird Is The New “Does It Run Doom?”

Back in 2014 [Johan] decided to celebrate BASIC’s 30 50 year anniversary by writing his own BASIC interpreter. Now, a few years later, he says he feels he has hit a certain milestone: he can play Flappy Bird, written in his own version of BASIC, running on his own home-built computer, the BASIC-1.

Inside the BASIC-1 is an Atmel XMega128A4, a keyboard from a broken Commodore 64, a joystick port, a serial to TV out adapter, and an SD card adapter for program storage. An attractively laser-cut enclosure with kerf bends houses the keyboard and hardware. The BASIC-1 boots into BASIC just like many of its home computer counterparts from the 80s.

Continue reading “Flappy Bird Is The New “Does It Run Doom?””

Showing An AVR Programmer Who’s Boss

[Bogdan] makes a good point. When you use a dev board you get programming, debugging, power sourcing, and usually a UART. When you go to the trouble of hooking up a programmer why don’t you get the same thing? Astutely, he points out that all you usually get with programmers is programming. So he set out to add features to the hardware he uses to program XMEGA.

The first part of the trick hinges on his use of PDI programming. This is slightly different from ISP programming. Both use a six-pin connector cable but with PDI two of these pins are unused. He took this opportunity to reroute the chip’s TX and RX pins through the cable, which now gives him an avenue to use a UART-to-USB adapter without adding any cables to his target board. Rather than add a second USB cable he rolled a USB hub into the mix. An LM1117 regulates the 5V USB rail down to 3.3V as a source for the target board.

The programmer being used is an Atmel ICE. As you might imagine he didn’t want to make permanent alterations to it. His modifications are all handled externally, with one IDC cable connecting the programmer to his added circuitry and another headed off to the target board. For now he’s jumpering RX/TX to the programming header but plans to route the signals on future PCBs.

Light Controller Goes Overboard For Halloween

floodbrain-halloween-light-controller

Yep, we said it. This Halloween decoration goes way overboard… and we love it! Not only does [Shelby Merrick] put on an incredible sound and light show for the neighborhood, but he keeps us happy by posting all the details for the lighting controller he designed. He calls the creation FloodBrain as it’s switching a set of flood lights to achieve the effects seen above. But for the full experience you’ll want to watch the demo videos below as well.

He needed a way to switch twelve RGB flood lights which pull 10 Watts. His controller was designed to communicate with them via RS485, with an AVR Xmega8E5 controlling the system. We like it that he included some images of the manufacturing process, using a stencil for solder paste before placing components for reflow.

The floodlights themselves are also an interesting hack. To get what he wanted at the best price he picked up 10W white LED flood lights for about eight bucks a piece, then swapped out the LED itself for an RGB version (same wattage) using the same heat sink and case.

More often that not we see this type of system controlling Christmas lights. [Shelby] mentions that he did get help from Christmas light controller forum We also think he should have no problem repurposing the controller for that type of application.

Continue reading “Light Controller Goes Overboard For Halloween”

2013 LayerOne Badge Hacking Contest Winner

2013-LayerOne-badge-hacking-contest-winner

[Dynotronix] wrote in to share the news that he won the 2013 LayerOne badge hacking contest. In addition to the good news he included a description of his badge hack.

We got a good look at the hardware included on the badge several days ago. You may remember that it’s outfitted with footprints for 48 LEDs around the perimeter which are driven by two ICs. Looking at the image above it’s hard to miss the fact that [Dyno] didn’t populate any of that. He went right for the power of the XMEGA processor to analyze and generate signals.

But what specifically can you do with the signal this thing generates? Turns out a rather simple circuit can make it into a transmitter. [Dyno] concedes that it’s a remarkably finicky setup, but just a few components on a scrap of copper clad turned this into an FM transmitter. Check out the video where you can hear the sweeping alarm-type sounds pushed to an FM radio via his voltage controlled oscillator circuit which has a range of about fifteen feet.

Continue reading “2013 LayerOne Badge Hacking Contest Winner”

Programming The XMEGA With An ISP

Atmel’s XMEGA series of microcontrollers are neat little pieces of hardware; with a very fast clock, a ton of IO, USB, and up to 8 UART ports, these neat little chips serve as a nice bridge between AVRs and PICs and the very powerful ARM chips coming out on the market. Unfortunately, the XMEGAs don’t use the extremely common ISP programming header found on just about every AVR dev board making them a bear to program. [Szu] over in Poland came up with a very easy way to program these chips, all while using the programming hardware you already have on hand.

[Szu]’s build uses a few resistors and diodes to break out a USBASP connection to the XMEGA’s PDI interface. On the software side of things, [Szu] wrote an update to the USBASP firmware to allow it to program PDI devices, and also has a patch for AVRdude to allow uploading firmware from the command line.

A very cool build, and one that allows for very, very powerful devices that build on the AVR code you’ve already written.