Building The Ocarina Of Time With An FPGA

[Joe] and [Evan] wanted to have some fun with their FPGA course at Cornell. When faced with what to do at the beginning of the semester, they figured additive synthesis was a worthy pursuit. They ended up building the Ocarina of Time for their final project.

The guys started by recording a real ocarina and figuring out the relative power levels of each harmonic. Because any sound can be synthesized from a bunch of sine waves, having their Altera FPGA board replicate those frequencies produces a nice ocarina sound

[Joe] and [Evan]’s ocarina has a ‘mouthpiece’ that is just a small microphone. This mic is hooked up to the FPGA board and controls the volume. Sadly, the guys didn’t have time to take apart an N64 controller so 6 red buttons serve as the finger holes.

From the video after the break, [Joe] and [Evan] really pulled together something that sounds like Link’s Ocarina. Great work, guys.

Continue reading “Building The Ocarina Of Time With An FPGA”

Half Keyboard, Half Guitar, Totally Radical, The Tabstrummer!

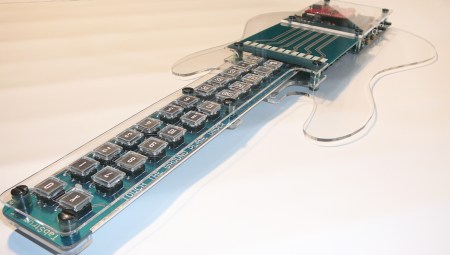
While tablature-based music probably annoys “properly” trained musicians to no end, it has given many musicians and musical-hobbyists their first introduction to the world of guitar. The [Tabstrummer] takes this to a whole new level, allowing chords to be programmed into this instrument and played back. Once pre-programmed chord is set, the “conductor-strings” are strummed to allow the chord to play.

This device is based around an Atmel microcontroller and features a MIDI output as well as an audio-out jack. Besides the interesting electrical hardware, the housing seems to be quite well-built featuring what appears to be an acrylic or polycarbonate body. Although not quite the same thing, possibly some influence was gained from the [Keytar]. It’s heyday may be past, but not forgotten.

Check out the video below for a Christmas-themed jam played on the [Tabstrummer] or check out their video page for several more songs. This “hack” is being considered as a commercial product, so the inventors would love to hear your feedback! Continue reading “Half Keyboard, Half Guitar, Totally Radical, The Tabstrummer!”

Get Ready To Play Some Wicked Air Harp

Who needs a tactile interface when you can wave your hands in the air to make music? Air String makes that possible and surprisingly it does so without the use of a Kinect sensor.

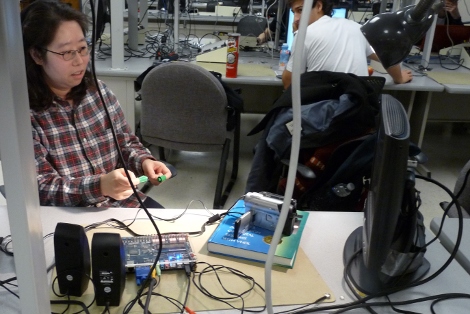
In the image above, you can see that two green marker caps are used as plectra to draw music out of the non-existent strings. Judiciously perched atop that Analysis and Design of Digital Systems with VHDL textbook is a camcorder recording an image of the player. This signal is processed by an FPGA (hence the textbook) in real-time, and shown on the monitor seen to the right. A set of guides are overlaid on the image, so the player knows where to pluck to get the notes she is expecting.

The program is designed to pick up on bright green colors as the inputs. It works like a charm as you can see in the video after the break. The team of Cornell students responsible for the project also mention a few possible improvements like adding a distance sensor (ultrasonic rangefinder?) so that depth can be used for the dynamics of the sound.

Continue reading “Get Ready To Play Some Wicked Air Harp”

Kindle Fire Cover From A Moleskine Journal

[Kevin Haw] is the proud owner of a brand new Kindle Fire. But to protect the investment he wanted a nice looking case and decided that DIY was the way to go. He ended up repurposing a Moleskine journal as a table cover.

You can do this one yourself in under an hour. Most of the pages in these journals are sewn in place and [Kevin] started by cutting the strings with a hobby knife. Once removed, he used a utility knife to separate the pages that were glued to the cover; this leaves you in the state seen above.

Obviously this unfinished look just won’t do. [Kevin] used some red duct tape duct tape to cover the unsightly spine. This adds strength, and does the job of cleaning up the area, but we might have also applied felt (or microfiber cloth) to the entire inside area for a bit more finished look. The final part is mounting the tablet which was accomplished with adhesive Velcro strips. These can be removed from the back of the Kindle Fire later on if you decided to use a different enclosure.

Simple PCB Vise

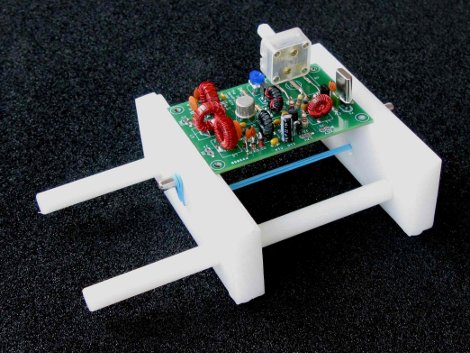
This one almost got relegated to a links post, but [Ken’s] simple PCB vise (PDF) is just so useful we had to give it a standalone feature. It works so well because he made every design feature count.

For instance, the groove the holds the PCB (almost impossible to see here but look at the diagrams in the PDF linked above) is cut with a dovetail bit, rather than just being a square rabbit. The clamping force is provided by that blue rubber band which simply hooks on a metal shelf peg on each side of the clamping plates. Those plates are machined out of polyethylene and slide nicely along the two nylon rods which keep them aligned. There’s really nothing to break or wear out here, except the rubber band with is easily replaceable. The rubber feet keep it from sliding across the bench as you work.

This is great for soldering, and would go right along with those diy smd parts clamps you made. It’s also a great way to hold onto your prototype boards when you’re working out the firmware.

Crunching The Numbers: Using Solar Cells Indoors

[Mathieu] was interested in using more solar cells for his everday electronics. He looked around but couldn’t find much information about using pholovoltaic for small indoor devices. We remember hearing some of the same things from [Dave Jones] in one of his EEVblog installments from a few years ago which looked at solar calculators; the only indoor solar gadget we can think of.

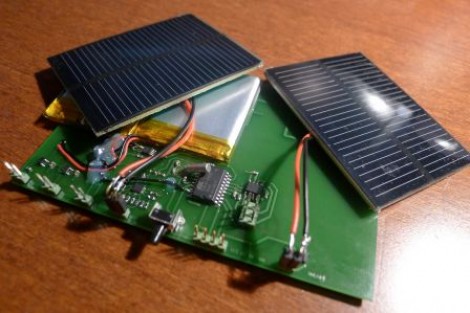
The quest for knowledge was on and [Mathieu] decided to build this indoor solar cell test platform. It’s a stable piece of hardware that allows him to run reliable tests in many different conditions. It’s designed to compare two identical cells. One is charging the Lithium cell, the other is driving a load directly. A second battery powers the platform separately from the solar circuits so that it can be used as a data logger. He collects, dumps, and graphs info from his test runs, then discusses his findings. We won’t spoil it, but the results are not great. Mostly you need sunlight to get real results as it’s just so much more powerful than artificial lighting.

Sphere Morphing Hexabot Is A Mechanical Jellyfish

Once again, we’re wowed over [Zenta]’s robotic skill. A few months ago, [Zenta] posted a video of his MorpHex hexapod spherebot that left us awed. After a few long months, more bits of MorpHex have made it onto the chassis. [Zenta] says his project isn’t done but it’s still enough to knock our socks off.

Going through the [Zenta] archives, there’s a little more to go on this time around. The MorpHex will be made up of two hemispheres, but only the bottom one will be able to walk. That’s really not that bad because [Zenta] gave the upper panels 1 degree of freedom. Just enough to scare off predators, we’re sure.

The chassis and the legs are amazing little pieces of engineering. Despite all the work [Zenta] has put into his MorpHex, there’s still work to be done. He hasn’t gotten the sphere to roll on command yet. We’ll be sure to post a video of the robot dancing to some lo-fi. Check that out after the jump.

Continue reading “Sphere Morphing Hexabot Is A Mechanical Jellyfish”