Space Invaders Played On A 16×2 Character Display

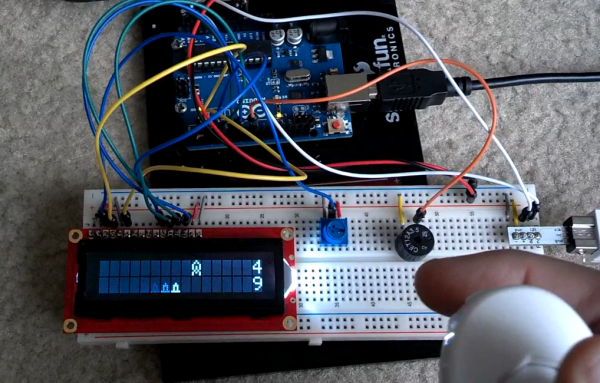
This Space Invaders game does more with less. [Rjk79] managed to make a video game using a two-line character display. The game consists of a wave of invaders on the top line, with the defender cannon on the bottom. The invader isn’t just stationary, but randomly moves to the left and the right. The image above captured a little bit of motion blur from the defender moving into position before firing on the enemy.

An Arduino board controls the 16×2 HD44780 character display. The game also includes sounds generated by the piezo buzzer seen on the breadboard. All the way to the right you can see the Wii Nunchuk breakout board which provides directional control and the firing trigger. If you want to recreate this one for yourself [Rjk79] is sharing the source code on Pastebin. There’s also a demo video found after the jump.

If you don’t have a character LCD on hand you might try this other Space Invaders clone that uses an 8×8 led matrix.

Continue reading “Space Invaders Played On A 16×2 Character Display”

Building A Linear Motor

linear-motor

We admit that this project doesn’t have very many details available, but it was just too neat for us to pass up. It’s a small linear motor which [ligonapProduktion] built after seeing a very brief description of a commercially available version.

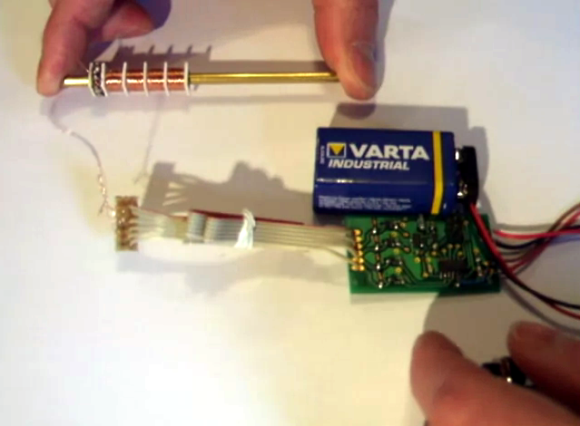
The video after the break shows him testing the motor. In this screenshot he’s holding the center shaft while the coil assembly moves back and forth. But it works with a stationary coil moving the rod as well. The motor is basically a modified solenoid. There are sixteen neodymium magnets inside the shaft. The set of four coils is driven by an ATtiny44. Just like a stepper motor, energizing the coils in the correct order pushes against the rare earth magnets creating motion.

We’re not sure if he has any use in mind for this build. For us we just like to see the concept in practice (we feel the same way about a homopolar motor build).

Continue reading “Building A Linear Motor”

Stellaris Launchpad Shield Shows Good Fabrication Technique

launchpad-shield-with-great-fabrication

Here’s an LED and Button shield for the Stellaris Launchpad (translated) which you can fabricate at home. It gives you access to a 5×5 matrix of LEDs, and adds four more buttons. In order to cut down on the number of I/O pins required to operate the lights [Cosimo] is using the concept of Charlieplexing. This lets him get away with just six driver pins and four button pins.

It’s not just the finished product that interests us here. The fabrication itself is worth clicking through to his project post. What initially caught our eye is the use of Kapton tape as an insulator so that clipped off LEDs could be used as jumpers flat against the top side of the board before populating the LEDs themselves. After those are soldered in place he masks them off, as well as the button footprints, and uses spray paint to protect the top side of the board. The final look is more polished than most at-home project boards.

CASUAL Seeks To Make Android Hacking OS Agnostic

CASUAL-android-hacking-scripts

[Adam Outler] tipped us off about a cross-platform Android hacking suite he’s been working on. The project, which is called CASUAL, brings several things to the table. First and foremost it breaks down the OS requirements seen on some hacks. It can perform pretty much any Android hack out there and it doesn’t care if you’re using Linux, OS X, or Windows.

We’ve embedded two videos after the break. The screenshot seen above is from the first clip where [Adam] demonstrates the package rooting the Oppo Find5 Android phone. He then goes on to show off the scripting language CASUAL uses. This layer of abstraction should make it easier to deploy hacking packages, as CASUAL handles all of the underlying tools like the Android Debug Bridge, fastboot, and Heimdall (an open source Odin replacement which brings the low level tool to all OS platforms) . The second video demonstrates a Galaxy Note II being rooted, and having a new recovery image flashed.

Continue reading “CASUAL Seeks To Make Android Hacking OS Agnostic”

Adaptive Technology Used To Fly An IR Helicopter

adaptive-tech-controlled-helicopter

This gentleman is using electrical impulses from his neck muscles to fly a toy helicopter around the room. The project is a demonstration of the AsTeRICS project which seeks to reduce the complexity of adapting the set of skills a disabled person can use to do a wide range of functions. In this case, controlling the helicopter could easily be switched to other tasks without changing the user interface hardware.

One of the plugins for the AsTeRICS project uses the OpenEEG library. This reads the signals coming from a pair of electrodes on top of each shoulder. In the video after the break you can see that as he flexes these muscles the changes in signal are mapped to the altitude of the helicopter. This is just one example of a wide range of inputs that include things like building a webcam-based mouse or using  facial recognition.

The toy itself is being driven by an Arduino sending IR commands. We’ve seen quite a few project where the helicopter communications protocols are laid bare.

Continue reading “Adaptive Technology Used To Fly An IR Helicopter”

Shooting Ping Pong Balls At Mach 1.2

Ping%20pong%20gun

Next time you’re in a Nerf gun battle, you better hope you’ve got this absurdly powerful ping pong ball gun. It shoots common celluloid spheres at over 400 meters per second, or Mach 1.2.

This ping pong gun is the work of [Mark French], [Craig Zehrung], and [Jim Stratton] at Purdue University. As you would expect, the gun is powered by compressed air housed in a length of 3 inch schedule 80 PVC pipe. One end of the pressure vessel is sealed with a PVC end cap, while the other is closed off with a doubled up piece of duct tape to contain the pressure.

The interesting bit of the build is a de Laval nozzle between the pressure vessel and the barrel. Just like a rocket engine nozzle, this bit of machined PVC compresses the air coming through the burst duct tape seal and allows it to expand again, propelling the muzzle-loaded ping pong ball at supersonic speeds.

The guys have written a report on their gun, you can grab that over on arxiv.

Finding 1s And 0s With A Microscope And Computer Vision

ROM

One day, [Adam] was asked if he would like to take part in a little project. A mad scientist come engineer at [Adam]’s job had just removed the plastic casing from a IC, and wanted a little help decoding the information on a masked ROM. These ROMs are basically just data etched directly into silicon, so the only way to actually read the data is with some nitric acid and a microscope. [Adam] was more than up for the challenge, but not wanting to count out thousands of 1s and 0s etched into a chip, he figured out a way to let a computer do it with some clever programming and computer vision.

[Adam] has used OpenCV before, but the macro image of the masked ROM had a lot of extraneous information; there were gaps in the columns of bits, and letting a computer do all the work would result in crap data. His solution was to semi-automate the process of counting 1s and 0s by selecting a grid by hand and letting image processing software do the rest of the work.

This work resulted in rompar, a tool to decode the data on de-packaged ROMs. It works very well – [Adam] was able to successfully decode the ROM and netted the machine codes for the object of his reverse engineering.