The Nickelphone

nickelphone

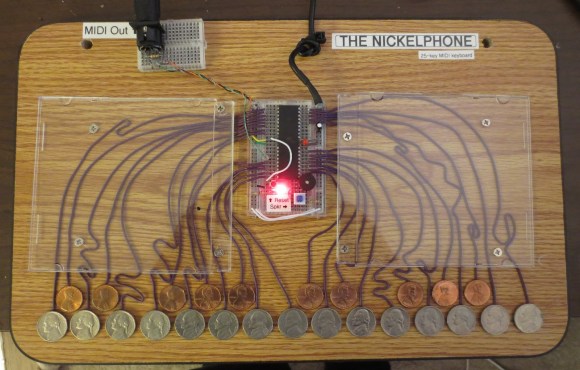
[Tyler Bletsch] sent us a tip about his new build: a keyboard that redefines “coin-operated.” The Nickelphone can emit square wave tones via a piezo buzzer, but [Tyler] made this 25-key piano as a MIDI keyboard capable of driving a full synthesizer.

He chose an ATMega644 as the brain because it’s Arduino-friendly but has more data pins—32—than the usual ATMega328 chip, which allows him to provide each key with its own pin. Each coin was soldered to its own wire and connects up to a 1MΩ resistor array. Coin-presses are recognized by the simple capacitive sensing technique outlined here, but [Tyler] needed to take advantage of a workaround to accurately detect multiple presses.

Check out [Tyler’s] detailed project guide for more information as well as the source code. Check out the video of the Nickelphone after the break, then browse through some other capacitive touch hacks, like the Capacitive Touch Business Card or the Capacitive Touch Game Controller.

Continue reading “The Nickelphone”

Hacking And Philosophy: An Introduction

hacking_philosophy

This fall marks my third (and Flying Spaghetti Monster willing, final) year as a PhD student, and although I’m no longer taking courses, I often wonder how my seminars might have differed if other hacker-types were in the classroom contributing to the discussion.

Hacking and Philosophy is a new column that explores scholarly research about hacking, and does so with a community that lives the hacking experience. It’s a chance to discuss how researchers and deep thinkers handle our culture, its image, its philosophy, etc. Put simply, think of it as a weekly book club meeting. I’ll choose the text and proceed one chapter at a time, giving you my complete response to that week’s reading while engaging your replies in the comments as well as including your important or insightful contributions in future posts. Further, I promise never to venture into Ivory Tower territory: I hate being talked down to as much as the next person.

Hacking and Philosophy only works if it’s a conversation, so I encourage contributions, corrections, respectful disagreements, and as much hypertext (obviously literally, but philosophically a la Landow) that you can manage. Think of me not as an instructor but as a fellow participant who will occasionally guide us through obscure concepts and terminology.

Keep reading after the break for a tentative book list and the reading for next week!

Continue reading “Hacking And Philosophy: An Introduction”

Making A Power Inductor Checker

inductor-checker-for-oscilloscope

Back to the basics: there are three kinds of passive electronic components: Inductors, Capacitors and Resistors. An inductor can be easily built and many types of core and bobbin kits are available. However, characterizing one hypothetical coil you just made is quite tricky as its inductance will depend on the measurement frequency and DC bias current. That’s why [ChaN] designed the circuit shown above.

As you may guess, RF enthusiasts are more interested in the inductance vs frequency curve while power circuit designers prefer inductance vs load current (for a given frequency). The basic principle behind the circuit shown above is to load an inductor for repetitive short periods and visualizing the current curve with an oscilloscope connected to a sense resistor. When loading the inductor, the current curve will be composed of two consecutive slopes as at a given moment the coil’s core will be saturated. Measuring the slope coefficient then allows us to compute the corresponding inductance.

[Via Dangerous Prototypes]

Portable PS2, Courtesy Of Cross Plane

It’s not exactly a portable, but [Downing]’s PS2 advance puts all the power of a Playstation 2 in the palm of your hands, all while being more popular that the Vita.

For the audio and video, the project uses a Cross Plane, a project from a slightly unsuccessful Kickstarter [Downing] pulled the plug on last month. When the handheld is plugged in to the Cross Plane, all the audio, video, and controller wires are transferred through a pair of cables, with the possible addition of wireless transmission should [Downing] ever want to revisit this project.

In deciding on what to use for a case, [Downing] had bought a few AG cases from Polycase but found the ergonomics severely lacking. Putting two of the case backs together, he found the resulting structure was actually very comfortable, and with a few simple modifications to add some holes for acorn nuts,

It’s a great looking project that really highlights [Downing]’s talents as a console modder. He’s also thrown his hat into the Hackaday Trinket contest by engraving the Jolly Wrencher into the back of his project, which unfortunately isn’t seen in the video below.

Continue reading “Portable PS2, Courtesy Of Cross Plane”

DIY Mini Quadcopter Frame Is Light And Strong

quadcopter-frame

[Oscar] has been busy lately building DIY mini quadcopters. We saw his controller design earlier in the month. Back then he was using it with his walking robot designs. Now [Oscar] has posted up some information on his quadcopter work. Even though [Oscar] is new to mini quads, he began by designing his own frame. He started his frame design by using a cut down version of the well-known 949 frame. [Oscar] chose polystyrene for his motor mounts, which turned out to be the downfall of the frame. Polystyrene proved to be much too flimsy to handle the vibrations of the motors and props. The vibrations were transmitted to the accelerometers, which resulted in a model that was very hard to control. You can see this in the first video after the break.

For his second attempt, [Oscar] started with a proven design from HobbyKing. HobbyKing’s fiberglass mini quadcopter frame is sturdy, but heavy, and expensive to replace (If the parts are even in stock). The frame did work though, so he used it as a starting point for his second DIY frame. The new frame is based upon fiberglass shafts. [Oscar] used hot glue to join the shafts to the motor mounts. Each joint was wrapped in string, which was then coated with hot glue. We’d suggest thin cyanoacrylate glue in the future for these types of joints. Only a few drops of CA soaks up into the string, creating an extremely light and strong joint. [Oscar’s] frame ended up at about half the weight of the HobbyKing frame, but was stiff enough for a successful flight test, as can be seen in the second video after the break.

Continue reading “DIY Mini Quadcopter Frame Is Light And Strong”

Microslice: The Tiny Arduino Laser Cutter

[SilverJimmy] already had a full-sized 50 watt laser cutter, but he decided to try his hand at putting together something smaller and microcontroller-driven. The result is this adorable little engraver: the MicroSlice.

To keep the design simple, [SilverJimmy] opted for a fixed cutting table, which meant moving the cutting head and the X-Axis as a unit along the Y-Axis. The solution was to take inspiration from gantry cranes. He snagged a couple of stepper motors with threaded shafts, designed the parts in Inkscape, then fired up his full-size cutter to carve out the pieces. An Arduino Uno and the relays for the laser and fans sit on the MicroSlice’s bottom platform, and two EasyDriver motor controllers sit above them on the next layer.

Swing by the Instructables for more details including the source code, and to see a video of the engraver below. [SilverJimmy] sourced his laser from eBay, but check out the engraver from earlier this year that used a DVD diode.

Continue reading “Microslice: The Tiny Arduino Laser Cutter”

Hackaday Links: October 27, 2013

hackaday-links-chain

[Kyle] came across a project which he thinks is “simply elegant”. If you don’t already have a PCB vice, here’s an easy way to build one of your own.

This one’s so good but alas it’s not a hack. Check out the slideshow tour at UC Boulder’s Fiske Planetarium. You get a really cool look at the hardware that makes the dome and projector such a great experience. [via Reddit]

Here’s a schematic and a couple of snapshots of [Trax’s] CAN bus hacking rig. He plans on doing a tutorial but decided to share this link after reading the first part of our own CAN hacking series.

These strings of LEDs bump to the tunes. [Alex] is using GrooveShark as a frequency analyzer, then pushing commands via Node.js to the Arduino controlling the lights. It’s all planned for the back porch during his Halloween party.

We remember drilling holes in the 3.5″ floppy discs (we even made a wood jig for this) to double their capacity. A similar blast from the past was to punch a notch in the larger 5.25″ versions to make them double-sided.

If you’re trying to learn about FFT [Ronald] highly recommends this website. We didn’t do too much poking around because it’s kind of strange. But if you do get sucked in and have fun with it leave a comment to let others know it’s worth their attention.

We suppose that using 39 Raspberry Pi boards and their camera modules isn’t the worst way to build a huge 3D model capture rig. The results certainly are impressive. [Thanks Wouter]