Metal Inlays Using A Bit Of Solder

metal inlay

Looking for a unique way to add a nice metal inlay to finish off your project? [Ben Krasnow] shows us how using a CNC router, a bit of solder, and a lot of sand paper!

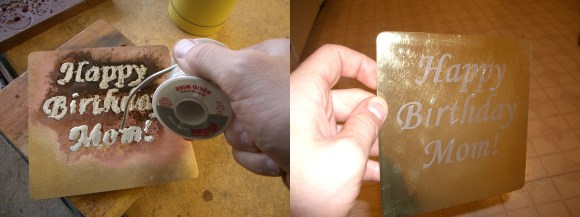
It’s actually a pretty simple job — Of course, that’s only if you have a CNC machine. [Ben] started by engraving his inlay using his handy CNC mill, and then sanding off any rough spots. He then filled the engraving with acid flux paste, got out his MAPP gas torch and started dripping solder into the piece. Once everything was covered, he started sanding it, from 60 grit all the way to 600 grit for a nice polished finish. The results speak for themselves.

An easier method of this could also be achieved using plastic and epoxy, instead of brass and solder. One of the biggest problems with the solder is bubbling, which can cause voids which will appear when you are sanding — so you might have to do a second pass with the solder.

[Ben Krasnow] is an interesting character. He’s sought out the perfect cookie, made his own CT scanner at home, explained the various heat treatments of steel — and even installed LEDs into his contact lenses just for kicks!

[Thanks Fabien!]

LED IM status indicator

Green Light Go, Red Light Come Back Later

Depending on your taste for social interaction and tolerance for distraction, an open floor plan or “bullpen” office might not be so bad with a total of four people. Hackaday.io user [fiddlythings] likes it, but people often stop by to see him or one of his coworkers only to find them busy or absent. While their status is something they could plainly see in Microsoft Communicator from their own desk, some people like to chat in person or stop by on their way to and from meetings.

In order to save these visitors a few seconds, [fiddlythings] came up with an IM status indicator using their existing nameplates outside the door. Each of their names has a little silver dot by it which he backlit with a flattish RGB LED. These LEDs are driven by a Raspberry Pi and NPN transistors through a ribbon cable.

The plan was to imitate the Communicator status colors of green for available, red for busy, and yellow for away. [fiddlythings] dialed up a lovely shade of amber for away using a mix of red and green. Since he really only needs two colors, he’s using eight NPN transistors instead of twelve. The quick ‘n dirty proof of concept version used Python and a Pidgin IM console client called Finch. Once he got IT’s blessing, he implemented the final version in C++ using Libpurple to interface with Communicator.

This isn’t the first time we’ve seen a Pi used to indicate status—remember this mobile hackerspace indicator?

Samsung NX300 Gets Rooted

sammy

[Ge0rg] got himself a fancy new Samsung NX300 mirrorless camera. Many of us would just take some pretty pictures, but not [Ge0rg], he wanted to see what made his camera tick. Instead of busting out the screwdrivers, he started by testing his camera’s security features.

The NX300 is sold as a “smart camera” with NFC and WiFi connectivity. The NFC connectivity turns out to be just an NXP NTAG203 tag embedded somewhere in the camera. This is similar to the NFC tags we gave away at The Gathering in LA. The tag is designed to launch an android app on a well equipped smartphone. The tag can be write-locked, but Samsung didn’t set the lock bit. This means you can reprogram and permanently lock the tag as a link to your favorite website.

[Ge0rg] moved on to the main event, the NX300’s WiFi interface. A port scan revealed the camera is running an unprotected X server and Enlightenment. Let that sink in for a second. The open X server means that an attacker can spoof keystrokes, push images, and point applications to the camera’s screen.

In a second blog post, [Ge0rg] tackled attaining root access on the camera. Based on the information he had already uncovered, [Ge0rg] knew the camera was running Linux. Visiting Samsung’s open source software center to download the open source portions of the NX300 confirmed that. After quite a bit of digging and several red herrings, [Ge0rg] found what he was looking for. The camera would always attempt to run an autoexec.sh from the SD Card’s root folder at boot. [Ge0rg] gave the camera the script it was looking for, and populated it with commands to run BusyBox’s telnet daemon.  That’s all it took – root shell access was his.


[Image via Wikimedia Commons/Danrok]

Upgrade Your Garage Door With Arduino And RFID

RFID Garage Door Opener

[Jason] really wanted to build an RFID controlled garage door opener and decided to turn to Arduino to get the job done. For someone who’s never worked with an Arduino before, he really seemed to know what he was doing.

The Arduino acts as the brains of the operation while an off-the-shelf NFC/RFID reader module is used to read the RFID tags. To add new keys to the system, [Jason] simply swipes his “master” RFID key. An indicator LED lights up and a piezo speaker beeps, letting you know that the system is ready to read a new key. Once the new key is read, the address is stored on an EEPROM. From that point forward the new key is permitted to activate the system.

Whenever a valid key is swiped, the Arduino triggers a relay which can then be used to control just about anything. In this case, [Jason] plans to use it to control his garage door. The system also has a few manual controls. First is the reset button. If this button is held down for two seconds, all of the keys from the EEPROM are erased. This button would obviously only be available to people who are already inside the garage. There is also a DIP switch that allows the user to select how long the relay circuit should remain open. This is configurable in increments of 100ms.

For now the circuit is wired up on a couple of breadboards, but it might be a good idea to use something more permanent. [Jason] could always take it a step further and learn to etch his own PCB’s. Or he could even design a board in Eagle CAD and order a real printed board. Don’t miss the video description of the RFID system below. Continue reading “Upgrade Your Garage Door With Arduino And RFID”

Laser Etching Brings New Life To An IBM Keyboard

IMG_20140314_011136

[Evan] was perusing his local thrift store when he found a beautiful IBM Model M 122-key keyboard made in 1987.

“This is my keyboard, there are many like it, but this one is mine.”

~The Typist’s Creed

In [Evan’s] case, this might actually be the only one like it still in use today. An idea formed in his head. What if he took this ancient keyboard, gave it a USB driver, and customized the keys on a hardware level to do exactly what he wanted.

The first step was converting it to USB. He’s using a Teensy 2.0 mostly because it is super inexpensive, and its able to act as a USB HID device. In addition to wiring up the keyboard to the Teensy he’s also added foot pedals that connect via 1/8″ stereo plugs — these kind of act like extra mouse buttons, allowing him to scroll through galleries left to right, add page breaks, and other macros to increase efficiency.

Continue reading “Laser Etching Brings New Life To An IBM Keyboard”

Hair Thin Wires Save A 3DS From The Landfill

Broken Nintendo 3DS

[Anton] recently acquired a broken Nintendo 3DS. When the power button was pressed, the device would start booting up only to shut back down after flashing a blue light and making a popping sound. It turns out this problem is pretty common with the 3DS.

[Anton] could have tossed this device into the landfill, but where’s the fun in that?  Instead, he cracked the device open like any self-respecting hacker would. It didn’t take him long to discover two broken flex ribbon cables. [Anton] could have then searched for replacement cables, but his inner hacker told him he could repair this himself. He carefully scraped the insulation off of the broken traces and then soldered on some hair thin wires to bridge the gap.

All that was left to do was to glue the wires securely in place and feed them back through the hinges. This project is a great example of how a little determination and know-how can keep a useful device from the landfill. If you attempt this repair yourself, you may find this 3DS teardown to be a helpful reference. What devices have you been able to save from an untimely demise?

OLED display, blue LED and Smartcard

Developed On Hackaday: License Incompatibilities And Project State

mooltipass top pcb

It has been a while since we wrote an article about our ongoing offline password keeper project, aka the Mooltipass. Our last post was asking our dear readers to vote for their favorite card art, so what have we been doing since then?

For the last few weeks we’ve mostly been improving our current PCBs and case design for the production process to go smoothly. The final top PCB shown above has been tweaked to improve his capacitive touch sensing capabilities, you may even see a video of the system in action in the Mooltipass project log on hackaday.io. We’ve also spent some time refining the two most popular card art designs so our manufacturers may print them correctly. We’ll soon integrate our updated USB code (allowing the Mooltipass to be detected as a composite HID keyboard / HID generic) into the main solution which will then allow us to work on the browser plugin.

It’s also interesting to note that we recently decided to stop using the GPL-licensed avrcryptolib. Our current project is CDDL licensed, allowing interested parties to use our code in their own project without forcing them to publish all the remaining code they created. The GPL license enforces the opposite, we therefore picked another AES encryption/decryption implementation. This migration was performed and checked by our dedicated contributor [Miguel] who therefore ran the AES NESSIE / CTR tests and checked their output, in less than a day.

We’re about to ship the first Mooltipass prototypes to our active contributors and advisers. A few weeks later we’ll send an official call for beta testers, just after we shown (here on Hackaday) what the final product looks like. Don’t hesitate to ask any question you may have in the comments section, you can also contact us on the dedicated Mooltipass Google group.