Kinect4NES

Using Kinect To Play Super Mario Bros 3 On NES Ensures Quick Death

Why do only the new game consoles get all the cool peripherals? Being a man of action, [Paul] set out to change that. He had a Kinect V2 and an original Nintendo and thought it would be fun to get the two to work together.

Thinking it would be easiest to emulate a standard controller, [Paul] surfed the ‘net a bit until he found an excellent article that explained how the NES controller works. It turns out that besides the buttons, there’s only one shift register chip and some pull up resistors in the controller. Instead of soldering leads to a cannibalized NES controller, he decided to stick another shift register and some resistors down on a breadboard with a controller cable connected directly to the chip.

Kinect4NES wiring

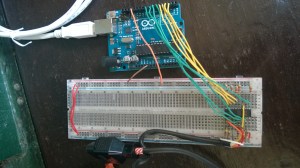
An Arduino is used to emulate the buttons presses. The Arduino is running the Firmata sketch that allows toggling of the Arduino pins from a host computer. That host computer runs an application that [Paul] wrote himself using the Kinect V2 SDK that converts the gestures of the player into controller commands which then tells the Arduino which buttons to ‘push’. This is definitely a pretty interesting and involved project, even if the video does make it look very challenging to rescue Princess Toadstool from Bowser and the Koopalings!

If you’d like to help the project or just build one for yourself, check out the source files on the Kinect4NES GitHub page.

Continue reading “Using Kinect To Play Super Mario Bros 3 On NES Ensures Quick Death”

The Marriot Chariot Hauling Ass

[Harrison Krix’s] Marriott Chariot

Atlanta’s Mini Maker Faire had plenty of booths to keep visitors busy, but the largest spectacle by far was the racetrack smack-dab in the middle, and you’d be hard pressed to find a more eye-catching contender than [Harrison Krix’s] vehicle: the Marriott Chariot.

If [Krix’s] name looks familiar, that’s because he’s the master artisan behind Volpin Props, and is responsible for such favorites as the Futurama Holophonor replica and the Daft Punk helmet. (Actually, he made the other one, too).

The Chariot is yet another competitor in the Power Racing Series, an event that keeps popping up here on Hackaday. [Krix] drew inspiration from this Jeep build we featured earlier in the summer, and went to work sourcing an old plastic body to get started. The frame is 16 gauge square tubing, with a custom motor mount machined from 3/16 steel. After welding the chassis together, [Krix] chopped up a small bicycle to snag its head tube and headset bearings. A pair of sealed lead acid batteries fit horizontally in the frame, providing a slightly lower center of gravity.

[Krix] has a keen eye for precision and his build journal shows each step of his meticulous process. But, you ask, why “Marriott Chariot?” and why does the car look like someone threw up a kaleidoscope? Read on beyond the break, dear reader, to learn the Chariot’s origin and to see a video of it winding around the track.

Continue reading “[Harrison Krix’s] Marriott Chariot”

A Compact Underwater Vehicle: The Nanoseeker

The Nanoseeker is a compact underwater vehicle in a torpedo-like form factor. [John] designed the Nanoseeker as completely enclosed vehicle: both the thruster and the control fins are all housed within the diameter of the tube. The thruster is ducted with vents on the sides and control fins integrated into the back of the duct assembly.

[John] designed a compact PCB to drive the vehicle, which includes an STM32F4 alongside several sensors. An MPU-9150 provides IMU functionality and two dual motor driver ICs from TI control the throttle and the control fins. [John] also added a Bluetooth radio for remote control functionality. For those who want a closer look, an image of the schematic is up on his blog.

The board is running MicroPython, which is a small Python implementation optimized for microcontrollers. Although [John]’s hardware platform looks great, he’s still getting started on his software. We look forward to seeing how his project develops, as his project is one of the smallest underwater vehicles we’ve seen.

[via Dangerous Prototypes]

An SDK For The ESP8266 WiFi Chip

The ESP8266 is a chip that turned a lot of heads recently, stuffing a WiFi radio, TCP/IP stack, and all the required bits to get a microcontroller on the Internet into a tiny, $5 module. It’s an interesting chip, not only because it’s a UART to WiFi module, allowing nearly anything to get on the Internet for $5, but because there’s a user-programmable microcontroller in this board. If only we had an SDK or a few libraries…

The ESP8266 SDK is finally here. A complete SDK for the ESP8266 was just posted to the Expressif forums, along with a VirtualBox image with Ubuntu that includes GCC for the LX106 core used in this module.

Included in the SDK are sources for an SSL, JSON, and lwIP library, making this a solution for pretty much everything you would need to do with an Internet of Things thing. As far as LX106 core is concerned, there’s example code for using the spare pins on this board as GPIOs, I2C and SPI busses, and a UART.

This turns the ESP8266 into something much better than a UART to WiFi module; now you can create a Internet of Things thing with just $5 in hardware. We’d love to see some examples, so put those up on hackaday.io and send them in to the tip line.

Use A Cheap PIN Diode As A Geiger Counter

After the Fukushima nuclear power plant disaster, radiation measurement became newly relevant for a lot of people. Geiger-Müller tubes, previously a curiosity, became simultaneously important and scarce.

Opengeiger.de (English-language version here) has complete instructions for making a Geiger counter without a Geiger-Müller tube. Instead, this counter uses a PIN photodiode and some carefully chosen operational amplifiers. The total cost of such a device is significantly cheaper than the alternative: under $1 for the diode and around $5 for the rest. And since the PIN photodiode in question is used in many other devices, it’s not a niche component like a Geiger tube is.

The secret sauce is in component selection and tuning. Opengeiger uses the BPW34 diode because it is relatively common and has a large surface area, but also because it has a very low capacitance when reverse-biased. The first-stage opamp choice is also fairly critical. Considering that an average gamma radiation event produces only around 10 nanoamps for about 50 microseconds, a lot of amplification (100,000x), low noise, and high bandwidth are a must.

If you want to get started with this project, you could first browse through the explanation (PDF) to get an overview of the project’s goals, read up on all the technical considerations (PDF) or just head straight for the DIY instructions for the “Stuttgarter Geigerle” (PDF, schematic is on the last page). All of the documentation is chock-full of relevant references and totally worth the read.

FlowPaw, The Bear Paw Of Electronics Education

If the astonishing success of littleBits is any indication, there’s a huge market for ‘intro to electronics’ products that are much more capable than the classic Radio Shack ‘springs and components stuck to cardboard’ kits or even the very successful littleBits. FlowPaw is the latest entry in this space, combining the sensor module paradigm of littleBits with a largish microcontroller, digital and analog pins, and a great programming interface.

The big innovation in the FlowPaw is the FlowStone programming language. It’s a graphical programming language that allows young creators to connect blocks, modules, and functions together with virtual wires, but also allows the editing of different modules with Ruby. Best of both worlds, there.

The FlowPaw kickstarter includes rewards for just the FlowStone software, or the FlowPaw electronics board with a bunch of modules. Already, the team has LED, relay, accelerometer, buzzer, and capacitive touch sensors, along with a Bluetooth and speech recognition module. They’re working on a few more advanced modules for GPS, pressure, DC motor control, and RFID as well.

excelMediaPlayer

Using Excel To Watch Movies At Work

The Excel subreddit exploded earlier this week when redditor [AyrA_ch] shared his custom spreadsheet that allowed him to play video files on a locked-down work computer. How locked down? With no access to Windows Media Player and IE7 as the only browser (all plugins disabled, no HTML5), Excel became the unlikely hero to cure a 3-hour boredom stint.

Behind the cascade of rectangles and in the land of the Excel macro, [AyrA_ch] took advantage of the program’s VBA (Visual Basic for Applications) functions to circumvent the computer’s restrictions. Although VBA typically serves the more-complex-than-usual macro, it can also invoke some Windows API commands, one of which calls Windows Media Player. The Excel file includes a working playlist and some rudimentary controls: play, pause, stop, etc. as well as an inspired pie chart countdown timer.

As clever as this hack is, the best feature is much more subtle: tricking in-house big brother. [AyrA_ch]’s computer ran an application to monitor process usage, but any videos played through the spreadsheet were attributed to Excel, ensuring the process usage stayed on target. You can download it for yourself over on GitHub.