DIY Robot Arm

Robot Arm You Can Build At Home

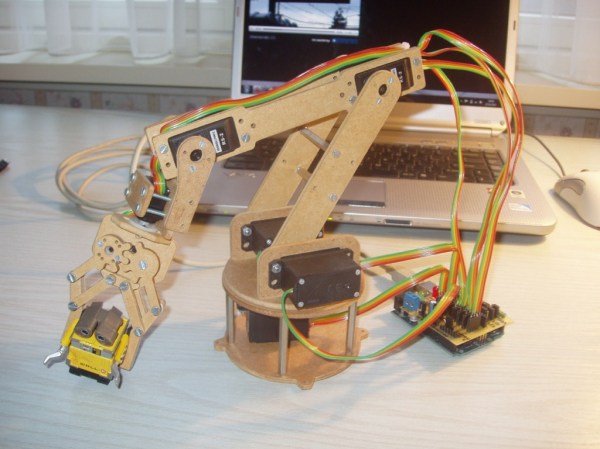
[jjshortcut] has created an easy to make robot arm that has 6 degrees of freedom. There is not much to it, the frame is made out of 4mm thick hardboard, hobby servos provide the power and a handful of hardware holds it together. The frame has been successfully cut out on both a laser cutter and a cnc router, making this design even more obtainable for any aspiring roboticist.

To control the robot arms movements [jjshortcut] plans to use a standard Arduino. There are certainly plenty of servo motor shields available but he still decided to design his own. In addition to the standard motor power and servo connections, a header for an infrared receiver was added for potential future communication options.

DIY Robot Arm Gripper
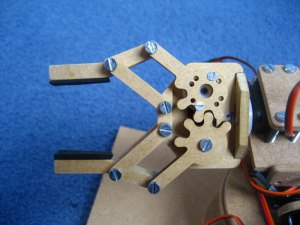
Like any project, there were some hiccups along the way. First, several revisions of the gripper were necessary to get the correct tooth profile that resulted in smooth and tight movement. Also, while making the shield the spacing between banks of headers came out one header too close! On this first board [jjshortcut] just bent the pins so they would fit into the Arduino. You can’t let some minor snafu prevent forward momentum of a project!

[jjshortcut] has done the hard part; the design. He has made all his mechanical and electronic files available… so go and build one! Check out the video after the break.

Continue reading “Robot Arm You Can Build At Home”

home made keyboard

Delving Into The Design And Manufacture Of A Keyboard

A while back [Dave] decided he wanted to build his own keyboard. [Dave] has no experience in design, or dealing with manufacturing companies, or even sourcing materials – he just wanted to see if he could do it.

That’s the beauty of the DIY world – most of the time, you can do it, you just don’t know it yet. The keyboard is made out of laser cut steel and acrylic sheets. The switches and key caps are Cherry MX Browns, supplied by GONSKeyboards Works. A Teensy 2.0 lies at the heart of the keyboard acting as an HID device, and the whole thing assembled looks pretty slick – but it wasn’t easy getting to that point.

Continue reading “Delving Into The Design And Manufacture Of A Keyboard”

Playing Doom (Poorly) On A VoCore

Last May brought the unastonishing news that companies were taking the Systems on Chip found in $20 wireless routers and making dev boards out of them. The first of these is the VoCore, an Indiegogo campaign for a 360MHz CPU with 8MB of Flash and 32MB or RAM packaged in a square inch PCB for the Internet of Things. Now that the Indiegogo rewards are heading out to workbenches the world over, it was only a matter of time before someone got Doom to run on one of them.

After fixing some design flaws in the first run of VoCores, [Pyrofer] did the usual things you would do with a tiny system running Linux – webcams for streaming video, USB sound cards to play internet radio, and the normal stuff OpenWrt does.

His curiosity satiated, [Pyrofer] turned to more esoteric builds. WIth a color LCD from Sparkfun, he got an NES emulator running. This is all through hardware SPI, mind you. Simple 2D graphics are cool enough, but the standard graphical test for all low powered computers is, of course, Doom.

The game runs, but just barely. Still, [Pyrofer] is happy with the VoCore and with a little more work with the SPI and bringing a framebuffer to his tiny system, he might have a neat portable Doom machine on his hands.

DIY Vacuum Former

DIY Vacuum Former On The Cheap

Vacuum Forming is a process used to mold plastic into a desired shape. A thin sheet of plastic is heated to a soft state and then air pressure is used to press the plastic down around or into a mold. Vacuum forming can be used to make a variety of items, anything from product packaging to bath tubs.

That being said, a vacuum former is probably one of those things that would be nice to have around but may not get a lot of use. Therefore, spending any significant amount of money on one would result in a low-value situation. For some folks, building one from scratch may be the way to go. [Amalgamized] built his own low-cost vacuum former and did a great job documenting the build.

VacuumDiagramFlattenedSmall
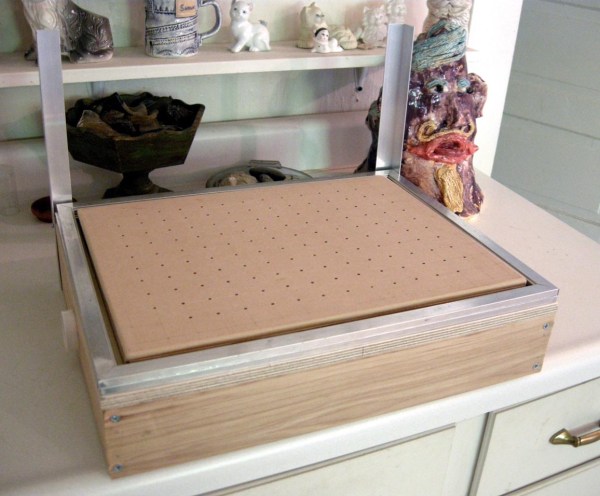
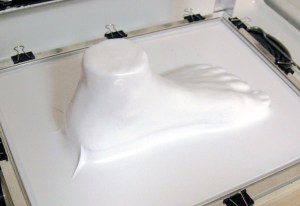
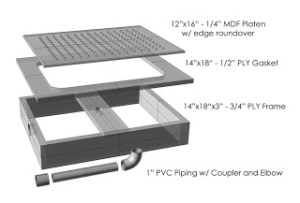
There is a two-pronged attack to keep the costs down on this project. First, the frame is made from readily available materials that you probably have kicking around in your wood scrap bin. The sides of the frame are 3/4″ plywood and the hole-filled top is made from 1/4″ MDF. A piece of PVC pipe connects the chamber below the top piece of MDF to a shopvac. The shopvac pulls the air down through the top’s holes; think reverse air hockey table.

Attack prong #2 is that there is no dedicated heater. Binder clips secure the plastic sheets to an aluminum window frame which are then put in the oven for a few minutes between 250 and 300ºF. When the plastic starts to droop, it is quickly removed from the oven and placed over a mold. The shopvac creates a low pressure zone under the plastic and atmospheric pressure pushes the plastic down around the mold.

DIY Vacuum Former

Replacing The Lead In A Motorcycle Battery With Supercaps

[Raphael] has a motorcycle he’s constantly working on, and for him that means replacing the battery occasionally. Tired of the lead-acid batteries that have been used for 100 years now, he took a look at some of the alternatives, namely lithium and the much cooler supercapacitor option. A trip to the local electronics distributor, and [Raphael] had a new supercapacitor battery for his bike, and hopefully he’ll never need to buy another chunk of lead again.

The battery pack is built from six 2.7V, 350F caps, a few connectors, and a handful of diodes. These are lashed together with rubber bands to form a 16V, 58F capacitor that makes for a great stand-in for a chunk of lead or a potentially puffy lithium battery.

[Raphael] put up a walkthrough video of his battery pack where he shows off the enclosure – an old, empty lead acid cell. He also goes through the back current protection and his method of balancing the supercaps with a few diodes.

The Network Of 1-Wire Devices

teensynet

[jimmayhugh] is a homebrewer and has multiple fermentation chambers and storage coolers scattered around his home. Lucky him. Nevertheless, multiple ways of making and storing beer requires some way to tell the temperature of his coolers and fermenters. There aren’t many temperature controllers that will monitor more than two digital thermometers or thermocouples, so he came up with his own. It’s called TeensyNet, and it’s able to monitor and control up to 36 1-wire devices and ties everything into his home network.

Everything in this system uses the 1-Wire protocol, a bus designed by Dallas Semiconductor that can connect devices with only two wires; data and ground. (To be a fly on the wall during that marketing meeting…) [jimmay] is using temperature sensors, digital switches, thermocouples, and even a graphic LCD with his 1-wire system, with everything controlled by a Teensy 3.1 and Ethernet module to push everything up to his network.

With everything connected to the network, [jimmay] can get on his personal TeensyNet webpage and check out the status of all the devices connected to any of his network controllers. This is something the engineers at Dallas probably never dreamed of, and it’s an interesting look at what the future of Home Automation will be, if not for a network connected relay.

This Analog Cambot Plays Outside The Lines

There are quite a few flavors of line following robot. No matter how they’re made, most are built for speed and accuracy. The Cambot by [Jorge Fernandez] however makes use of a traditional video camera to read visual input instead of the reflective sensors we’re used to seeing in these types of robots. Because of this it lacks those swift and agile qualities, but scores points with its unique analog design, over-sized tricycle wheels, and stylish RCA jacks poking out on the side.

Coupled with a PIC 16F84A microcontroller, [Fernandez] divides the video input from the camera into 625 lines. The PIC is responsible for scanning horizontally across these lines and translating the proportions of black and white into PWM pulses. The duration these proportions are seen by the camera determines the PWM frequency fed to the left and right servo motors driving the robot.

As far as line-followers go, this is a refreshing retro approach to the concept. [Hernandez] outlines the finesse about driving his cambot on his blog (an English translation can be read here) and provides a complete schematic for those who are interested in whipping up their own quirky little machine.

Continue reading “This Analog Cambot Plays Outside The Lines”