HotWheels

DIY Hot Wheels Drag Race Timer

[Apachexmd] wanted to do something fun for his three-year-old son’s birthday party. Knowing how cool race cars are, he opted to build his own Hot Wheels drag race timer. He didn’t take the easy way out either. He put both his electronics and 3D printing skills to the test with this project.

The system has two main components. First, there’s the starting gate. The cars all have to leave the gate at the same time for a fair race, so [Apachexmd] needed a way to make this electronically controlled. His solution was to use a servo connected to a hinge. The hinge has four machine screws, one for each car. When the servo is rotated in one direction, the hinge pushes the screws out through holes in the track. This keeps the cars from moving on the downward slope. When the start button is pressed, the screws are pulled back and the cars are free to let gravity take over.

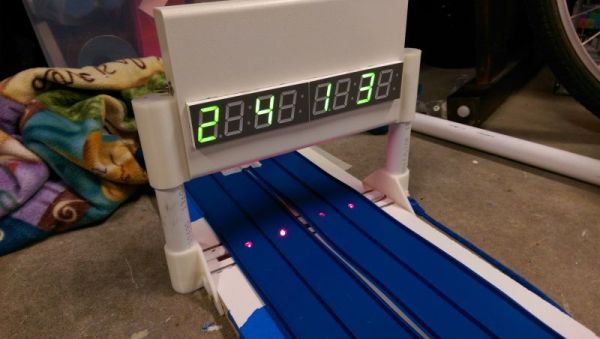
The second component is the finish line. Underneath the track are four laser diodes. These shine upwards through holes drilled into the track. Four phototransistors are mounted up above. These act as sensors to detect when the laser beam is broken by a car. It works similarly to a laser trip wire alarm system. The sensors are aimed downwards and covered in black tape to block out extra light noise.

Also above the track are eight 7-segment displays; two for each car. The system is able to keep track of the order in which the cars cross the finish line. When the race ends, it displays which place each car came in above the corresponding track. The system also keeps track of the winning car’s time in seconds and displays this on the display as well.

The system runs on an Arduino and is built almost exclusively out of custom designed 3D printed components. Since all of the components are designed to fit perfectly, the end result is a very slick race timer. Maybe next [Apachexmd] can add in a radar gun to clock top speed. Check out the video below to see it in action. Continue reading “DIY Hot Wheels Drag Race Timer”

Arduino Calculator

High Cost Arduino Calculator Is Unwieldy, Still Cool Though

One of [Kale_3D]’s teachers had made an Arduino-powered calculator. It wasn’t robust and didn’t last too long in the classroom environment. After the non-functional calculator sat around the class for a while, [Kale_3D] decided he would give a shot at repairing it. Along the way the project didn’t just get repaired, it got a full rebuild.

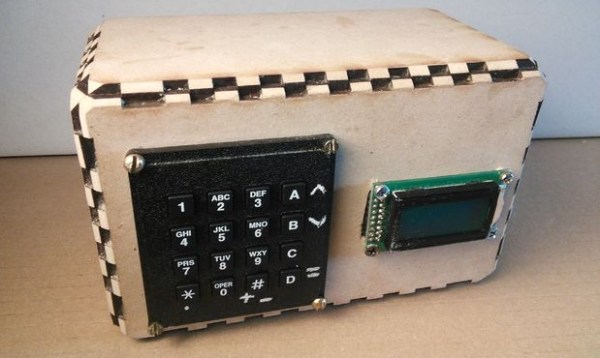
This calculator uses a full 16 button matrix keypad. The Arduino deciphers button pushes with the help of the Keypad library, at which time the appropriate character is displayed on the 2×8 LCD screen. Selecting the function is a little different from normal since this project is limited to 16 buttons. Two of the buttons allow scrolling through not only standard arithmetic functions but trigonometric functions also. This was one of the features that the previous version was not capable of.

To protect the components, an enclosure was made out of 1/4″ laser cut wood. The pieces have notched edges to permit a nice fit. Even so, corner blocks were added to give the case even more rigidity.

Yes, this calculator is not practical, but that’s not the point. In the end [Kale_3D] felt that the project was definitely worth doing. He had learned a bunch of stuff about Arduino and especially code debugging! Most important of all he had a good time building it. There’s a video after the break showing how it works. The code and wiring diagrams are available for download on the project’s Instructable page.

Continue reading “High Cost Arduino Calculator Is Unwieldy, Still Cool Though”

A Cute Little 3D Printed Skateboard

[Julian] has been wanting a tiny little skateboard for a while now, and decided to make something useful on his 3D printer. A little more than twenty hours later a tiny and cute printed skateboard popped out.

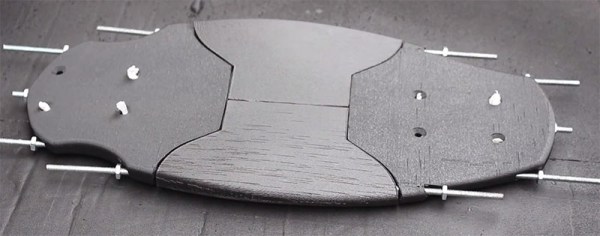
[Julian] got the files for his 3D printed skateboard from Thingiverse and printed them off on a MakerGear M2. The parts printed easily, each part taking about six hours to print. The parts are bolted together with five threaded rods, the trucks were screwed on, and the wheels popped into place.

While a normal skateboard probably wouldn’t stand up to the 3D printed parts and threaded rod construction, this Pennyboard is tiny, and most of [Julian]’s weight is right over the trucks at all times. This is also not a board that’s going to see a lot of tricks; it’s basically a micro longboard for moving from one place to another, not something you’ll need to find an abandoned in-ground pool to use properly.

You can check out the video below.

Continue reading “A Cute Little 3D Printed Skateboard”

Cracking Litter Box DRM

DRM on a specific brand of cat litter box has been cracked. In other news, DRM on cat litter boxes exists.

[Jorge] moved into a new apartment with a feline companion and wanted one of those fancy, auto-cleaning litter boxes. Apparently only one such device exists, the CatGenie. This ‘Rolls Royce of cat litter boxes’ uses little pieces of plastic granules as ‘functional medium’ that are scooped up, cleaned, and returned to use. These granules are washed with a cartridge full of fresh-smelling cleaning solution that comes in a container with an RFID tag. Yep, DRM’ed cat boxes. Welcome to the future.

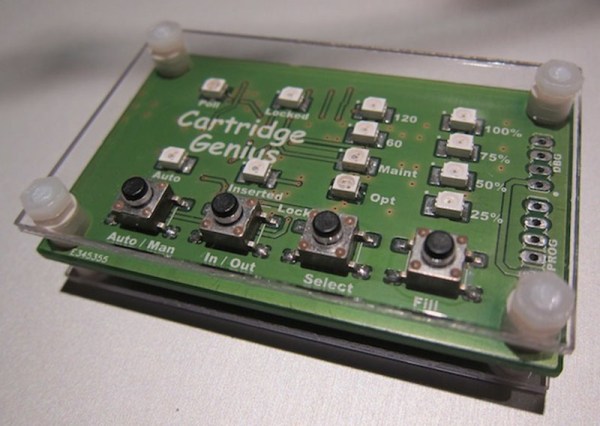
After cruising around the Internet, [Jorge] found a CatGenie community that has released open source firmware for a litter box and something called a CartridgeGenius, a drop-in replacement for the cartridge tag reader in the litter box. It simulates both the RFID tag and its reader, allowing any robotic litter box owner to select between 120 cycle cartridges, 60 cycle cartridges, a maintenance cartridge, and set the fill level of those cartridges.

Previously, [Jorge] was spending about $350 a year on the solution to clean these plastic granules, so in a few months this CartridgeGenius has already paid for itself.

ARM Pro Mini

Slowly but surely, the age of 8-bit micros being the first tool anyone picks up is coming to an end, and we’re seeing more and more ARM dev boards in nifty, breadboard-friendly packages. [Zapta] thought he would throw his hat into the ring with the ARM Pro Mini, a tiny little board based on the ARM M0 microcontroller.

The ARM chip on this board is the NXP LPC11 with 64 kB of Flash, 12 kB of RAM, and just enough pins to make the whole endeavor worthwhile. The board itself is extremely simple, with just enough SMD parts to be annoying to hand solder.

All the nifty bonuses of ARM boards are available on the ARM Pro Mini, including drag and drop firmware over the USB port, support for single stepping and debugging, and the IDE is a single install with NXP Eclipse/LPCXpresso. Mbed is also supported, so it’s possible to use this board with no software installs when using the online Mbed IDE.

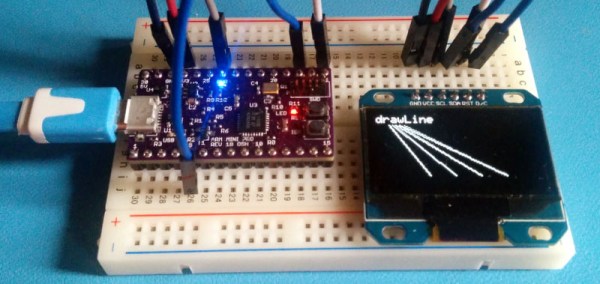
[Zapta] has put everything you need to build this board up on his Github, and has even done a few simple ‘getting started’ tutorials, including a cool little example with a graphics library and a small OLED.

Hackaday Omnibus 2014 — Our First Ever Print Edition

Here’s your chance to grab a tangible piece of Hackaday. This morning we are starting pre-orders for the Hackaday Omnibus 2014. This is our first-ever print edition. It collects some of the best original content published on Hackaday in 2014.

We’re proud of what the Hackaday crew accomplished last year. From stories of old and new to articles that encouraged you to stretch your hacking universe, we are thrilled with the original content articles we saw published last year. To go along with this top-tier content, we added amazing art and illustrations from [Joe Kim]. The product is something that demands commemoration in print and thus the Omnibus was born.

This full-color, 80 page, perfect binding volume is just what your coffee table has been crying out for. Of course it will look spectacular covered in solder and clipped resistor leads on the bench. And if your company is serious about hardware you need to send that message with a copy of the Omnibus in the reception area (or comically in the commode).

We are pricing the Hackaday Omnibus 2014 at $15 but we will sweeten the deal if you get in on the preorder. Use this coupon code to get $5 off: OMNIBUS2014. The coupon will work for the first 500 copies pre-ordered with an estimated shipping date of 2/9/15.

omnibus-sample-1
omnibus-sample-2
omnibus-sample-3

Wifi Antenna

Simple Directional WiFi Antenna

Back in 2007, [Stathack] rented an apartment in Thailand. This particular apartment didn’t include any Internet access. It turned out that getting a good connection would cost upwards of $100 per month, and also required a Thai identification card. Not wanting to be locked into a 12-month contract, [Stathack] decided to build himself a directional WiFi antenna to get free WiFi from a shop down the street.

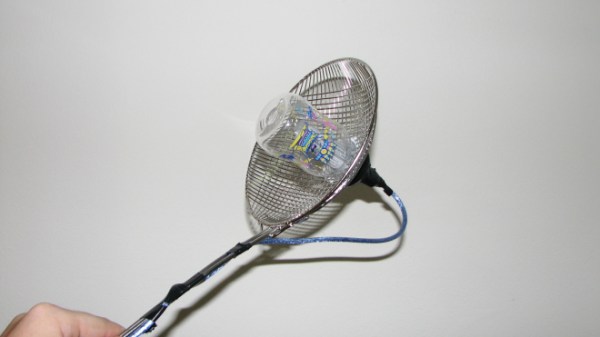
The three main components of this build are a USB WiFi dongle, a baby bottle, and a parabolic Asian mesh wire spoon. The spoon is used as a reflector. The parabolic shape means that it will reflect radio signals to a specific focal point. The goal is to get the USB dongle as close to the focal point as possible. [Stathack] did a little bit of math and used a Cartesian equation to figure out the optimal location.

Once the location was determined, [Stathack] cut a hole in the mesh just big enough for the nipple of the small baby bottle. The USB dongle is housed inside of the bottle for weatherproofing. A hole is cut in the nipple for a USB cable. Everything is held together with electrical tape as needed.

[Stathack] leaves this antenna on his balcony aiming down the street. He was glad to find that he is easily able to pick up the WiFi signal from the shop down the street. He was also surprised to see that he can pick up signals from a high-rise building over 1km away. Not bad for an antenna made from a spoon and a baby bottle; plus it looks less threatening than some of the cantenna builds we’ve seen.