WiFi Sucks For RC Vehicles, Upgrade To 3G

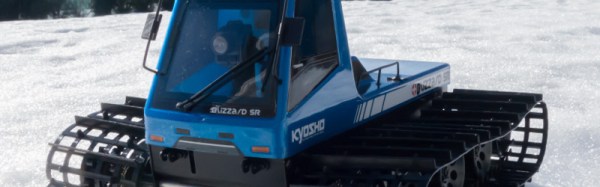
This is the Kyosho Blizzard, a tracked remote control vehicle that’s a blast to take out in the rapidly retreating snowpack. [Antibore] was interested in performance testing the range of the thing. It includes a camera that streams video back to a tablet or smartphone. Both the video and the controls use WiFi for communications. As he expected, the rover loses control signal at about fifty meters, with the video has a disappointing twenty meter limit. His workaround is to saddle the crawler with a 3G bridge. Not a bad idea that may be feasibly completed with hardware you have on hand.

In this case he grabbed a Beagleboard-XM. It runs embedded Linux and has USB ports which is perfect for the other two parts of the added hardware: a Huawei E230 3G dongle and a WiFi dongle. This means no alterations to the rover were necessary. He set up OpenVPN and performed a few other tweaks. The WiFi signal is constant, as the transmitter and receiver are both attached to the rover. We just wonder about the latency of the 3G traffic. Let’s hear your thoughts on that in the comments below.

We would be remiss if we didn’t tie-in the potential of this hack. Previously this winter we saw a Kyosho with a 3D printed snow thrower attached to the front. More snow removal power, arguably unlimited range… you can do your entire block from the comfort of the couch. To the Future!

circuit board

Internet Knows Your Every Move Thanks To IKEA And ESP8266

[terenceang] got his feet wet with the ESP8266 WiFi module by hacking up an IKEA Molgan PIR light. The stock PIR light simply lights when motion is detected. [terenceang] added some extra functionality to it by making it send notifications to his phone as well.

The default configuration of the stock PIR light was to only work at night. This is done with a photo diode. It was removed to make it work in daylight, along with several other components. He removed a handful of current limiting resistors to disable the hi output LEDs. One was preserved as a visual indicator. The onboard voltage regulator didn’t supply enough current for the ESP8266. [terenceang] used some electronic wizardry and was able to solve the problem with an opto-coupler.

The one thing he would change is moving from battery to mains power, as expected battery life is less than two weeks.Schematics, source code and tons of great pictures are available on his blog. If you want to give it a try but need a crash course check out the recent news that the Arduino IDE works with ESP8266, or give direct programming a try.

Hackaday Links Column Banner

Hackaday Links: March 29, 2015

Every once in a while, the Hackaday Overlords have a Hardware Developers Didactic Galactic in San Francisco. Last week was #06 featuring [Mike Estee] from Othermill and Hackaday writer [Joshua Vasquez] talking about synthesizing an SPI slave in an FPGA. Video here.

It’s no secret that [Fran] is building a DSKY – the part of the Apollo guidance computer that was on-screen in Apollo 13. It’s time for a project update, and here’s where she stands: if anyone has a source of JAN-spec Teledyne 420 or 422-series magnetic latching relays (they’re in a TO-5 package), contact [Fran]. The backplane connector has been identified; it’s a Teradyne I/O 100 series connector with a 120mil spacing. Contact [Fran] if you know where to get them.

Let’s say you want a carbon fiber quadcopter frame. What’s the most reasonable thing you can do? 3D print a CNC machine, obviously. That’s a 200mm FPV racer cut from 1mm and 3mm carbon fiber sheets, but the real story here is the CNC machine. It’s a PortalCyclone, and even the cable chains are 3D printed.

What does an AMOLED display look like up close? Pretty cool, actually. That’s 20x magnification, and it’s not a Bayer filter. Can anyone fill us in on the reason for that?

Laser cutters are tricky if you want to do grayscale or half tones. [oni305] made an Inkscape extension to generate better GCode for engraving with a laser cutter.

19″ racks have no dimensions that are actually 19″. Also 2x4s aren’t 2 inches by four inches. Somehow, a 2×4 server rack works.

Measuring Alcohol Content With Time Of Flight Sensors

[Chris] is a homebrewer – the tasty kind – and wanted a way to track the rate of specific gravity against temperature. Tracking temperature is easy, all you need is a 1-wire temperature probe hooked up to the microcontroller of your choice. Logging the rate of fermentation isn’t as simple, but with a time of flight sensor, a hydrometer, and some pool toys, [Chris] kludged something together that works reasonably well.

Specific gravity, and thus fermentation, has been measured for centuries with hydrometers. Not wanting to complicate matters with electronic sensors, [Chris] built a floating cage for his hydrometer out of a clear tube, a kick board, and a few bits of styrofoam. By placing a Sparkfun time of flight sensor at the top of the tube, and lowering the hydrometer into his fermentation bucket, [Chris] can measure the height of the hydrometer above the level of the liquid in his fermentation bucket.

Both the temperature and specific gravity are logged to a Raspberry Pi, and after combing through this data [Chris] can see a big ‘bump’ in the specific gravity due to a mass of foam, tapering down to the desired values after a day or so.

3D Printed Mechanical keyboard

3D Printed Mechanical Keyboard

Tired of buying boring keyboards with almost no customization available? We’ve seen lots of keyboard hacks before, but if you want to take it a step further — why not make it from scratch and have it 3D printed?

Reddit user [Wildpanic] has just finished his first attempt at a 3D printed keyboard and he’s even shared the files to make it over at Thingiverse. The frame is entirely 3D printed, but he’s chosen to use pre-manufactured key switches, which is probably for the best. They are the Cherry MX Green variety, which have these little clips in the side which make them super easy to install — especially on a 3D printed frame.

He’s wired them all using 20ga copper wire (which might be a bit overkill) to a Teensy 2.0 microcontroller. The diodes he chosen to use are 1N4148 which he was able to get fairly inexpensively. Total cost is just a bit over $50. Not bad!

Oh and in case you’re wondering, he’s chosen the style of keyboard that makes use of 4 keys for the space bar — as made popular by the planck style custom keyboards — you know, for people who love symmetry.

For more awesome keyboard hacks, check out this roundup [Adam Fabio] put together in a Hacklet last year!

[via reddit]

diy electric skateboard

Electric Skateboard Rev’ed To Version 2

What’s cooler than a sweet skateboard? A sweet electric skateboard! And the only thing cooler than that is a DIY electric skateboard. [comsa42] has proven to be a DIY electric skateboard aficionado with his new project. It’s a rebuild and upgrade from his electric longboard that has previously been featured on Hackaday.

The most noticeable change is the size of the deck, it was cut down to be 31 inches long to enhance its maneuverability. The electronics are housed in an updated fiberglass compartment that attaches to the bottom of the deck. The old compartment had a large port that had to be removed in order to charge the battery. The new compartment has a plug for easily connecting the charger.

The drive components still consist of a brushless DC motor, RC hobby ESC and a LiPo battery. Previously, an RC transmitter and receiver were used to control the motor. [comsa42] wrote an app for his phone to send throttle signals to a Bluetooth module which controls the ESC as well as relays battery life back to the phone.

We think this project is pretty rad and wouldn’t mind taking this skate for a spin around the block.

Reverse Engineering Lattice’s ICE40 FPGA Bitstream

Unlike microcontroller projects, projects involving FPGAs cannot yet claim to rely on a mature open-source toolchain. Each FPGA will, at some point, need to be configured with a proprietary bitstream produced from a closed source synthesis tool. This lack of a full FPGA toolchain to take your project from Verilog-or-VHDL to an uploadable bitstream is due to many reasons. First, writing such a “compiler” is complicated. It involves intimate knowledge of the resources available on the FPGA that can assimilate the functionality of the intended design. Second, the entire synthesis procedure is closed-source, a “secret sauce” of sorts for each FPGA vendor.

In response, [Alex] and [Clifford] have taken the first step towards an open-source toolchain for one FPGA; they’ve reverse-engineered the bitstream of Latttice Semiconductor’s iCE40 FPGA. The duo didn’t just pick the iCE40 on a whim. This choice was deliberately because that FPGA is available on a development board for a mere $22 so that others could follow in their footsteps without breaking the bank.

In the video below, [Clifford] demos the functionality of this new tool by synthesizing a design from Verilog to a bitstream and then back from a bitstream to Verilog. Given this feature, a staggering amount of work has been done towards developing a polished open-source toolchain for this particular FGPA.

To snag a copy of the latest code, have a look at its documentation page.

Continue reading “Reverse Engineering Lattice’s ICE40 FPGA Bitstream”