rf detector circuit

Using An LED As A Simple RF Detector

When [b.kainka] set out to make the world’s simplest RF detector, he probably didn’t realize it would be as easy as it was. Consisting of only a handful of components and thirty eight lines of code, he was able to make an RF detector that works reasonably well.

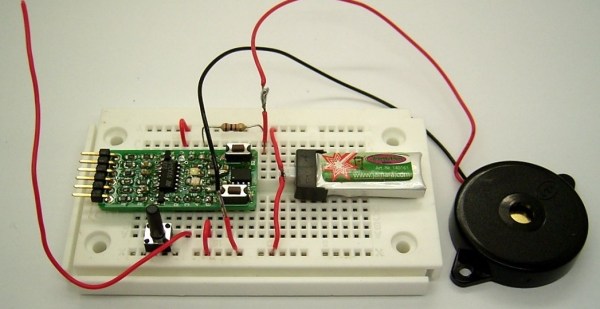
The microcontroller running the code is an ATtiny13 on a Sparrow board. He’s using an everyday LED as a detector diode and an internal pull-up resistor in the ATtiny13 for the bias voltage. The antenna runs off the LED’s anode. To make it sensitive enough, he switches on the pull-up resistor for a tiny fraction of time. Because an LED can act like a small capacitor, this charges it to a few volts. He then switches the pullup off, and the voltage across the LED will start to discharge. If there is an RF signal present, the discharge voltage will be less than the discharge voltage with no signal present.  Neat stuff.

Be sure to check out his Hackaday.io page linked at the top for full source, schematics and some videos demonstrating his project.

Continue reading “Using An LED As A Simple RF Detector”

Senior Design Project Serves Infinite Drinks

If you’re creative, you can make your passion projects count for college credit. Somehow [InfinityTable] managed to use this infinity bartender build called BarT as a senior design project.

There’s a lot going on here, starting with the cabinet which is 30″x30″ and has some custom mirrored glass necessary because of a square cut-out in the middle of the front pane. The two mirrors face each other, with a strip of LEDs in between which accounts for the “infinity” part of the build. This is popular but usually it’s usually just the mirror and lights. In this case that special cut-out is a cubby for a glass. Place it in there and the rest of the build will mix you up a tasty beverage.

There is a second chamber in the enclosure behind the rear mirror. This houses the components that mix up the drinks. Raw materials are dispensed from 1.25L plastic bottles. The extra special part of the build is that since it is a senior project, all the driving circuitry uses roll-your-own boards.

Continue reading “Senior Design Project Serves Infinite Drinks”

A Deadbugged GPS/GLONASS/Geiger Counter

So you think you’re pretty good at soldering really tiny parts onto a PCB? You’re probably not as good as [Shibata] who made a GPS/GLONASS and Geiger counter mashup deadbug-style with tiny 0402-sized parts.

The device uses an extremely small GPS/GLONASS receiver, an AVR ATxmega128D3 microcontroller, a standard Nokia phone display and an interesting Geiger tube with a mica window to track its location and the current level of radiation. The idea behind this project isn’t really that remarkable; the astonishing thing is the way this project is put together. It’s held together with either skill or prayer, with tiny bits of magnet wire replacing what would normally be PCB traces, and individual components making up the entire circuit.

While there isn’t much detail on what’s actually going on in this mess of solder, hot glue, and wire, the circuit is certainly interesting. Somehow, [Shibata] is generating the high voltage for the Geiger tube and has come up with a really great way of displaying all the relevant information on the display. It’s a great project that approaches masterpiece territory with some crazy soldering skills.

Thanks [Danny] for sending this one in.

Continue reading “A Deadbugged GPS/GLONASS/Geiger Counter”

Dust Separator

DIY Dust Cyclone A Traffic Cop Would Be Proud Of

Sure, having a wood shop is super handy but it also can get real dusty. Hooking up a shop vac to suck up dust coming off a wood-cutting machine works for all of 3 minutes before the vacuum’s filter gets clogged with dust. There is a solution, though, and it is called a dust separator.

A dust separator does just as its name suggests, it separates dust from air. There is a common type of dust separator made in the DIY community, it has a cone-shaped body and is generally referred to as a cyclone-style. [Dror] built his own cyclonic dust collector out of an odd object… a traffic cone. Looking at it now, we wonder why this isn’t much more common!

The dusty air enters the PVC pipe and ends up spinning around the inside of the cone. Since the dust particles have mass, they are thrown to the outside of this chamber as they spin. They lose speed and drop down into the 5 gallon bucket below. The dust-free air then outlets through the top of the dust separator which is connected to a shop vac.

You’ll notice that [Dror] decided to use threaded rod to hold his separator pieces together. While this may seem like overkill, he had tried several glues and could not get any to stick to the traffic cone!

If you’d like to get in on the dust separator action but don’t have a traffic cone, they can also be 3D printed or made from metal.

The Ultimate Tool For Homebrew PCB Manufacturing

While OSHPark, Seeed Studio, and DirtyPCB have taken most of the fun and urgency out of making your own circuit boards at home, there are still a few niche cases and weird people who like to go it alone. For them, [Jarzębski] has created the ultimate homebrew PCB manufacturing solution (.pl, here’s the Google translatrix).

[Jarzębski] is using UV-sensitive photomasks for his PCBs, but he’s not doing something simple like a blacklight to develop his boards. He’s using a 30 Watt UV LED for exposing his boards. This, of course, generates a lot of heat and to mitigate that he’s added a Peltier cooler, temperature sensor, and a fan to cool off this retina-burning LED. 30 Watts will get the job done, considering [Jarzębski] was using a quartet of 4.5W LEDs before this build.

Developing a PCB is only one part of the equation; you need to etch it, too. For this, [Jarzębski] is using a small 1.6 Liter aquarium and four aquarium heaters for dunking 120mm x 120mm PCBs in the tank. There’s no mention of what chemistry [Jarzębski] is using – ferric chloride, cupric chloride, or otherwise – but the heaters and aerator should make etching go very smoothly.

There’s a video (English) going over the rest of the project below.

Continue reading “The Ultimate Tool For Homebrew PCB Manufacturing”

The Digistump Oak; An ESP8266 On Kickstarter

When it was first released, the ESP8266 was a marvel; a complete WiFi solution for any project that cost about $5. A few weeks later, and people were hard at work putting code on the tiny little microcontroller in the ESP8266 and it was clear that this module would be the future of WiFi-enabled Things for the Internet.

Now it’s a Kickstarter Project. It’s called the Digistump Oak, and it’s exactly what anyone following the ESP8266 development scene would expect: WiFi, a few GPIOs, and cheap – just $13 for a shipped, fully functional dev board.

The guy behind the Oak, [Erik Kettenburg], has seen a lot of success with his crowdfunded dev boards. He created the Digispark, a tiny, USB-enabled development board that’s hardly larger than a USB plug itself. The Digispark Pro followed, getting even more extremely small AVR dev boards out in the wild.

The Digistump Oak moves away from the AVR platform and puts everything on an ESP8266. Actually, this isn’t exactly the ESP8266 you can buy from hundreds of unnamed Chinese retailers; while it still uses the ESP8266 chip, there’s a larger SPI Flash, and the Oak is FCC certified.

Yes, if you’re thinking about building a product with the ESP8266, you’ll want to watch [Erik]’s campaign closely. He’s doing the legwork to repackage the ESP into something the FCC can certify. Until someone else does it, it’s a license to print money.

The FCC-certified ESP8266 derived module, cleverly called the Acorn, will be available in large quantities, packaged in JEDEC trays sometime after the campaign is finished. It’s an interesting board, and we’re sure more than one teardown of the Acorn will hit YouTube when these things start shipping.

Brewdoo Helps Keep The Office Coffee Fresh

Until about lunch time, the coffee goes pretty fast in our office. Only a few of us drink it well into the afternoon, though, and it’s anyone’s guess how long the coffee’s been sitting around when we need a 4:00 pick-me-up. It would be great to install a coffee timer like [Paul]’s Brewdoo to keep track of these things.

The Brewdoo’s clean and simple design makes it easy for anyone in the office to use. [Paul]’s office has two carafes, so there’s a button, an RGB LED, and a line on the LCD for each. Once a pot is brewed, push the corresponding button and the timer is reset. The RGB LED starts at green, but turns yellow and eventually red over the course of an hour. Brewdoo has a failsafe in place, too: if a timer hasn’t been reset for four hours, its LED turns off and the LCD shows a question mark.

[Paul] knew he couldn’t touch the existing system since his company leases the equipment, so the Brewdoo lives in an enclosure that [Paul] CNC’d with custom g-code and affixed to the brewing machine with hard drive magnets. Although [Paul] designed it with an Arduino Uno for easy testing and code modification, the Brewdoo has a custom PCB with a ‘328P. The code, Fritzing diagram and Eagle files are up at [Paul]’s GitHub.