Hackaday Prize Entry: Useful Code For Useful Things

The Hackaday Prize isn’t exclusively about building things that will help the planet; you can also build things that will enable others to build things to save the planet. [Eric] isn’t saving the world with his commonCode library, but it will make it vastly easier for other people to build the next great Thing.

The idea behind commonCode is the same as shared libraries you’ll find in any desktop application of reasonable size; it provides a common library for AVR microcontrollers to build just about anything. Bit manipulation, an interface for timers, math functions, graphics, I/O, and peripheral drivers are all available in the commonCode library. This makes it easy for the developmentally challenged among us to create whatever project they want.

The commonCode library wasn’t created just for The Hackaday Prize. [Eric] has been tinkering around with AVRs since well before the Arduino existed, and he has dozens of projects in permanent installations. It’s a great way to give back to the community, and the perfect way to allow people to develop their own things to solve whatever problem they have in mind.


The 2015 Hackaday Prize is sponsored by:

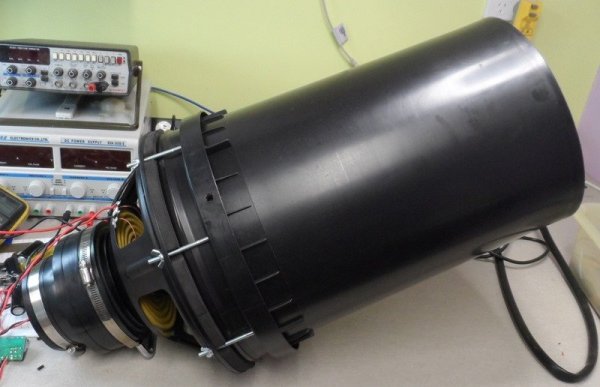
Subwoofer Vortex Cannon: 300V Of “Thwup!”

Need a cool toy for your kids? How about something with a bunch of fun fluid dynamics and a tinge of higher-than-average-voltage danger? Did we mention the subwoofer and bank of high-voltage capacitors? Have we got the project for you: [Robert Hart]’s vortex cannon design.

We’ve seen vortex cannons before, where you usually fix a balloon to the back of a trash can. Pull on the balloon membrane and then let it go with a snap, and it sends out a swirling donut of high-pressure air that travels surprisingly far. It’s like smoke rings, but amped up a bit.

[Robert]’s addition is to bolt on a high-power subwoofer in place of the balloon’s rubber membrane, and generate the air pulse by dumping a capacitor bank into the speaker.

6699171432446530681The circuit design is a bit more clever than we thought at first. The bottom half is a voltage inverter followed by a diode bridge rectifier that essentially makes 320V DC (peak) out of 12V, and stores this in four fairly large capacitors. A pushbutton activates a relay that dumps the capacitors through the speaker.

On top of the circuit is a -12V voltage inverter. Just before firing, the speaker is pulled back a little bit by applying this -12V to the speaker, and then the relay is triggered and the capacitors dump, shooting the speaker cone forward.

6973681433156869012[Robert] is still developing and testing the device out, so if you’re curious or just want to say hi, head on over to Hackaday.io and do so! Be sure to check out his videos. The smoke tests are starting to look good, and we love the control box and high-voltage warning stickers.

Hacking The IM-ME To Open Garages

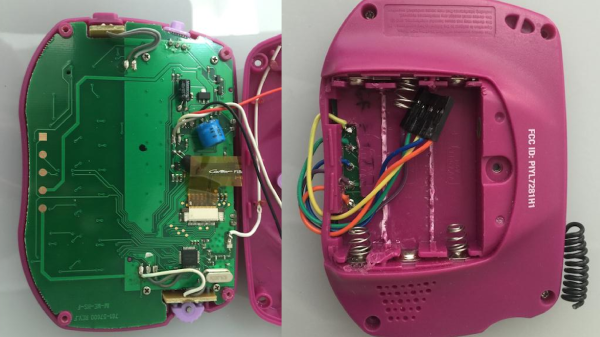
If you have a wireless controlled garage door, a child’s toy can wirelessly open it in a few seconds. [Samy Kamkar] is a security researcher who likes to”think bad, do good”. He’s built OpenSesame, a device that can wirelessly open virtually any fixed-code garage door in seconds, exploiting a new attack he’s discovered in wireless fixed-pin devices, using the Mattel IM-ME toy.

The exploit works only on a gate or garage which uses “fixed codes”. To prevent this type of attack, all you need to do is to upgrade to a system which uses rolling codes, hopping codes, Security+ or Intellicode. These are not foolproof from attack, but do prevent the OpenSesame attack along with other traditional brute forcing attacks. It seems there are at least a couple of vendors who still have such vulnerable products, as well as several more whose older versions are affected too.

Before you read further, a caveat – the code released by [Samy] is intentionally bricked to prevent it from being abused. It might work, but just not quite. If you are an expert in RF and microcontrollers, you could fix it, but then you wouldn’t need his help in the first place, would you?

The IM-ME is a defunct toy and Mattel no longer produces it, but it can be snagged from Amazon or eBay if you’re lucky. The Radica Girltech IM-ME texting toy has been extensively hacked and documented. Not surprising, since it sports a TI CC1110 sub-GHz RF chip, an LCD display, keyboard, backlight, and more.  A good start point is the GoodFET open-source JTAG adapter, followed by the work of [Travis Godspeed] , [Dave] and [Michael Ossmann].

One issue with fixed code systems is their limited key space. For example, a remote with 12 binary dip switches supports 12 bits of possible combinations. Since its binary and 12 bits long, that’s 2^12, which is 4096 possible combinations. With a bit of math, [Samy] shows that it takes 29 minutes to open an (8-12)-bit garage, assuming you know the frequency and baud rate, both of which are pretty common. If you have to attempt a few different frequencies and baud rates, then the time it takes is a multiple of 29 minutes. If you don’t transmit the codes multiple times, and remove the pauses in between codes, the whole exercise can be completed in 3 minutes.

The weak link in the hardware is how the shift registers which decode the received codes work. Each bit is loaded in the register sequentially, gradually moving as additional bits come in and push the previous ones. This, and using an algorithm [Samy] wrote based on the De Bruijn sequence, the whole brute force attack can be completed in just over 8 seconds. OpenSesame implements this algorithm to produce every possible overlapping sequence of 8-12 bits in the least amount of time.

You can take a look at understanding how the code works by checking it out on Github. [Samy] loves doing such investigative work – check out his combo lock code breaker we featured recently, the scary, keyboard sniffing wall wart and the SkyJack – a drone to hack all drones.

Continue reading “Hacking The IM-ME To Open Garages”

Hard Drive Rootkit Is Frighteningly Persistent

There are a lot of malware programs in the wild today, but luckily we have methods of detecting and removing them. Antivirus is an old standby, and if that fails you can always just reformat the hard drive and wipe it clean. That is unless the malware installs itself in your hard drive firmware. [MalwareTech] has written his own frightening proof of concept malware that does exactly this.

The core firmware rootkit needs to be very small in order to fit in the limited memory space on the hard drive’s memory chips. It’s only a few KB in size, but that doesn’t stop it from packing a punch. The rootkit can intercept any IO to and from the disk or the disk’s firmware. It uses this to its advantage by modifying data being sent back to the host computer. When the computer requests data from a sector on the disk, that data is first loaded into the disk’s cache. The firmware can modify the data sitting in the cache before notifying the host computer that the data is ready. This allows the firmware to trick the host system into executing arbitrary code.

[MalwareTech] uses this ability to load his own custom Windows XP bootkit called TinyXPB. All of this software is small enough to fit on the hard drive’s firmware. This means that traditional antivirus cannot detect its presence. If the owner of the system does get suspicious and completely reformats the hard drive, the malware will remain unharmed. The owner cannot even re-flash the firmware using traditional methods since the rootkit can detect this and save itself. The only way to properly re-flash the firmware would be to use an SPI programmer, which would be too technical for most users.

There are many more features and details to this project. If you are interested in malware, the PDF presentation is certainly worth a read. It goes much more in-depth into how the malware actually works and includes more details about how [MalwareTech] was able to actually reverse engineer the original firmware. If you’re worried about this malicious firmware getting out into the wild, [MalwareTech] assures us that he does not intend to release the actual code to the public.

“Giger Counter” Makes Radiation Detection Surreal

Here’s a quick question: are Geiger and Giger (as in H.R. Giger, designer of the Alien Xenomorph) pronounced the same? The answer is no. Nevertheless, the late artist has had his name mispronounced (for the record, it’s ghee-gur) by many over the years. [Steve DeGroof’s] friend posted a goofy tweet that gave him the inspiration to finally put a skeletal lid on the matter, the Giger Counter.

The innards are a Mightyohm Geiger Counter Kit. The external casing is where the true hack lies in this project, made from a 1:2 scale plastic skeleton model, flexible conduit, and dark metallic spray paint. Only the ribcage, some vertebrae, and part of the skull are used from the model. They are assembled in a delightfully inhuman fashion with some conduit wrapped around it and into the bottom of the ribcage for good measure. After some gluing and spray painting, the LED from the Geiger Counter kit is placed through a drilled hole in the skull while the board sits inside the ribcage. Getting the board in and out can be a little tricky, but it looks like the batteries can be changed without having to pull the whole board out.

Check out the video below to see the Giger Counter. If you want another hack inspired by H.R. Giger’s artistic vision, take a look at this Xenomorph suit we covered.  Or, if you can’t get enough Geiger counters, we’ve featured plenty of cool ones on this site.

Continue reading ““Giger Counter” Makes Radiation Detection Surreal”

A Mountain Of Prizes For Projects Using These Parts

Here’s your chance to bring some great stuff home from The Hackaday Prize. For the next 3 weeks we’ll be looking for the best entries using Atmel, Freescale, Microchip, and Texas Instruments parts.

Each of the four contests (yes, four running concurrently) will award the top 50 projects. That’s 200 in total being recognized. The odds are really in your favor — currently some of those lists have less than 50 projects on them — so enter yours right away! Scroll down to see the mountain of prizes that we have for this epic run.

Make Sure We Know About Your Entry

There are two things you need to do to be eligible for this pile of awesome stuff:

  1. Enter your project in the 2015 Hackaday Prize
  2. Leave a comment here with a link to your project and we’ll add it to the list

Do this by the morning of Monday, June 29th to make sure you’re in the running. We’ve been diligent about adding entries to the lists for Atmel, Freescale, Microchip, and Texas Instruments but at the rate new entries have been coming in it’s easy to miss one here or there. Don’t be bashful about asking to be added to these lists!

The prerequisite is to be using a part from one of these four manufacturers. We’ll be looking at these lists for projects using great ideas which have also been well-documented. Tells us why you’re building it, what it does, how you came up with the idea… you know, the whole story!

The Loot

Up for grabs in each of the 4 contests are:

3x Mooshimeters which is a multimeter that uses your smartphone as a wireless readout.

2x DS Logic analyzers which [Adam] reviewed a few weeks back.

15x Stickvise to hold your PCBs (and other things) in place while you work

A continuation of what we’re giving away in each of the 4 contests:

10x Bluefruit LE Sniffers to help you figure out what’s being transmitted by your BTLE devices

10x Cordwood Puzzles; grab your iron and tackle this head-scratching soldering challenge

10x TV-B-Gone is an iconic invention from [Mitch Altman]; one button turns off all TVs


The 2015 Hackaday Prize is sponsored by:

lego 3d printer

Lego Printer Prints Lego

[Gosse Adema] made his very first instructable by detailing his Lego 3D printer build. It’s Prusa i3 based, and originally started out as an A4 plotter with repurposed steppers out of an old HP printer. After upgrading to some NEMA 17 steppers, it became a full-blown 3D printer.

It turns out that NEMA 17 stepper mounting holes align perfectly with Lego, making it super easy to mount them. Check out this Lego ‘datasheet’ for some great details on measurements.

The brains of the printer are occupied by Marlin running atop a Atmega 2560, and Pronterface for the PC software. He tops it off with a Geeeteck built MK8 extruder boasting a 0.3 mm nozzle that accepts 1.75 mm filament.

As with almost any DIY 3D printer build, his first prints didn’t turn out so well. After adjusting the nozzle and filament size in the software, he started to get some good results. Be sure to check out the video below to see this Lego 3D printer in action.

Continue reading “Lego Printer Prints Lego”