The Thrill Of Shenzhen — Candyland For Electronics Geeks

Just getting to Shenzhen is an adventure for a different post, but the Hackaday crew made it and spent our first full day in the city last Thursday.

Unlike Wednesday’s experience in Hong Kong, most people you run into do not speak English and the signs generally don’t have English words on them. This makes getting around hard in that it’s difficult to figure out where it is you’re going. It’s equally tough to convey the destination to a taxi driver or translate it into public transportation. I was able to get to the Software Industrial Base via taxi because I had saved the Chinese character address on my phone and showed it to the cab driver. But when the trip ended I had trouble figuring out how much to pay… the meter reads 10 Yuan but there is an additional charge of a few Yuan which I only realized in retrospect. But my driver was very nice about this and helped me with change and a smile.

Visiting Seeed Studio

You might think finding the correct building would be simple. But the Shenzhen Industrial Software Base is a huge complex of similar buildings. A friendly security guard looked at my saved address and used the squares in the sidewalk as a map to non-verbally get me headed the right way. Seeed Studio, our hosts for SZMF, have a beautiful new office which is industrial-modern in its decor. There are glass-walled conference rooms but the majority of the space is open in design as it wraps around the exterior of half a floor in the six or seven story building.

Hitting the Markets

After doing some planning for the Hackaday workshop the next day, [Chris] from Seeed offered to take us to the electronics markets. How do you pass up that offer? We first stopped off at a Korean restaurant for lunch, then hopped a slightly-crowded cab to meet [Matt] and [Alek] who were already at the market.

The Huaqiangbei markets are multi-story buildings filled with booths. We first went into the wrong one, which turned out to be the used equipment building. Vendors specialize in refurbishing electronics. There were floors and floors of booths filled with equipment — often three tiers or more of laptop computers (open and running) wrapping each booth which were about the footprint of a king-sized bed.

IMG_20150619_184322523Back on track we made it to a brand new building which was seemingly built already completely packed with booths. The place has everything, generally divided up by floor. The top two floors are mostly LEDs of every kind, or drivers for them. We were on the hunt for addressable LEDs, but there didn’t seem to be any legendary bargains available. This may have been an issue of volume because I later heard from a friend that he acquired 25-meters of 12V WS2812 strips for a song.

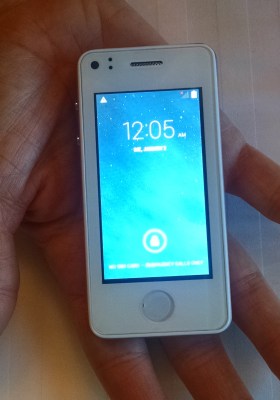
Next it was the hunt for the “baby phone”. This is an Android phone built to look like a miniature iPhone. They’re cute. The blocks, and blocks, and blocks of walking, backtracking, running into acquaintances who joined the hunt, and finally ascending shady stairs and dingy aisles did pay off. Ta-da, [Sophi’s] new phone!

We hopped the subway to get back from the markets. I love trying out public transportation in different cities and this didn’t disappoint. The stations are so clean, and after 85 degrees F and 80 percent humidity all day the air conditioning is heavenly.

Awesome Subways

Shenzhen-Subway-Token-cropped
Image Source: WhereAmI.org (also an interesting Shenzhen read)

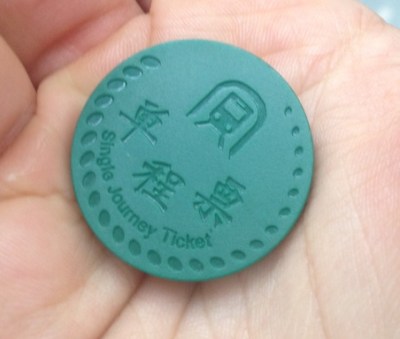
You purchase a token which is a green plastic disc about the size of two american quarters stacked on top of one another. Very light weight and very tech-oriented. Each is an RFID (or some other non-contact) tag. Tap it on your way in, drop it in the slot on your way out. Midway during our return trip we realized we were changing the location for Hackaday’s Saturday Shenzhen Meetup. We got off the train, rode the other way, switched lines, and popped out in a beautiful part of Shenzhen. Everything in this city seems to be new and under construction. NYPD Pizza is in the middle of a very partially completed complex but has the hip, trendy, divebar-neveau that made for an awesome meetup. Check back on that yarn which deserves it’s own post.

A bit exhausted, we made it back to the hotel for a bit of dinner and relaxation. But who could pass up the opportunity to head to an outdoor BBQ party marking the end of Hacker Camp? This creation, started by Hackaday Alumni and Dangerous Prototypes founder [Ian Lesnet], invites engineers and hardware creators to come tour Shenzhen and pick up as much manufacturing knowledge as possible in between epic evenings of socializing.

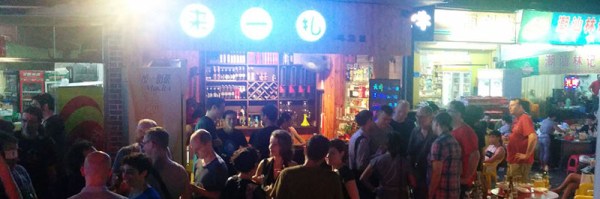
Dripping wet BBQ Party

Again, figuring out where to go is really hard! We jumped on the subway and made it to the correct stop, but getting to the BBQ alley in what feels like a residential neighborhood required a aimless wandering, and bumping into two different people who had already been to the party.

The atmosphere was sticky and blazing hot. Everyone was dripping with sweat and drinking a very large beverage. Check out this hi-res album for the proof. There were a few restaurants, an open-air bar, and a bodega with bombers of Tsingtao for under a buck (USD). To me it seemed to be a dead end street, but every few minutes a honking motorbike was waddled through the shoulder-to-shoulder crush of sweaty bodies. Hardened ex-pats and locals drank beer from glasses, but the foreign visitors seemed to stick with bottles.

This definitely registered as one of the most exciting days of my life. I love the adventure. The city feels safe and friendly — but travel (especially at night) adds a thrill.

New Round Of Astronaut Or Not: Most Likely To Save The Planet

Last Friday we closed the first round of Astronaut or Astronot, the first round of community voting for the Hackaday Prize. We tried to give away a $1000 gift card for the Hackaday Store to a random person on Hackaday.io if they have voted. The random person selected didn’t vote, but we did manage to give away some t-shirts to people who did vote.

Now that we’re well into the second round of community voting, and it’s time to select the community choice for the project Most Likely to Save The Planet. DO THAT HERE.

With that said, here are the projects voted by the hackaday.io community that are the Most Likely To Be Widely Used:

CommunityVoting1

The projects voted Most Likely To Be Widely Used by the hackaday.io community are, in order:

Congratulations everyone who was voted to the top. These projects will be getting a fancy Hackaday Prize t-shirt that even I don’t have.

Round Two: Most Likely To Save The Planet

Right now we’re in the middle of the second round of voting. The theme is “Most Likely To Save The Planet”. How do you pick which projects you think are most likely to save the planet? Head on over to the voting page and pick some projects.

Next Friday, around 22:00 UTC, I’m going to go through the voting database and pick a random person on hackaday.io. If that person has voted in the current round of voting, they get a $1000 gift card for the Hackaday store. Your votes from the last round do not carry over. If you want a chance at winning the gift card, you need to vote this week.

At this stage in the community voting during last year’s Hackaday Prize, I calculated the cumulative probability of giving away a big prize to someone on Hackaday.io who voted. The result was about 0.70. We ended up giving away an oscilloscope, a Bukito 3D printer, an awesome power supply, and a goodie bag filled with programmers, bench tools, and dev boards. That’s four winners, when I originally guessed we would have had – maybe – one winner. We’re going to give away a gift card for the Hackaday Prize eventually, the only question is if you’re going to vote or not. Vote now.

If you are incapable of understanding how this works, here’s a video tutorial on how to vote. Vote now, and good luck to everyone who has a project up in the Hackaday Prize.


The 2015 Hackaday Prize is sponsored by:

Wireless Weather Station

High schooler [Vlad] spent about a year building up his battery-operated, wireless weather station. Along the way, not only has he learnt a lot and picked up useful skills, but also managed to blog his progress.

The station measures temperature, humidity, pressure and battery voltage, and he plans to add sensors for wind speed, wind direction and rainfall soon. It is powered via a solar panel and can run on a charged battery for a full month. The sensor module transmits data to a remote receiver connected to a computer from where it is published to the internet. Barometric pressure is measured using the BMP180 and the DHT22 provides temperature and humidity values. The link between the transmit and receive sections uses a 433MHz Superhetrodyne RF Kit which gives [Vlad] a range of 50m. There’s an ATMega328 on the transmitter and receiver side. He’s taking measurements once every 12 minutes, and putting the micro controller in low power mode using the Rocket Scream Low Power Library. A 5W, 12V solar panel charges the 6V Lead Acid battery via a LM317 based charge circuit. This ensures the battery gets charged even when the solar panel is not receiving optimal radiation. One hour of sunlight provides enough charge to keep it going for 2 days. And a fully charged battery will keep it running for a full month even when there’s no sunlight.

The server software consists of two parts. The first pushes serial data to a mySQL database. This is written in Visual Studio C# using help from Oracle mySQL connector. The second part publishes the entries in the mySQL database to the web server. This is written in php, and uses  Libchart for graphing. He’s got the code, schematics, parts list and a lot of other information available for download on his blog. There’s a couple of items pending on his to-do list, so if you have any tips to offer post your comments below.

Temperature Logger

Logging Engine Temperature For RC Models

[Rui] enjoys his remote-controlled helicopter hobby and he was looking for a way to better track the temperature of the helicopter’s engine. According to [Rui], engine temperature can affect the performance of the craft, as well as the longevity and durability of the engine. He ended up building his own temperature logger from scratch.

The data logger runs from a PIC 16F88 microcontroller mounted to a circuit board. The PIC reads temperature data from a LM35 temperature sensor. This device can detect temperatures up to 140 degrees Celsius. The temperature sensor is mounted to the engine using Arctic Alumina Silver paste. The paste acts as a glue, holding the sensor in place. The circuit also contains a Microchip 24LC512 EEPROM separated into four blocks. This allows [Rui] to easily make four separate data recordings. His data logger can record up to 15 minutes of data per memory block at two samples per second.

Three buttons on the circuit allow for control over the memory. One button selects which of the four memory banks are being accessed. A second button changes modes between reading, writing, and erasing. The third button actually starts or stops the reading or writing action. The board contains an RS232 port to read the data onto a computer. The circuit is powered via two AA batteries. Combined, these batteries don’t put out the full 5V required for the circuit. [Rui] included a DC-DC converter in order to boost the voltage up high enough.

Hackaday Prize Entry: An Urban Kitchen Garden

[Eric] is used to growing his own food, and looked at the commercial options for growing veggies and herbs year round. It turns out the commercial options are terrible, with proprietary lighting, proprietary ‘seed pods,’ and no climate control.

Unsatisfied with the commercial options, [Eric] looked for a DIY solution. His entry for The Hackaday Prize is just that: an Urban Kitchen Garden.

The Urban Kitchen Garden was a peltier wide cooler in its former life, turned into a grow chamber with LED grow lights, an Arduino, a DHT11 temperature and humidity sensor, a soil moisture sensor, and an old Nokia LCD to keep track of everything. He’s been growing basil in it over the winter, and it just won’t die.

[Eric] won’t be growing tomatoes or beans in his tiny, desktop-sized garden, but it’s not really designed for that. It’s meant for herbs and seedlings, mostly, with larger plants moved outside when [Eric]’s Canadian winters finally subside.

There’s a video of the build, you can check that out below.


The 2015 Hackaday Prize is sponsored by:

Continue reading “Hackaday Prize Entry: An Urban Kitchen Garden”

DIY Rotary Tool

DIY Rotary Tool

[Shashank] has a modest tool collection but is missing a rotary tool. He needed one for a project he was working on but didn’t think that it would get much use after the current project was completed. So instead of buying a rotary tool, he decided to make one to get the job done.

The project started out with a 40mm PVC pipe that would serve a the main body of the tool. Two MDF disks were cut to fit inside the pipe. One was used for mounting an RC vehicle brushless motor and the other was bored out to accept a pair of bearings. The bearings supported a modified pin vise that acts as the chuck for securing rotary tool bits. A 20-amp ESC and a servo tester control the motor’s speed and can get the motor up to 18,000 rpm.

Although this worked for a while, [Shashank] admits it did fall apart after about 20 hours of use. The MDF bearing mounts crumbled, thought to be a result of vibration due to mis-assignment between the motor and pin vise. He suggests using aluminum for the bearing mounts and a flexible coupling to connect the motor to the pin vise. If you’re interested in making your own rotary tool but don’t have any spare motors kicking around,  this 3D printed vacuum-powered rotary tool may be for you.

Hackaday Links Column Banner

Hackaday Links: Summer, 2015

[Elia] was experimenting with LNAs and RTL-SDR dongles. If you’re receiving very weak signals with one of these software defined radio dongles, you generally need an LNA to boost the signal. You can power an LNA though one of these dongles. You’ll need to remove a few diodes, and that means no ESD protection, and you might push the current consumption above the 500mA a USB port provides. It does, however, work.

We’ve seen people open up ICs with nitric acid, and look inside them with x-rays. How about a simpler approach? [steelcityelectronics] opened up a big power transistor with nothing but a file. The die is actually very small – just 1.8×1.8mm, and the emitter bond wire doesn’t even look like it’ll handle 10A.

Gigantic Connect Four. That’s what the Lansing Makers Network built for a Ann Arbor Maker Faire this year. It’s your standard Connect Four game, scaled up to eight feet tall and eight feet wide. The disks are foam insulation with magnets; an extension rod (with a magnet at the end) allows anyone to push the disks down the slots.

[Richard Sloan] of esp8266.com fame has a buddy running a Kickstarter right now. It’s a lanyard with a phone charger cable inside.

Facebook is well-known for the scientific literacy of its members. Here’s a perpetual motion machine. Comment gold here, people.

Here’s some Hackaday Prize business: We’re giving away stuff to people who use Atmel, Freescale, Microchip, and TI parts in their projects. This means we need to know you’re using these parts in your projects. Here’s how you let us know. Also, participate in the community voting rounds. Here are the video instructions on how to do that.