Setup Day At The Faire Is A Glorious Time!

The Bay Area Maker Faire starts today, but the Hackaday crew rolled in early for something new this year. Friday has traditionally been just for exhibitor setup but this year a few extra groups were on site to see everything come together. Most notably, school field trips. How awesome is it to skip the normal class schedule and hang out at the fair? Also able to get in are media and industry.

I had a great time. Watching everything get setup is often more interesting that seeing the finished display. It’s also much quieter, many fewer bodies (Saturday afternoon is usually a mad press of people) and people haven’t yet lost their voices or the fallen into the monotony of voicing the same explanation over and over again.

Above you can see a few of the friends I ran into. [Windell Oskay] is one of the 2015 Hackaday Prize Judges. He had a freshly minted copy of his new book which I first heard about when visiting Evil Mad Scientist Labs last fall. I also ran into [Kevin] who is the creator of the Arduboy. I first met him at BAMF last year and this year he makes a triumphant return with the new version of Arduboy which overshot it’s Kickstarter by an order of magnitude in just a few days. And who else should I bump into but [Brian Benchoff]. He lives in Pennsylvania and I in Wisconsin so we look forward to hanging out when Hackaday hits the road. I also said a quick hello to [Caleb Kraft] who was slinging veggie paella all evening.

[Brian], [Sophi], [Matt], [Jasmine], [Rich], and I will all be at tonight’s Hackaday Meetup. Anyone in the area won’t want to miss this one. There are a ton of awesome hackers already planning to clink glasses starting at 7pm. All you need to do to join in is RSVP.

Back to the action; I made a quick Friday first pass which still took about three hours. The setup changes just a bit each year… generally things are in the same places but of course returning exhibitors have made a year of upgrades and there’s always a lot of fresh and new on hand. I don’t remember seeing the probability machine last year. It has reservoir of marbles at the top which are being steadily dropped into the “Plinko” style peg-board showing a distribution which has a higher probability toward the center.

Here are just a few more favorites. The Kijani Grows booth has a couple of full aquaponics setups that are worth checking out. I spent some time with the Firepick Delta guys. Sand plotters are always fun and there’s a giant one in one of the booths. I may try my hand at lock picking in The OPen Organization of Lockpickers tent today. And [Louis] of SmartMatrix is launching his Kickstarter to bring fully-assembled versions to people who don’t want to solder the one available in our store.

That’s all for now, I’m off to see as much as is humanly possible. If you’re at the Faire today or tomorrow track us down for some stickers and other swag, and don’t forget tonight’s meetup that I mentioned above!


Not Just A Floor Wax But An Embossing Powder!

The embossing process used in the creation of some of your fancier wedding invitations and business cards is an interesting one. It’s often called thermography or thermographic printing. Slow-drying, wet ink is applied to a substrate. The ink is dusted with a thermoplastic polymer called embossing powder, and a heat source raises the ink while drying it.

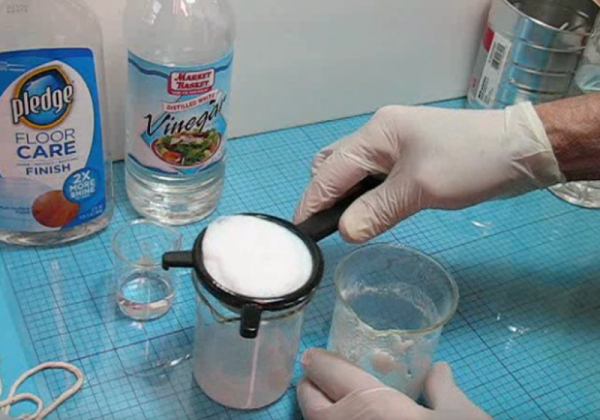
Commercial embossing powder costs about $10 an ounce. As [Ken] discovered, its manufacture is quite closed-source to boot. He set about creating his own embossing powder, and succeeded with a combination of commonly available floor finish and distilled white vinegar. A standard-sized bottle of floor finish yielded about four ounces of homemade embossing powder.

How does this work? The floor finish is an acrylic-based stable emulsion. Adding vinegar destabilizes the emulsion, decreasing its pH and setting the polymer free.  It’s a fairly fast process, which you can see in the second video that accompanies [Ken]’s write up. From there, it’s mostly a matter of straining the material, letting it dry, and pulverizing the coarse matter into powder. In the first video, [Ken] performs a comparison test of Ranger, a commercial powder, and his own concoction.

For a completely different take on home embossing, check out this soda-can-turned-keepsake-box.

Hamvention Just Getting Started

For one weekend in May, the landscape of Dayton, Ohio is dominated by ham radio operators. The Dayton Hamvention (“ham-convention”), sponsored by the Dayton Amateur Radio Association, is the preeminent gathering of hams from around the world. This is where industry rolls out new products, friends gather to catch-up, and old equipment is “re-distributed” amongst willing parties in the sprawling swap meet which subsumes the entire Hara Arena parking lot where you can find almost anything and meet some of the most interesting people.

Continue reading “Hamvention Just Getting Started”

Ultrasonic Misting Vapor Polisher For 3D Printed Parts

If you’ve ever seen 3D printed parts form an extrusion type printer, one of the first things you’ll notice is the texture. It’s caused by the printer laying down its plastic layer after layer. This surface texture isn’t always desirable, so people have found a few ways to smooth the 3D printed part out. For example if you are using ABS, you can rinse or “paint” the part with acetone. Another method of smoothing is heat up some acetone in a container, and let the acetone vapors do work to smooth the finished part.

[Mike] from engineerdog.com thinks he may have found a more elegant solution using an inexpensive ultrasonic humidifier you can buy online for about $40 USD. This room humidifier uses a piezoelectric transducer that can vibrate liquids at a high frequency to produce a mist. [Mike] removed the transducer and electronics from the humidifier and mounted it into a paint can.  This is where the acetone is stored, and turned into a vapor by the transducer. An aquarium pump is used to transfer the highly concentrated vapors into the polishing chamber (an extra large pickle jar.) He added a spring loaded, electrical timer (the kind you might find in the bathroom at an office building) to make his vapor polisher as easy to use as a microwave oven.

[Mike] concludes his post with some strength testing of parts before and after acetone treatment, and was surprised to find that the parts were weaker after the treatment.  You can read more about that on his blog and see a video of the vapor polisher after the break.

Continue reading “Ultrasonic Misting Vapor Polisher For 3D Printed Parts”

Hackaday Prize Entry: DC Motor Controller

There are a lot of cheap Chinese CNC machines out there with okay mechanics and terrible electronics. The bearings aren’t complete crap, but the spindle of these CNC machines is a standalone PWM controller with a pot to control the speed. This means you can’t control the spindle speed with LinuxCNC or Mach3.

For his Hackaday Prize entry, [SUF] is building a DC motor controller for a Chinese spindle motor that doesn’t use any kind of encoder. The first part of that project is fairly easy; [SUF] has already built a high current driver. The second bit is a little it harder – because these spindles don’t have an encoder, [SUF] will have to read voltage spikes on the motor poles, giving him the RPM of the spindle. From there, it’s a bit of PID code to get this spindle running at a desired RPM and connecting it to a CNC control box.

So far, [SUF] has a second version of his board waiting for assembly. In the first version of the board, the switching time for the MOSFET was a little slow, but that’s all corrected in the current revision. It’s a great project to extend the capability of these cheap CNC machines, and perfect project for the Hackaday Prize.


The 2015 Hackaday Prize is sponsored by:

DIY Coffee Roaster Uses Cordless Drills And A Camp Stove

We’re no stranger to coffee roasting hacks, but it’s been a while since we’ve seen a new DIY roaster design. Thankfully [Larry] has been hacking together a small-batch roaster with a bunch of off-the-shelf parts. He was originally trying to make a fully-automated roasting system, but after a bunch of failed prototypes, he settled on a simple roaster design that works great.

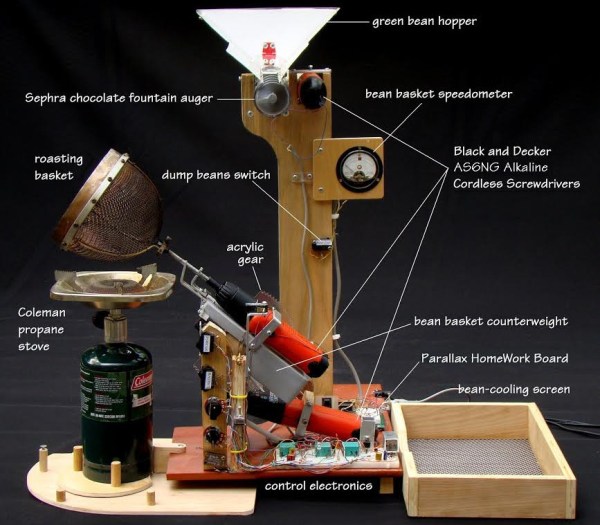
[Larry]’s roaster is designed for small batches of coffee (about 3oz). He has a small hopper with a motorized auger (cannibalized from a chocolate fountain) which drops coffee down into his roasting basket. The basket is mounted to a cordless screwdriver which rotates it to agitate the beans inside. A small camp stove provides the heat, which is placed right under the basket. The beans churn around in the roasting basket and heat up until they reach the desired roast level (typically between first and second crack).

Once the roasting is complete, another hand drill rotates the basket assembly to dump out the coffee. [Larry]’s build includes an assortment of knobs and switches which control the auger, basket speed, bean dumping, and even a “speedometer” gauge that shows how fast the basket is rotating. Want to build your own roaster? Check out the instructions for building [Larry]’s roaster or some other builds we’ve featured before.

Drawer Blade

Smarter-than-wood Saw Blade Makes Perfect Foldable Joints

[Andrew Klein] knows the pain of building drawers from plywood. It can be a pain to get all of the pieces measured and cut just right. Then you have to line them up, glue them together, and clamp them perfectly. It’s time-consuming and frustrating. Then one day it hit him that he might be able to make the whole process much easier using a custom saw blade.

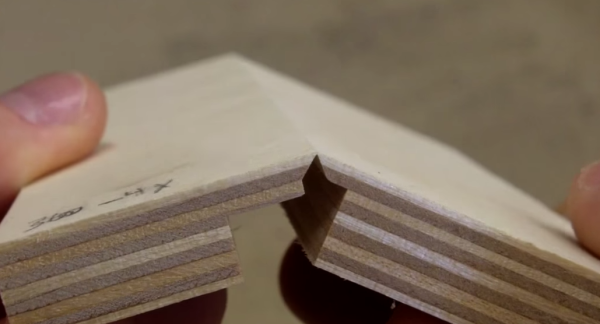
The the video below, [Andrew] does a great job explaining how the concept works using a piece of paper. The trick is that the plywood must be cut in a very specific shape. This shape results in the plywood just barely being held together, almost as if it’s hinged. The resulting groove can then be filled with wood glue, and the plywood is folded over on itself. This folding process leaves no gaps in the wood and results in a strong joint. Luckily this special shape can be cut with a specialized saw blade.

This new process removes the requirement of having five separate pieces for a drawer. Instead, only four cuts are needed on a single piece of square plywood. The corners are then removed with a razor blade and all four sides are folded up and into place. [Andrew] shows that his prototype blade needs a little bit of work, but he’s so hopeful that this new invention will be useful to others. Continue reading “Smarter-than-wood Saw Blade Makes Perfect Foldable Joints”