Rewire Your Own Brushless Motors

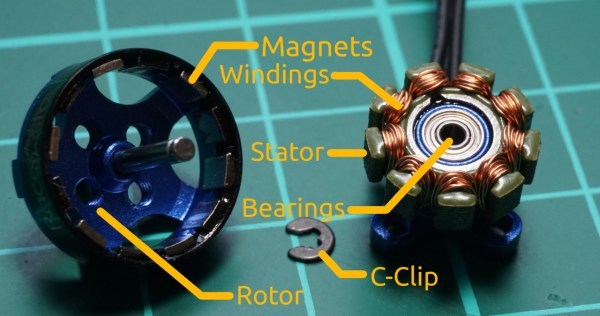
Hackaday likes the idea of fine-tuning existing hardware rather than buying new stuff. [fishpepper] wrote up a tutorial on rewinding brushless motors, using the Racerstar BR1103B as the example. The BR1103B comes in 8000 Kv and 10000 Kv sizes,  but [fishpepper] wanted to rewind the stock motor and make 6500 Kv and 4500 Kv varieties — or as close to it as he could get.

Kv is the ratio of the motor’s RPM to the voltage that’s required to get it there. This naturally depends on the magnet coils that it uses. The tutorial goes into theory with the difference between Wye-terminated and Star-terminated winding schemes, and how to compute the number of winds to achieve what voltage — for his project he ended up going with 12 turns, yielding 6700 Kv and 17 turns for 4700 Kv. His tutorial assumes the same gauge wire as the Racerstar.

Just as important as the theory, however, the tutorial also covers the physical process of opening up the motor and unwinding the copper wire, cleaning the glue off the stator, and then rewinding to get the required stats.

[fishpepper]’s handle has graced Hackaday before: he created what he calls the world’s lightest brushless FPV quadcopter. In addition to motors and drones, he also rocks a mean fidget spinner.


Visual 3D Print Finishing Guide

With 3D printers now dropping to record low prices, more and more people are getting on the additive manufacturing bandwagon. As a long time believer in consumer-level desktop 3D printing, this is a very exciting time for me; the creativity coming out of places like Thingiverse or the 3D printing communities on Reddit is absolutely incredible. But the realist in me knows that despite what slick promotional material from the manufacturers may lead you to believe, these aren’t Star Trek-level replicators. What comes out of these machines is often riddled with imperfections (from small to soul crushing), and can require considerable cleanup work before they start to look like finished pieces.

If all you hope to get out of your 3D printer are some decent toy boats and some low-poly Pokemon, then have no fear. Even the most finicky of cheap printers can pump those out all day. But if you’re looking to build display pieces, cosplay props, or even prototypes that are worth showing to investors, you’ve got some work cut out for you.

With time, patience, and a few commercial products, you can accomplish the ultimate goal: turning a 3D printed object into something that doesn’t look like it was 3D printed. For the purposes of this demonstration I’ll be creating a replica of the mobile emitter used by the “Emergency Medical Hologram” in Star Trek: Voyager. I can neither confirm nor deny I selected this example due to the fact that I’m currently re-watching Voyager on Netflix. Let’s make it look good.

Continue reading “Visual 3D Print Finishing Guide”

Homebrew SNES Mini Aims For Historical Accuracy

While “normies” are out fighting in the aisles of Walmart to snap up one of the official “Classic Mini” consoles that Nintendo lets slip out onto the market every once and awhile, hackers have been perfecting their own miniature versions of these classic gaming systems. The “Classic Mini” line is admittedly a very cool way to capitalize on nostalgic masses who have now found themselves at the age where they have disposable income, but the value proposition is kind of weak. Rather than being stuck with the handful of generation-limited games that Nintendo packed into the official products, these homebrew consoles can play thousands of ROMs from systems that stretch across multiple generations and manufacturers.

But for those old enough to remember playing on one of these systems when they first came out, these modern reincarnations always lack a certain something. It never feels quite right. That vaguely uncomfortable feeling is exactly what [ElBartoME] is aiming to eliminate with his very slick miniature SNES build. His 3D printed case doesn’t just nail the aesthetics of the original (PAL) console, but the system also uses real SNES controllers in addition to NFC “cartridges” to load different ROMs.

The project’s page on Thingiverse has all the wiring diagrams and kernel configuration info to get the internal Raspberry Pi 3 to read an original SNES controller via the GPIO pins. He also gives a full rundown on the hardware and software required to get the NFC-enabled cartridges working with EmulationStation to launch the appropriate game when inserted. Though he does admit this is quite a bit trickier than the controller setup.

[ElBartoME] has put a video up on YouTube that shows him inserting his mock cartridges and navigating the menus with an original SNES controller. If it wasn’t for the fact that the console is the size of a smartphone and the on-screen display is generations beyond what the SNES could pull off, you’d think he was playing on the real thing.

We’ve seen some incredibly impressive emulation boxes based on the Raspberry Pi, and builds which tried to embrace original hardware components, but this particular project may represent the best of both worlds.

Continue reading “Homebrew SNES Mini Aims For Historical Accuracy”

Automated Chamber Passes Just The Right Gas

It sounds like an overly complicated method a supervillain would use to slowly and painfully eliminate enemies — a chamber with variable oxygen concentration. This automated environmental chamber isn’t for torturing suave MI6 agents, though; rather, it enables cancer research more-or-less on the cheap.

Tasked with building something to let his lab simulate the variable oxygen microenvironments found in some kinds of tumors, [RyanM415] first chose a standard lab incubator as a chamber to mix room air with bottled nitrogen. With a requirement to quickly vary the oxygen concentration from the normal 21% down to zero, he found that the large incubator took far too long to equilibrate, and so he switched to a small acrylic box. Equipped with a mixing fan, the smaller chamber quickly adjusts to setpoints, with an oxygen sensor providing feedback and controlling the gas valves via a pair of Arduinos. It’s quite a contraption, with floating ball flowmeters and stepper-actuated variable gas valves, but the results are impressive. If it weren’t for the $2000 oxygen sensor, [RyanM145] would have brought the whole project in for $500, but at least the lab can use the sensor elsewhere.

Modern biology and chemistry labs are target-rich environments for hacked instrumentation. From DIY incubators to cheap electrophoresis rigs, we’ve got you covered.

Continue reading “Automated Chamber Passes Just The Right Gas”