Toy Dash Turned Gaming Interface

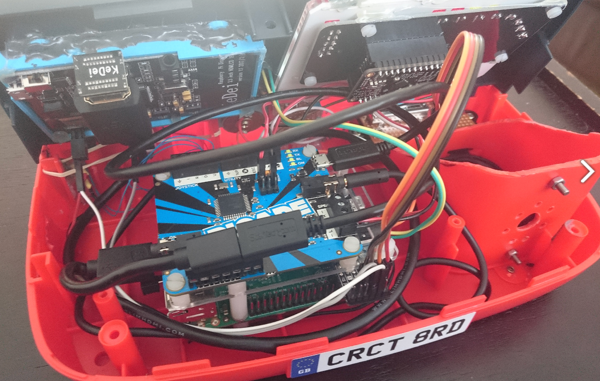
We see a lot of MAME cabinets and other gaming emulator projects here on Hackaday, but it’s not often that we see one the form factor of which so elegantly matches the ROM. [circuitbeard] converted a Tomy Turnin Turbo toy dashboard into a mini arcade machine playing Outrun.

There are many fascinating details in [circuitbeard]’s writeup. His philsophy is to “keep it looking stock” so he went to great lengths to add functionality to various elements of the toy without changing its appearance. The gear shifter was turned into a 3-way momentary switch with high and low speeds at top and bottom, with rubber bands pulling the switch back the center (neutral) when he lets go of it. The original toy’s steering wheel mounts to a slide potentiometer. The dash has a working ignition switch that uses a PowerBlock to manage the safe startup and shutdown of the Pi.  The dash also lights up the way you’d expect, and even displays accurate MPG and rev info.

For more MAME goodness here on Hackaday, see this broken tablet turned into a mini MAME cabinet or the portable MAME system of the future

Continue reading “Toy Dash Turned Gaming Interface”

Hackaday Prize Entry: An Open Source Kiln

For his Hackaday Prize entry, [Matt] is building a small kiln for melting metals and firing clay.  He’s making this kiln out of materials anyone can acquire — dirt and a bit of nichrome wire.

Most kiln builds you’ll find on the Internet use fancy refractory bricks and other materials you may not have in your back yard. [Matt]’s project is entirely DIY, and starts with a large pile of dirt and rocks. Aftter shaking off the sifted dirt, washing the rocks, straining off the gravel, getting rid of the sand, and siphoning off the water, [Matt] has a big bag of wet clay. This clay is mixed with perlite, an insulating, refractory material, molded into bricks, and fired. The result is a brick that looks good enough to be made into a kiln.

[Matt] has already put a lot of work into the calculations required to figure out the heat transfer of this kiln. At best, this kiln is going to take 14 hours to get up to temperature. That’s incredibly slow, but then again, this kiln will be electric, and will only use 1500 Watts. That’s nothing compared to a commercial electric kiln, but it is a build [Matt] designed himself without any outside help, using only parts he can easily acquire. In any event, this is an excellent project for the Hackaday Prize.

Lu Ban’s Axe And Working With Your Chinese Suppliers

It is nearly impossible to build any kind of hardware these days without at some point in the process dealing with China — Chinese suppliers, and so by extension Chinese culture. Difficulties can be as simple as the usual inconvenience of everything stopping for weeks up to and after Chinese New Year, or engineers that you know to be otherwise reasonably competent simply choosing not to bring up glaring and obvious problems. Having encountered my share of Western hardware entrepreneurs on the verge of a breakdown, and just as many flummoxed Chinese bosses completely unable to see exactly why they’re so upset, I thought I’d try to offer at least a little insight into one of the many issues that comes up.

Nearly any school child in the world will be able to tell you whom they were taught invented the lightbulb, the telephone, the radio transmitter. Those same children will usually be able to tell you of at least a few Chinese inventions as well — gunpowder, paper, the compass etc. But with one key difference, even the Chinese children are unlikely to be able to credit even a group of people for their invention let alone a single (usually misattributed) individual.

China does not really have an Edison, or Tesla, or Bell — oh we’ve had people as brilliant, but they are not celebrated in quite the same way for cultural reasons. If you were to do an alternate history of China where we went through the Industrial Revolution first, you’d want to split the timeline around Mozi (墨子). The Mohists (followers of Mozi) had advanced siege engine design, schools of logic, mathematics and theory for the physical sciences. much of the same foundation that set the West on its particular trajectory. In the end, Confucian ideals won out and China became a culture that celebrated scholarship over ingenuity (to vastly oversimplify things).

Even our respective terms for engineer reflect this. The word engineer (Latin ingeniator) is derived from the Latin words ingeniare (“to contrive, devise”) and ingenium (“cleverness”). Yet in Chinese 工程师, the first character for engineer in Chinese is the carpenters square 工. He or she is a simple worker (工人 literally “Work Person”). Even now, engineers are not held in anywhere near the same regard in China as they are in the West.

Continue reading “Lu Ban’s Axe And Working With Your Chinese Suppliers”

Friday Hack Chat: Making In Shenzhen

China is an amazing land of opportunity, and if you want to build anything, you can build it in Shenzhen. This city that was just a small fishing village a few decades ago has grown into a cyberpunk metropolis of eleven million and has become the manufacturing capital of the world. You’re probably reading this on a device made somewhere around Shenzhen.

For this week’s Hack Chat, we’re going to be talking about manufacturing in Shenzhen. We’re bringing in a very special guest for this one: [Naomi Wu] is a Cantonese DIY maker, professional web dev, transhumanist, electronics reviewer, occasional Hackaday contributor, vlogger, 3D printerer, advocate of women in STEM, SexyCyborg, and a riot on Twitter. [Naomi] also lives and works in Shenzhen, and is tapped into the DIY and maker culture there. She’s created 3D printed pen testing shoes, a Raspberry Pi cosmetics case, and infinity skirts.

This Friday (or Saturday, depending on which side of the date line you’re on), [Naomi] is going to be talking about manufacturing, making, DIY, and Shenzhen culture. Of particular interest will be electronics purchasing and manufacturing in Shenzhen, designing wearable projects with an emphasis on power and thermal design, documenting projects, and Shenzhen culture. This is basically an AMA, so if you have any questions you’d like to ask, throw them up in this spreadsheet.

Here’s How To Take Part:

join-hack-chatOur Hack Chats are live community events on the Hackaday.io Hack Chat group messaging. Hack Chats are usually at noon, Pacific time on Friday. This week we’re doing the Hack Chat a little later, because timezones. This week’s Hack Chat will be at 6 pm PDT Friday / 9 am CST Saturday. Confused? Here’s a time and date converter!

Click that speech bubble to the right, and you’ll be taken directly to the Hack Chat group on Hackaday.io

You don’t have to wait until Friday; join whenever you want and you can see what the community is talking about.

Portable SNES Chiptune Player

Chiptunes are the fantastic, bleeping musical renditions of the soundchips of retro consoles past. Performers of the art overwhelmingly favour the various flavours of Game Boy, though there are those who work with such varied machines as the Commodore 64, Sega Genesis, and the Nintendo Entertainment System. A little more off the beaten track in the chiptune scene is the Super Nintendo, but [kevtris] has struck out and built a chiptune player for SNES-based music.

The heavy lifting is handled by an FPGA, which emulates the SNES’s S-SMP sound processor, and handles loading the music from the SPC-format files. Being chiptunes, these files store both the instrument data as well as the note data for the music. Audio output is clean and crisp, as heard in the test video.

The laser cut case lends the device a great aesthetic.

Case design is where this project really shines. Laser cut clear acrylic is combined with a bright LCD character display and some LEDs which create an effect not unlike a glowing magical block from your 90s platformer of choice. It’s combined with some slick capacitive buttons that avoid the need to drill holes for bulky traditional buttons. [kevtris] goes through the case design, showing how it all fits together with a combination of screws and standoffs. Being built out of a series of essentially 2D slices, the case is stacked up one layer at a time.

What really stands out about this project is the fit and finish. There’s plenty of microcontroller and FPGA projects out there that can hum out a tune, but the attention to detail paid to the case design and the neatly laid out PCB really add polish to a project like this. For a different take, why not check out this chiptune player built around a Raspberry Pi?

[Thanks Morris!]

How To Do PCB Art In Eagle

Last month I had the pleasure of creating a new piece of hardware for Tindie. [Jasmine], the queen bee of Tindie, and I designed, developed, and kitted three hundred Tindie badges in ten days leading up to DEF CON. The badges were a complete success, they introduced soldering to a lot of people, and were loved by all.

This badge was such a rousing success, it’s now official Tindie swag. We’ll be handing out a few of these blinky badges at upcoming events. But as of right now we’ve already handed out our entire stock, that means we need to build more. The second run meant ordering a thousand PCBs.

We could just do another run, and order a few more PCBs from the Gerbers I’ve already designed. I’m not really happy with the first version of this badge, though, and this is an opportunity to improve my design. This also gives me an opportunity to demonstrate my workflow for creating artistic boards in Eagle.

Effectively, what I’ll be demonstrating here is the creation of the Benchoff Nickel. A few months ago, [Andrew Sowa] took a portrait of yours truly, changed the colors to what is available on a normal OSHPark PCB, and turned that into different layers in KiCad. There are a few differences here. Firstly, I’ll be using a blue solder mask, although the same technique can be applied to green, red, yellow, white, or black soldermask. Secondly, this is Eagle, and I’m going to do the majority of the work with a BMP import. This is the fast and easy way to do things; if you want a KiCad tutorial, check out [Andrew]’s work, or my overly-involved multiple silkscreen process for KiCad. I don’t recommend this overly-involved process if you can help it. It took 20 hours to do the art for my previous project in KiCad, and I estimate it would have taken two in Eagle.

With that said, here’s the easy, cheap, and fast way of doing artistic boards in Eagle.

Continue reading “How To Do PCB Art In Eagle”

Living In A Storage Locker Undetected For 2 Months

A Vancouver man [007craft], also known as [Michael], posted a video on YouTube about his living in a storage locker to save money for an apartment. The small space meant he had to incorporate quite a few little hacks to make living there comfortable.

While probably illegal and almost certainly against the storage locker’s terms of service, it seems you can live quite well in a storage locker if times get tough. [Michael] lived in a U-haul storage locker which cost him around $160 per month complete with bed, bar, living area and kitchen including running water. He goes on to explain how his first problem was electricity, which he had to obtain from an outlet quite a distance from his unit, To do this he just plugged in a large extension cord and cable tied it to the wall so it didn’t look too out-of-place, while for his water supply he used two water tanks, one each for waste and fresh water. Surprisingly he says he only needed to change them over around once a week from a water fountain. He did manage to live there undiscovered for 2 months by keeping out of sight as much as possible.

The video includes quite a few small hacks which try to make the most of the tiny space available and is well worth a watch even if you aren’t planning on living in a storage unit, so check it out below the break.

Continue reading “Living In A Storage Locker Undetected For 2 Months”