A Retro Car Stereo With Arduino Inside

For some car enthusiasts whose passions run towards older vehicles, only originality will do. [RetroJDM] for instance has an RA28 Toyota Celica from the mid 1970s for which he has gone to great lengths to source a pristine center console to replace a damaged original.

There is only one problem with the center console on a 1970s Toyota, it doesn’t have a DIN cut-out for the standard-sized car radios that have become universal in the decades since its manufacture. Instead it has a cut-out for a Toyota-specific radio in the old style with holes for volume and tuning knobs to either side of a protruding center unit that would have contained a tuning dial and a slot for cassettes or maybe 8-track cartridges.

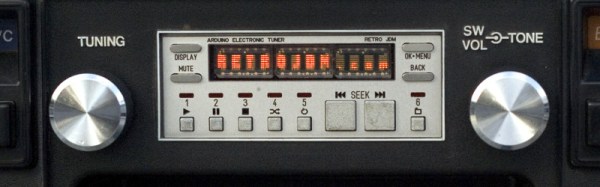
His solution is an interesting one, he’s put together his own car stereo in an enclosure suitable for the Toyota cut-out. Inside the radio there is an Arduino Mega controlling the breakout boards for an Si4703 FM tuner and a VMusic3 MP3/USB music player, and a PT2314 audio processor. For display there is a set of retro LED seven-segment modules, and an MSGEQ7 spectrum analyser. The result is a modern radio with FM, line-input, and MP3 player, with all the functions you’d expect. There is no onboard amplifier though, but this function is fulfilled by an external unit.

The finished unit is topped off with a very professional front panel, which you can see in his demo video below the break.

Continue reading “A Retro Car Stereo With Arduino Inside”

Gimbal SDI Camera Mod

Sometimes when you need something, there is a cheap and easily obtainable product that almost fits the bill. Keyword: almost. [Micah Elizabeth Scott], also known as [scanlime], is creating a hovering camera to follow her cat around, and her Feiyu Mini3D 3-axis brushless gimbal almost did everything she’d need. After a few modifications, [Micah] now has a small and inexpensive 3-axis gimbal with a Crazyfire HZ-100P SDI camera and LIDAR-Lite distance sensor.

At thirty minutes long, [Micah’s] documenting video is rife with learning moments. We’ve said it before, and we’ll say it again: “just watch it and thank us later.” [Micah Elizabeth Scott] has a way of taking complicated concepts and processes and explaining things in a way that just makes sense (case in point: side-channel glitching) . And, while this hack isn’t exactly the most abstractly challenging, [Micah’s] natural talent as a teacher still comes through. She takes you through what goes right and what goes wrong, making sure to explain why things are wrong, and how she develops a solution.

Throughout her video, [Micah] shares small bits of wisdom gained from first-hand experience. From black hot glue to t-glase (a 3D printing filament), we learned of a few materials that could be mighty useful.

We’re no strangers to the work of [Micah Elizabeth Scott], she’s been on the scene for a while now. She’s been a Hackaday Prize Judge in 2015 and 2016 and is always making things we love to cover. She’s one of our three favorite hackers and has a beautiful website that showcases her past work.

Video after the break.

Continue reading “Gimbal SDI Camera Mod”

Arduino And Encoder Form Precision Jig For Cutting And Drilling

“Measure twice, cut once” is great advice in every aspect of fabrication, but perhaps nowhere is it more important than when building a CNC machine. When precision is the name of the game, you need measuring tools that will give you repeatable results and preferably won’t cost a fortune. That’s the idea behind this Arduino-based measuring jig for fabricating parts for a CNC build.

When it comes to building on the cheap, nobody holds a candle to [HomoFaciens]. We’ve seen his garbage can CNC build and encoders from e-waste and tin cans, all of which gave surprisingly good results despite incorporating such compliant materials as particle board and scraps of plumber’s strapping. Looking to build a more robust machine, he finds himself in need of parts of consistent and accurate lengths, so he built this jig. A sled of particle board and a fence of angle aluminum position the square tube stock, and a roller with a paper encoder wheel bears on the tube under spring pressure. By counting pulses from the optical sensors, he’s able to precisely position the tube in the jig for cutting and drilling operations. See it in action in the video after the break.

If you’ve been following [HomoFaciens], you’ll no doubt see where he’s been going — build a low-end tool, use that to build a better one, and so on. We’re excited to see him moving into more robust materials, but we’ll miss the cardboard and paperclip builds.

Continue reading “Arduino And Encoder Form Precision Jig For Cutting And Drilling”

A Mobile Bar In A Trailer!

Ok, there are some worthy laws in place regulating the sale and distribution of alcohol — and for good reason. For many a bootlegger, however, the dream of renovating an old trailer from 1946 into a mobile bar is a dream that must– wait, what? That already exists?

It’s no mobile workshop, but the bar was initially built to accommodate guests at their wedding. [HelloPennyBar] has shared the reconstruction process with the world. Inside, there’s everything you’d need to serve beverages, including a (double) kitchen sink. In addition to a water tank, a pair of car batteries serve as the central power with electrical work installed for interior lights, a small fan to keep the bartenders cool, exterior lights, a water pump, the trailer lights, and more exterior lights so the patrons can party the night away.

Before you say anything, [HelloPennyBar] says they would need a license to sell alcohol, but alleges that for serving alcohol at private events in their state it suffices to have an off-site responsible serving license. Furthermore, a few helpful redditors have chimed in regarding battery safety and cable-mounts, to which [HelloPennyBar] was amenable. Safety and legality noted, the mobile bar must make for a novel evening of fun.

[via /r/DIY]

Self balancing robot

Building A Self-Balancing Robot Made Easy

Not only has [Joop Brokking] built an easy to make balancing robot but he’s produced an excellent set of plans and software for anyone else who wants to make one too. Self-balancers are a milestone in your robot building life. They stand on two-wheels, using a PID control loop to actuate the two motors using data from some type of Inertial Measurement Unit (IMU). It sounds simple, but when starting from scratch there’s a lot of choices to be made and a lot of traps to fall into. [Joop’s] video explains the basic principles and covers the reasons he’s done things the way he has — all the advice you’d be looking for when building one of your own.

He chose steppers over cheaper DC motors because this delivers precision and avoids issues when the battery voltage drops. His software includes a program for getting a calibration value for the IMU. He also shows how to set the drive current for the stepper controllers. And he does all this clearly, and at a pace that’s neither too fast, nor too slow. His video is definitely worth checking out below.

Continue reading “Building A Self-Balancing Robot Made Easy”

Saving A Part-Way-Through Failed 3D Print

This will be an experience shared by all 3D printer owners; a long print is mostly done, and something goes wrong. Result: most of the print and a heap of plastic vermicelli, or worse still, a print with an obviously offset layer in it.

[Simon Merrett] had a large part running on his printer, and 2.5 hours in to a 3 hour print the nozzle caught the edge of what he had already done, and as a result he was extruding into thin air (He told us in his tip email that his machine build was the likely culprit). Being fortunate enough to see it happening, he was able to hit the stop button in his Repetier software and bring the calamity to a swift halt.

How he rescued the situation is an interesting tale which he’s recorded in the screen capture video we’ve placed below the break, it involved using a spreadsheet to analyse the G-Code and remove the lines for the part he had already printed before inserting a new set of Z-axis dimensions to start the remaining section of print from the bed upwards. A few further fixes, and he was able to print the rest of his part, which he could then glue to the unfinished top of the section he had already printed. He points out in his YouTube description that he emailed the Repetier folks, and they told him a quicker way to deal with the Z-axis: using the G92 command to reset it.

You might ask why if he was prepared to spend this amount of time he didn’t simply reprint the entire part. But he points out, in that event the print could well have failed again at exactly the same point.

Continue reading “Saving A Part-Way-Through Failed 3D Print”

Z80 Based Raspberry Pi Look-alike

Homebrew computers are the ‘in thing’ these days and the Zilog Z80 is the most popular choice for making one on your own. We have seen some pretty awesome builds but [Martin K]’s Z-berry is the smallest on record yet. As the name suggests, the retrocomputer conforms to the Raspberry Pi form factor which includes the GPIO header.

The Z-berry is designed with a Z80 CPU running at 10 MHz (20 MHz possible) and comes with 32 kB ROM
and 512 kB RAM. In addition to the serial interface, the computer boasts an I2C bus, an SPI bus, and a PS/2 keyboard connector to boot. [Martin K] has a video where the finished system is enclosed in a Raspberry Pi case and has an I2C OLED display attached and working.

[Martin K] has posted a lot of details on how to make your own Z-berry which includes the BOM, schematic and preliminary information. We reached out to him to find out more about the software which is stable and available on request along with PCBs and sample code. Additionally, this project promises to draw much less current than the Raspberry Pi and should prove useful for anyone looking to create a retro solution to a modern problem.

It is interesting to see projects that combine modern techniques with retro technologies. One of the best Z80 projects we have seen is the FAP80 and there are some awesome homebrew computer projects on Hackaday.io for you to take a look and get inspiration.
Continue reading “Z80 Based Raspberry Pi Look-alike”