Hair Today, Gone Tomorrow, Via Electrolysis

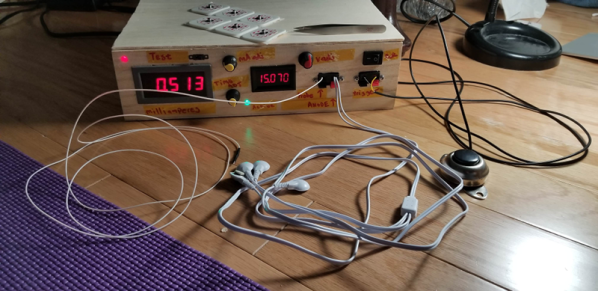
We think of electrolysis as a way to split things like water into oxygen and hydrogen using electricity, but it has a second meaning which is to remove hair using electricity. An electrologist inserts very thin needles into each hair follicle and uses a burst of electricity to permanently remove the hair. [Abbxrdy] didn’t want to buy a cheap unit because they don’t work well and didn’t want to spend on a professional setup, so designing and building ensued.

You’ll have to read through the comments to find some build details and the schematic. The device uses commercial electrolysis needles and a DE-9 connector socket as a holder. The device can supply 6 to 22V at up to 2mA. A timer can restrict the pulse to 5 seconds or less.

Continue reading “Hair Today, Gone Tomorrow, Via Electrolysis”

Digikey Tips Its Hat To Kicad With Its Own Library

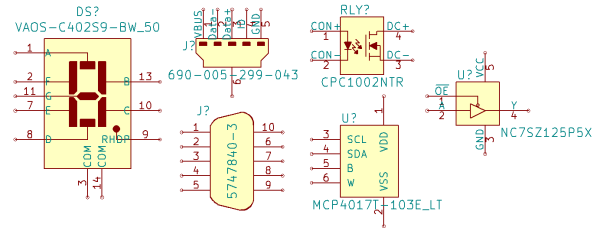
Digikey might wow us with their expansive stock, but now they’re wowing us with a personal gesture. The US-based electronics vendor is nodding its head in approval to KiCad users with its very own parts library. What’s more, [Chris Gammell] walks us through the main features and thought process behind its inception.

With all the work that’s going into this library, it’s nice to see features showing that Digikey took a thorough look at KiCad and how it fits into the current state of open-source PCBA design. First off, this library follows a slightly different design pattern from most other KiCad libraries in that it’s an atomic parts library. What that means is that every symbol is linked to a specific manufacturer part number and, hence, gets linked to a specific footprint. While this style mirrors EagleCad’s; KiCad libraries usually separate symbols from footprints so that symbols can be reused and parts can be more easily swapped in BOMs. There’s no “best” practice here, so the folks at Digikey thought they’d expose the second option.

Next off, the library is already almost 1000 parts strong and set to grow. These aren’t just the complete line of Yageo’s resistor inventory though. They actually started cultivating their library from the parts in Seeed Studio’s open parts library. These are components that hobbyists might actually use since some assembly services have a workflow that moves faster with designs that use these parts. Lastly, since all parts have specific vendor part numbers, BOM upload to an online cart is more convenient, making it slightly easier for Digikey to cha-ching us for parts.

Yes, naysayers might still cry “profit” or “capitalism” at the root of this new library, but from the effort that’s gone into this project, it’s a warm gesture from Digikey that hits plenty of positive personal notes for hobbyists. Finally, we can still benefit from plenty of the work that’s gone into this project — even if we don’t use it as intended. The permissive license lets us snag the symbols and reuse them however we like. (In fact, for the sharp-eyed legal specialists, they actually explicitly nullified the clause stating that derivative projects need not be licensed with a creative-commons license.)

With maturing community support from big vendors like Digikey, we’re even hungrier to get our hands on KiCad V.

Continue reading “Digikey Tips Its Hat To Kicad With Its Own Library”

A Telepresence System That’s Starting To Feel Like A Holodeck

[Dr. Roel Vertegaal] has led a team of collaborators from [Queen’s University] to build TeleHuman 2 — a telepresence setup that aims to project your actual-size likeness in 3D.

Developed primarily for business videoconferencing, the setup requires a bit of space on both ends of the call. A ring of stereoscopic z-cameras capture the subject from all angles which the corresponding projector on the other end displays. Those projectors are arranged in similar halo above a human-sized, retro-reflective cylindrical screen which can be walked around — viewing the image from any angle without a VR headset or glasses — in real-time!

Continue reading “A Telepresence System That’s Starting To Feel Like A Holodeck”

See-Through Rotary Engine Reveals Wankel Magic

The Wankel rotary engine is known for its troubled life in the mainstream automotive industry, its high power-to-weight ratio, and the intoxicating buzz it makes at full tilt. Popular with die-hard enthusiasts and punishing to casual owners, it stands as perhaps the most popular alternative internal combustion design to see the light of day. There are myriad diagrams out there to explain its operation, but what if you could see inside?

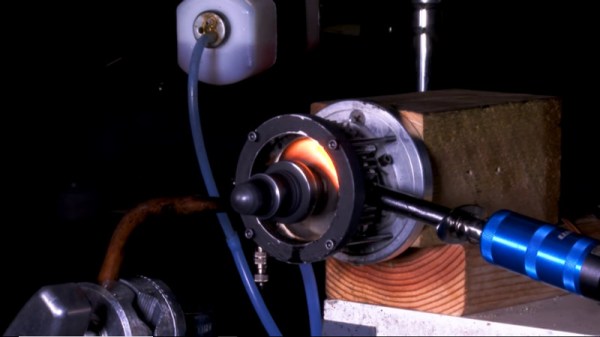
The video comes courtesy of [Warped Perception], and features a small Wankel rotary engine intended for model aircraft. The engine’s end plate is removed and replaced with a transparent plate, making the combustion process visible. Add in a high-speed camera, and you’ve got a recipe for a great technical video.

It starts with a basic explanation of how the Wankel rotary power cycle operates, before cutting to the glorious slow-motion shots of the engine in operation. It also highlights several techniques useful for producing this type of video, such as painting surrounding components black to make it easier to image the parts of interest. The visuals are amazing and very clearly show the  manner in which the intake, compression, power and exhaust strokes function in the engine.

Continue reading “See-Through Rotary Engine Reveals Wankel Magic”

Building Badges The Hard Way

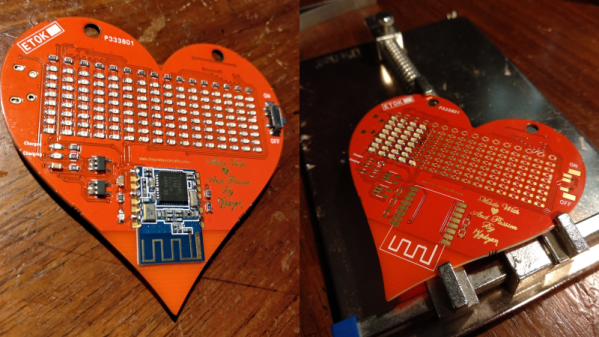
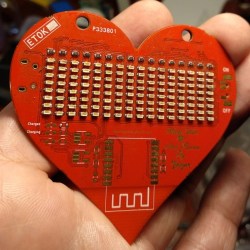
What’s a hacker to do to profess his love for his dearest beloved? [Nitesh Kadyan] built his lady-love this awesome LED pendant – the LED BLE Hearty Necklace Badge.

The hardware is pretty vanilla by today’s hacker standards. An ATMega328p  does most of the heavy lifting. An HM-11 BLE module provides connection to an Android mobile app. Two 74HC595 shift registers drive 16 columns of red LEDs and a ULN2803 sinks current from the 8 rows. The power section consists of a charger for the 320mAh LiPo and an LDO for the BLE module. All the parts are SMD with the passives mostly being 0603, including the 128 LEDs.

128 LEDs soldered wrong way around

[Nitesh] didn’t get a stencil made for his first batch of boards, so all the parts were painstakingly soldered manually and not in a reflow oven. And on his first board, he ended up soldering all of the LED’s the wrong way around. Kudos to him for his doggedness and patience.

The Arduino code on the ATmega is also quite straightforward. All characters are stored as eight bytes each in program memory and occupy 8×8 pixels on the matrix. The bytes to be displayed are stored in a buffer and the columns are left shifted fast enough for the marquee text effect. The Android app is built by modifying a demo BLE app provided by Google. The firmware, Android app, and the KiCAD design files are all hosted on his Github repository.

[Nitesh] is now building a larger batch of these badges to bring them to hillhacks – the annual hacker-con for making and hacking in the Himalayas. Scheduled for later this month, you’ll have to sign up on the mailing list for details and if you’d like to snag one of these badges. To make it more interesting, [Nitesh] has added two games to the code – Tetris and Snakes. Hopefully, this will spur others to create more games for the badge, such as Pong.

Continue reading “Building Badges The Hard Way”

The Anxiety Of Open Source: Why We Struggle With Putting It Out There

You’ve just finished your project. Well, not finished, but it works and you’ve solved all the problems worth solving, and you have a thing that works for you. Then you think about sharing your creation with the world. “This is cool” you think. “Other people might think it’s cool, too.” So you have to take pictures and video, and you wish you had documented some more of the assembly steps, and you have to do a writeup, and comment your code, and create a repository for it, maybe think about licensing. All of a sudden, the actual project was only the beginning, and now you’re stressing out about all the other things involved in telling other people about your project, because you know from past experience that there are a lot of haters out there who are going to tear it down unless it’s perfect, or even if it is, and even if people like it they are going to ask you for help or to make one for them, and now it’s 7 years later and people are STILL asking you for the source code for some quick little thing you did and threw up on YouTube when you were just out of college, and of course it won’t work anymore because that was on Windows XP when people still used Java.

Take a deep breath. We’ve all been there. This is an article about finding a good solution to sharing your work without dealing with the hassle. If you read the previous paragraph and finished with a heart rate twice what you started, you know the problem. You just want to share something with the world, but you don’t want to support that project for the rest of your life; you want to move on to new and better and more interesting projects. Here are some tips.

Continue reading “The Anxiety Of Open Source: Why We Struggle With Putting It Out There”

Recycling And Casting Styrofoam With Solvents

Styrofoam is an ever-present waste material in modern society, being used to package everything from food to futons. It’s also not the easiest thing to deal with as a waste stream, either. With this in mind, [killbox] decided to have a go at recycling some styrofoam and putting it to better use.

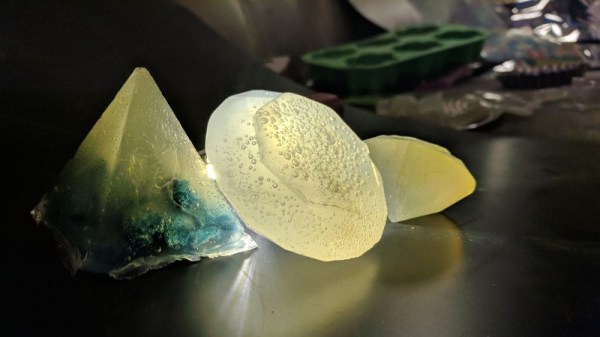
The process starts by combining the EPS styrofoam with a solvent called D-limonene. This was specifically chosen due to its low toxicity and ease of use. The solvent liquifies the solid foam and the air bubbles are then allowed to make their way out of the solution. If it’s desired to create a coloured end product, it’s noted that this can be achieved by using other plastic items to provide colour at this stage, such as a red Solo cup.

It’s a slow process thanks to the choice of solvent, but it makes the process much more palatable to carry out in the average home lab setup. It’s possible to then perform casting operations or further work with the recovered material, which could have some interesting applications. It’s not the first plastics recycling project we’ve seen, either – check out this full setup.

[Thanks to Adric for the tip!]