Why You Need To Finish

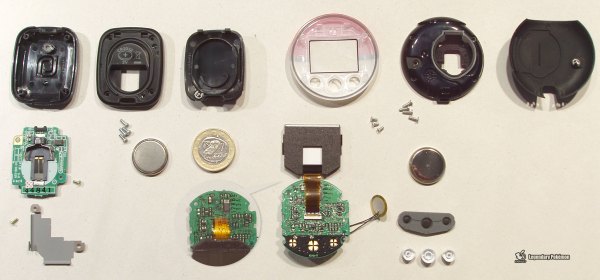
Mike and I were talking about an interesting smart-glasses hack on the podcast. This was one of those projects where, even if you don’t need a pair of glasses with LEDs on them to help you navigate around, you just couldn’t help but marvel at a lot of the little design choices made throughout.

For instance, I love the way the flex PCB is made to do double duty by wrapping around the battery and forming a battery holder. This struck me as one of those quintessential hacks that only occurs to you because you need it. Necessity is the mother of invention, and all that. There was a problem, how to fit a battery holder in the tiny space, and a set of resources that included a flex PCB substrate. Cleverly mashing that all together ended up with a novel solution. This wouldn’t occur to you if you were just sitting at the beach; you’d have to be designing something electronic, space-constrained, and on a flex PCB to come up with this.

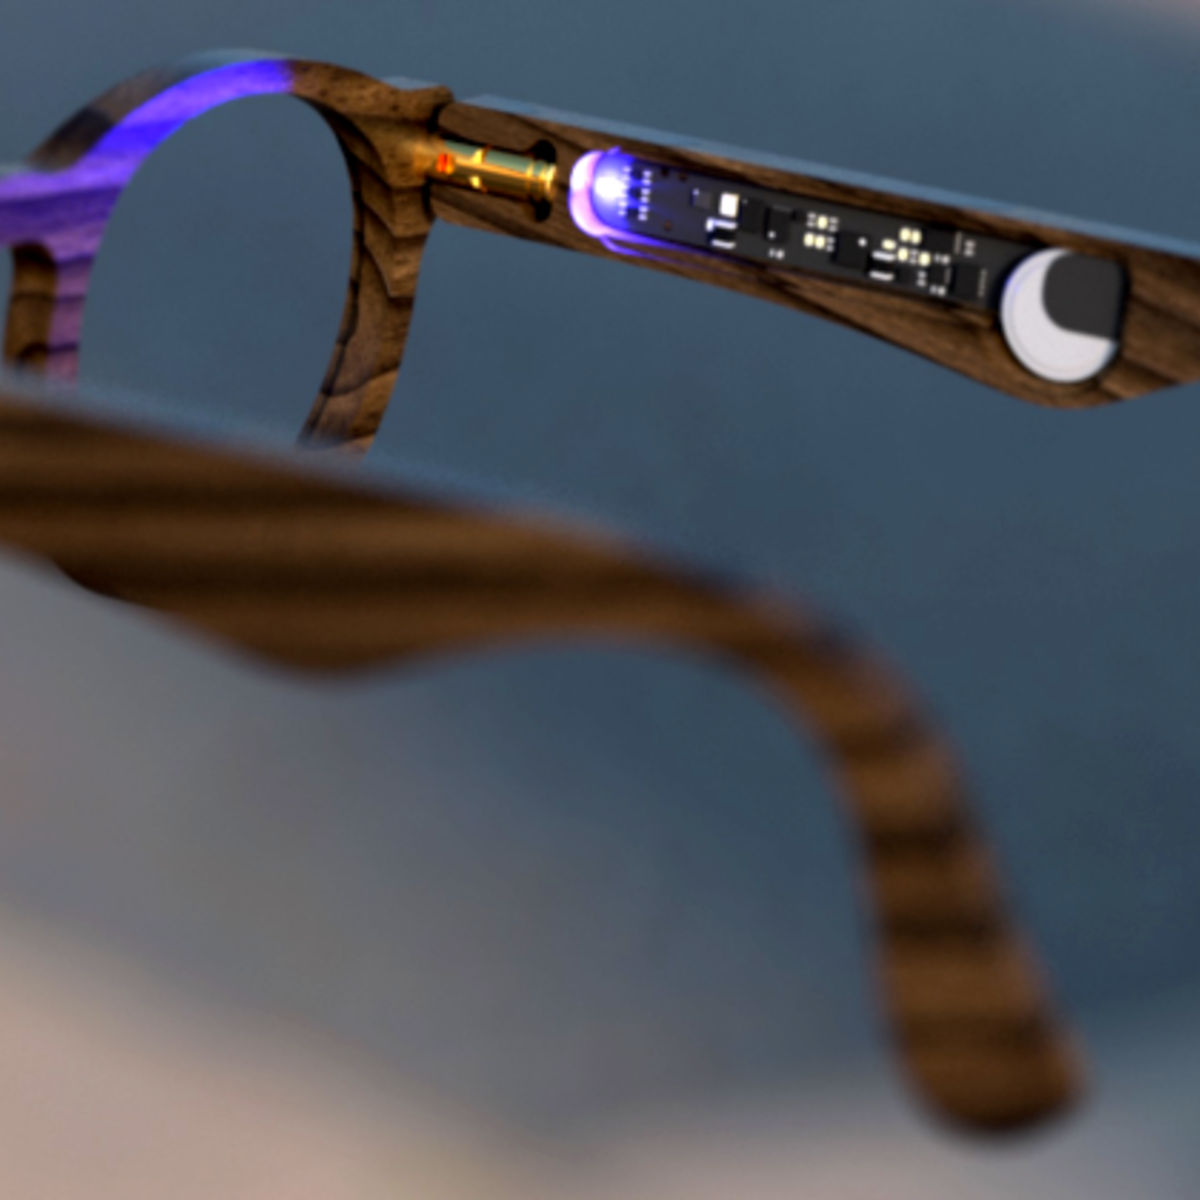
Mike made an offhand comment about how sometimes you just need to finish a project for the good ideas and clever solutions that you’ll come up with along the way, and I think this battery holder example drives that point home. I can’t count the number of my projects that may or may not have been dumb in retrospect, but along the way I came up with a little trick that I’ll end up using in many further projects, outliving the original application.

Finishing up a project on principle is a reasonable goal just on its own. But when the process of seeing something to conclusion is the generator of new and interesting challenges and solutions, it’s even more valuable. So if you’re stuck on a project, and not sure you want to take it all the way, consider if the journey itself could be the destination, and look at it as an opportunity to come up with that next long-lasting trick.

Bad News: Arecibo

If you read the newsletter last week, you heard me wondering aloud if the damage to Arecibo Observatory had crossed the threshold into where it’s no longer economically viable to keep it running, and the sad news has just come in and the battle for Arecibo has been lost. We said we’d shed a tear, and here we are. Sic transit gloria mundi. Here’s hoping something cooler replaces it!

Reduce, Reuse, Injection Mold

Many people have the means now to create little plastic objects thanks to 3D printing. However, injection molding is far less common. Another uncommon tech is plastic recycling, although we do occasionally see people converting waste plastic into filament. [Manuel] wants to solve both of those problems and created an injection molder specifically for recycling.

The machine — Smart Injector — is automated thanks to an Arduino. It’s pretty complex mechanically, so in addition to CAD models there are several PDF guides and a ton of pictures showing how it all goes together.

Continue reading “Reduce, Reuse, Injection Mold”

Reverse Engineering A PokeWalker

The PokeWalker is part of Nintendo’s long quest to get children (and likely some adults) walking and exercising. There’s the PokeWalker, Pokemon Pikachu, PokeBall Plus, Pokemon Pikachu 2, Pokemon mini, and of course Pokemon Go. Despite being out a decade, there wasn’t a ROM dump for the device and there was minimal documentation on the communication protocol. [Dmitry Grinberg] took it upon himself to change all that and crack the PokeWalker open.

At its heart, the PokeWalker is just a pedometer with an IR port and a 96×64 grayscale screen. It came out in 2009 to accompany the new Pokemon release for the Nintendo DS. Cracking open the device revealed a 64KB EEPROM, a Renesas H8/38606R CPU, a Bosch BMA150 accelerometer, and a generic IR transceiver. The CPU is particularly interesting as in addition to being quite rare, it has a mix of 8, 16, and 32 bits with 24-bit pointers. This gives it a 64K address space. While the CPU is programmable, any attempt to do so erases the onboard flash. The communication protocol packets have an 8-bit header that precedes each packet. The header has a checksum, a command byte, and four bytes of session id, and an unused byte. Curiously enough, every byte is XOR’d with 0xAA before being broadcast.

One command is an EEPROM write, which uses back-referencing compression. Each chunk of data to be written is packaged into 128-byte chunks, though 128 bytes likely won’t be sent thanks to the compression. The command can theoretically reference 4k bytes back, but in practice, it can only reference 256 bytes back. It was this command that laid the foundation for the exploit. By carefully crafting the command to send, the command can overflow the decompression buffer and into executable code. Only a few bytes can be overflowed so the payload needs to be carefully crafted. This allowed for an exploit that reads the system ROM and broadcasts it out the IR port. Only 22k bytes can be dumped before the watchdog reboots the device. By changing the starting address, it was easy to do multiple passes.

After the ROM was stitched together from the different passes, the different IR commands were analyzed. In particular, a command was found that allows direct writes into RAM. This makes for a much easier exploit as you can write your exploit, then override a pointer in the event table, then have the exploit revert the event table once the system naturally jumps to your exploit.

[Dmitry] finishes off this amazing exploit by writing a PalmOS app to dump the ROM from a PokeWalker as well as modify the system state. PalmOS was chosen as it is an easy and cheap way to have a programmable IR transciever. All in all, a gorgeous hack with a meticulous writeup. This isn’t the first video game accessory that’s been reverse engineered with a scrupulous writeup, and we’re sure it won’t be the last.

Continue reading “Reverse Engineering A PokeWalker”

Big Nerf Bazooka Packs A Wallop

Nerf blasters are a fun toy, often confiscated from children once they hit one too many precious ornaments around the home in the midst of battle. [Ivan Miranda] is bigger than most children however, and set about building a much larger blaster.

The bazooka-like design uses a several meters of 160mm PVC pipe, firing “darts” constructed out of foam yoga rollers and buffing pads. The build uses a littany of 3D printed components in its construction, both as part of the firing mechanism and as jigs to help machine the pipe. A large plunger is used to propel the darts, which is pulled back against the tension of thick rubber tubes before being released by the trigger mechanism.

It’s an intimidating device, to be sure. However, we suspect its short range, huge size, and slow reload time should stop it from breaking the meta-game at your local Nerf battles. That said, we still wouldn’t want to take a shot from this bad boy to the head. Hackers do love a good Nerf build, and they’re particularly popular in sentry applications. Video after the break.

Continue reading “Big Nerf Bazooka Packs A Wallop”

Procedurally Generated Trees

As the leaves fall from the trees here in the Northern Hemisphere, we are greeted with a clear view of the branches and limbs that make up the skeleton of the tree. [Nicolas McDonald] made a simple observation while looking at trees, that the sum of the cross-sectional area is conserved when a branch splits. This observation was also made by Leonardo Da Vinci (according to Pamela Taylor’s Da Vinci’s Notebooks). Inspired by the observation, [Nicolas] decided to model a tree growing for his own curiosity.

The simulation tries to approximate how trees spread nutrients. The nutrients travel from the roots to the limbs, splitting proportionally to the area. [Nicolas’] model only allows for binary splits but some plants split three ways rather than just two ways. The decision on where to split is somewhat arbitrary as [Nicolas] hasn’t found any sort of rule or method that nature uses. It ended up just being a hardcoded value that’s multiplied by an exponential decay based on the depth of the branch. The direction of the split is determined by the density of the leaves, the size of the branch, and the direction of the parent branch. To top it off, a particle cloud was attached at the end of each branch past a certain depth.

By tweaking different parameters, the model can generate different species like evergreens and bonsai-like trees. The code is hosted on GitHub and we’re impressed by how small the actual tree model code is (about 250 lines of C++). The power of making an observation and incorporating it into a project is clear here and the results are just beautiful. If you’re looking for a bit more procedurally generation in your life, check out this medieval city generator.

A Motorized Rotary Shop Table From Scratch

As we’ve seen over the years, it’s possible to bootstrap your own metalworking shop using little more than a pile of scrap steel, a welder, and an angle grinder. With time and dedication, you can build increasingly complex shop tools until you’ve got yourself a nice little post-apocalyptic workshop. It’s the whole idea behind the [Workshop From Scratch] channel, and we never get bored of seeing his incredible backyard engineering.

But eventually, you’ll have built all the basic stuff. What then? Well, as [Workshop From Scratch] shows in a recent video, you can start working on the luxuries. Do you need a motorized table that will let you spin the workpiece and position it an at arbitrary angle? No, probably not. But as the video after the break shows, it’s certainly a handy thing to have around the shop. We especially like how he uses it to quickly and easily produce nearly perfect circular welds.

Note the welded standoffs used to hold on the lid.

From a technical standpoint, this is perhaps one of his more straightforward builds. But at the same time, the attention to detail that he puts into even this “simple” design is phenomenal. Nothing is wasted, and cutoff pieces from one section are often used in imaginative ways elsewhere.

[Workshop From Scratch] is truly a master of working with what you have, and this project is a perfect example. We especially like the tilt mechanism, which uses a massive leadscrew spun by a wiper motor salvaged from an Audi A8 B4. It looks like a fair amount of new hardware went into the control electronics, but even still, we have no doubt that the cost of this build is well below the purchase price of a commercial alternative.

Much like his hydraulic lifting table or motorized plasma cutter, not everyone is going to need something this elaborate in their home shop. But his magnetic vise and mobile drill press cart are far more approachable for the home gamer. Of course even if you don’t follow along and build your own versions of his tools, it’s always worth tuning in just to see him work.

Continue reading “A Motorized Rotary Shop Table From Scratch”

No Wonder These Projects Won The Circuit Sculpture Contest

There are five winners of the Hackaday Circuit Sculpture contest, and every one of them comes as no surprise, even in a tightly packed race to the top.

Beginning with the gorgeous photo above, we have [Eirik Brandal’s] waldian being named the most beautiful. Imagine this hanging on your living room wall, then head over and listen to the video demo as it’s light-actuated synthesizer chimes like distant (or maybe not so distant) church bells. This isn’t a one-off dip into circuit sculpture for [Eirik], we featured his broader body of work back in 2018, all of it worth checking out in more depth.

The glowing mask is actually made of PCB. The seams are secured with super glue bolstered with baking soda. The labor behind this one is intense. As we mention back in September, the project took place over about two years, mostly due to the sheer volume of cutting and sanding [Stephen Hawes] needed to do to bring together so many pieces. This one grabbed him the most artistic award.

[Jiří Praus] takes the top spot for best video with his luminescent RGB LED sphere. We swooned over this one when it first dropped back in December. [Jiří] shows off a combination of patience and ingenuity by using a 3D-printed mold to hold each LED while he soldered brass rod in place to serve as both electrical and mechanical support.

Speaking of molds, one of the challenges was to show off the best jig for creating a circuit sculpture. [Inne’s] Soft Soldering Jig provides the channels needed to keep crisp right angles on the brass rod as you work, with voids to position components at intersections for soldering. Drawing on the advice of numerous circuit sculpture success from people like [Mohit Bohite] and [Jiří Praus], he was looking for a way to easily position everything on a surface that would not be burnt by the soldering iron. The answer comes in the form of Silicone jigs made with 3D-printed molds.

Finally we have the Binary Calculator project which won the most functional award. While it does operate as a binary calculator, the beauty of it is not to be overlooked. Among its many attributes are a set of cherry-wood keycaps that were milled for the project and a bell-jar display stand where the calculator rests and serves as a binary clock when not in use. You may remember seeing our feature of this project last week.

As prizes, the binary calculator, orb, and wall sculpture creators will each be receiving $200 in goodies from Digi-Key who sponsored the contest and will be featuring entries in a 2021 wall calendar. Creators of the soldering jig and the PCB mask will receive a $100 Tindie gift card.