This Arduino Terminal Does All The Characters

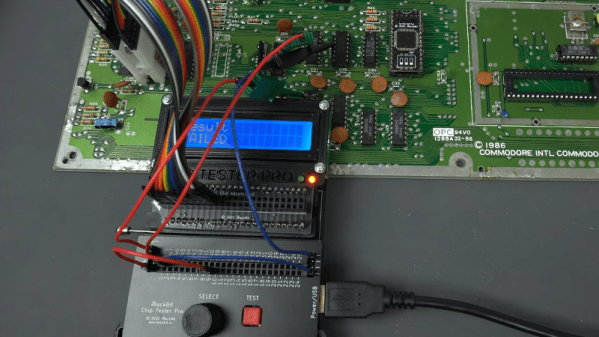
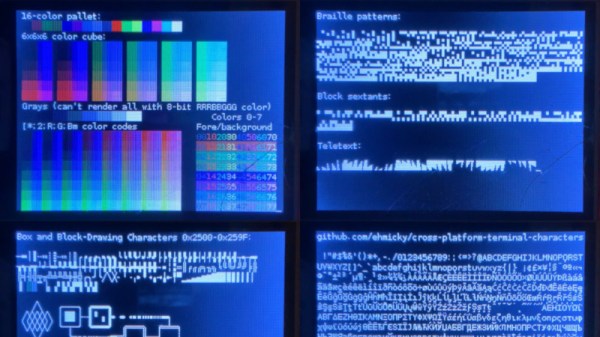
The job of a dumb terminal was originally to be a continuation of that performed by a paper teletype, to send text from its keyboard and display any it receives on its screen. But as the demands of computer systems extended beyond what mere ASCII could offer, their capabilities were extended with extra characters and graphical extensions whose descendants we see in today’s Unicode character sets and thus even in all those emojis on your mobile phone. Thus a fully-featured terminal has a host of semigraphics characters from which surprisingly non-textual output can be created. It’s something [Michael Rule] has done some work on, with his ILI9341TTY, a USB serial terminal monitor using an Arduino Uno and an ILI9341 LCD module that supports as many of the extended characters as possible.

A graph, entirely in Unicode characters.

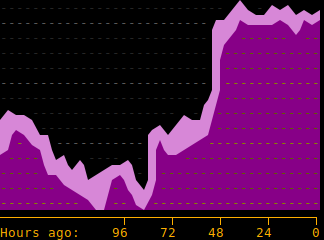
It’s fair to say that most of us who regularly use a terminal don’t go far beyond the ASCII, as it’s likely that a modern terminal will sit in a window over a desktop GUI. So even if you have little use for a hardware terminal monitor there’s still plenty of interest to be found in those rarely-seen character sets. Our favourite is probably the Symbols for Legacy Computing, an array of semigraphics characters that may be familiar to readers who have used an 8-bit home computer or two. He includes a graph example using these characters coloured with ANSI escape codes, and it’s certainly not what you expect from a terminal.

If microcontroller terminals capture your interest, this isn’t the first we’ve brought you.

Line of electromechanical water valves dispensing a pattern of water droplets

Gravity-Defying Water Drop Display Shows Potential

[3DPrintedLife aka Andrew DeGonge] saw that advert for gatorade that shows some slick stop-motion animation using a so-called ‘liquid printer’ and wondered how they built the machine and got it to work so well. The answer, it would seem, involves a lot of hard work and experimentation.

Conceptually it’s not hard to grasp. A water reservoir sits at the top, which gravity-feeds into a a series of electromechanical valves below, which feed into nozzles. From there, the timing of the valve and water pressure dictate the droplet size. The droplets fall under the influence of gravity, to be collected at the bottom. From that point it’s a ‘simple’ matter of timing droplets with respect to a lighting strobe or camera shutter and hey-presto! instant animation.

As will become evident from the video, it’s just not as easy as that. After an initial wobble when [Andrew] realised that cheap “air-only” solenoids actually are for air-only when they rusted up, he took a slight detour to design and 3D print his own valve body. Using a resin printer to produce fine detailed prints, enabled the production of small internal passages including an ‘air spring’ which is just a small chamber of air. After a lot of testing, proved to be a step in the right direction. Whether this could have been achieved with an FDM printer, is open to speculation, but we suspect the superior fine detail capabilities of modern resin printers are a big help here.

In a nice twist, [Andrew] ripped open and dissolved a fluorescent marker pen, and used that in place of plain water, so when illuminated with suitably triggered UV LED strips, discernable animation was achieved, with an eerie green glow which we think looks pretty neat. All he needs to do now is upgrade the hardware to make a 3D array with more resolution, and he can start approaching the capability of the thing that inspired him. Work on some custom electronics to drive it has started, so this is one to watch in the coming months!

We’ve seen many water-based display device before, like this one that projects directly onto a thin stream of water, and this strangely satisfying hack using paraffin and water, but a full 3D Open Source display device seems elusive so far.

All project details can be found on the associated GitHub.

Continue reading “Gravity-Defying Water Drop Display Shows Potential”

Automating Pool Monitoring And Chemical Dosing

Anyone who has had a backyard pool will know that it only takes a little lapsed attention to turn the whole thing green. For those sick of having to stay on top of things, the idea of automating pool care may be attractive. This project from [Discreet Mayor] hopes to do just that.

Data is graphed for easy analysis using Grafana.

The project uses a TI SimpleLink wireless-enabled microcontroller to run the show, which allows data to be offloaded to a base station for graphing with Grafana. The system can monitor pH levels as well as ORP (oxidation/reduction potential) levels using probes attached via BNC connectors. Based on these readings, the device can dose chlorine into the pool as needed using a peristaltic pump driven by a TI DRV8426 stepper motor driver.

We’d want to keep a close eye on the system for some time, making sure it wasn’t over or underdosing the pool with chemicals. However, that’s easy enough to do when all the data is logged neatly in a web-accessible graph.

We’ve seen other hackers implement similar controls to their own pools, too. If you’ve been working on your own home automation projects, be sure to drop us a line.

ESP32-Cam Makes A Dandy Motion Detector

Halloween is right around the corner and just about every Halloween project needs some kind of motion sensor. Historically, we’ve used IR and ultrasonic sensors but [Makers Mashup] decided to use an ESP32-Cam as a motion sensor in his latest animatronic creation. You can see a video of the device and how it works below.

The project is a skull that follows you around with a few degrees of motion on a stepper motor. There’s a 3D-printed enclosure to make the hardware assembly easy. The base software was borrowed from [Eloquent Arduino].

Continue reading “ESP32-Cam Makes A Dandy Motion Detector”

A 2nd gen Amazon Echo Dot inside a 1980s answering machine.

An Echo Dot For The 1980s

There’s so much obsolete technology out there with great design. It’s really sad to see it end up in the landfill, because even though the insides may be outdated, good design is forever. Take this 1980s Panasonic answering machine, for instance. The smoky plastic of the cassette lid is the perfect screen for Dot, because it lets the light through while hiding the modernity of the thing in the process. Check it out in action after the break.

What [ehans_makes] has written is really more of an overall guide to repurposing old electronics and fighting e-waste in the process. First, they non-destructively figure out what needs to be done to both the old thing and the newer thing to get them to play nicely together — what 3D printed parts need to be added, what can be salvaged and reused from the old thing, and what parts of the old enclosure can be Dremeled away. In this case, [ehans_makes] ended up printing an adapter to be able to re-use the original speaker’s mounting points inside the answering machine, and printed a mount for the Dot as well. The STLs are available if you happen to find the same answering machine at your local thrift store or neighbor’s estate sale.

While we’ve always managed to hold on to the screws when we disassemble something, [ehans_makes] has an even better idea: draw a diagram of where they go, and tape the actual screws to the diagram as you remove them.

Some of the best designs never really existed, at least not on a commercial scale. If you can’t find a cool old enclosure, you can always build one yourself.

Continue reading “An Echo Dot For The 1980s”

In Search Of The First Comment

Are you writing your code for humans or computers? I wasn’t there, but my guess is that at the dawn of computing, people thought that they were writing for the machines. After all, they were writing in machine language, and whatever bits they flipped into the electronic brain stayed in the electronic brain, unless punched out on paper tape. And the commands made the machine do things, not other people. Code was written strictly for computers.

Modern programming practice, on the other hand, is aimed firmly at people. Variable and function names are chosen to be long and to describe what they contain or do. “Readability” of code is a prized attribute. Indeed, sometimes the fact that it does the right thing at all almost seems to be an afterthought. (I kid!)

Somewhere along this path, there was an important evolutionary step, like the first fish using its flippers to walk on land. Comments were integrated into programming languages, formalizing the notes that coders of old surely wrote by hand in the margins of the paper first-drafts before keying it in. So I went looking for the missing link: the first computer language, and ideally the first program, with comments. I came up empty handed.

Or rather full handed. Every computer language that I could find had comments from the beginning. FORTRAN had comments, marked by a “C” as the first character in a line. APL had comments, marked by the bizarro rune ⍝. Even the custom language written for the Apollo 11 guidance computers had comments — the now-commonplace “#”. I couldn’t find an early programming language without comments.

My guess is that the first language with a comment must have been an assembly language, because I don’t know of any machines with a native comment instruction. (How cool and frivolous would that be?)

Assemblers simply translate mnemonic names to their machine instruction counterparts, but this gives them the important freedom to ignore anything starting with, traditionally, a semicolon. Even though you’re just transferring the contents of register X to the memory location pointed to in register Y, you can write that you’re “storing the height above ground (meters)” in the comments.

The crucial evolutionary step, though, is saving the comments along with the code. Simply ignoring everything that comes after the semicolon and throwing it away doesn’t count. Does anyone know? What was the first code to include comments as part of the code itself, and not simply as marginalia?

Chip Tester Knows If Your Old Chips Are Working

[Noel’s Retro Lab] has looked at retro chip testers before, but in a recent video you can see below he’s looking at the Chip Tester Pro, a preassembled chip tester for vintage chips, especially those used in Commodore computers. The device looks good on the surface with a form factor like a calculator or cell phone, an LCD display, and a 48 pin ZIF socket.

The user interface is pretty simple. A rotary encoder and a big red button are about it. However, there are also some headers where you have to use jumpers to wire signals to the chip. The firmware gives you specific directions, but it is reminiscent of programming old punchcard machines with jumper wires. Luckily, it looks like you only route the power to the device so you don’t have many wires to connect (usually two or three).

Continue reading “Chip Tester Knows If Your Old Chips Are Working”