Detecting Ripeness In Fruit And Vegetables Via Neural Networks

Humans have an innate knack for identifying food that is fit to eat. There’s a reason you instinctively enjoy fresh fruit and vegetables, but find maggot-infested rotting flesh offputting, for example. However, we like to automate as much of the food production process as possible so we can do other things, so it’s necessary to have machines sort the ripe and ready produce from the rest at times. [kutluhan_aktar] has found a way to do just that, using the power of neural networks.

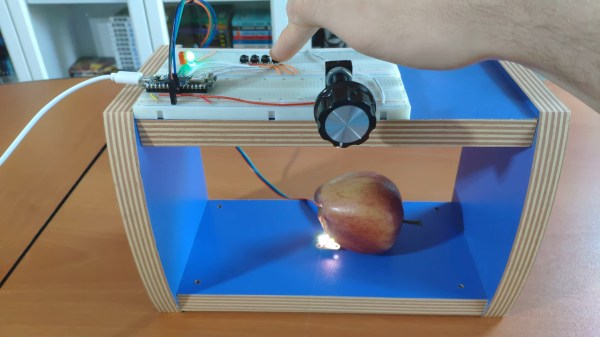
The project’s goal is a straightforward one, aiming to detect ripeness in fruit and vegetables by monitoring pigment changes. Rather than use a camera, the project relies on data from an AS7341 visible light sensor, which is better suited to capturing accurate spectral data. This allows a better read of the actual light reflected by the fruit, as determined by the pigments in the skin which are directly related to ripeness.

Sample readings were taken from a series of fruit and vegetables over a period of several days, which allowed a database to be built up of the produce at various stages of ripeness. This was then used to create a TensorFlow model which can determine the ripeness of fruit held under the sensor with a reasonable degree of certainty.

The build is a great example of the use of advanced sensing in combination with neural networks. We suspect the results are far more accurate than could have reasonably be determined with a cheap webcam, though we’d love to see an in-depth comparison as such.

Believe it or not, it’s not the only fruit spectrometer we’ve featured in these hallowed pages. Video after the break.

Continue reading “Detecting Ripeness In Fruit And Vegetables Via Neural Networks”

New Video Series: Designing With Complex Geometry

Whether it’s a 3D printed robot chassis or a stained glass window, looking at a completed object and trying to understand how it was designed and put together can be intimidating. But upon closer examination, you can often identify the repeating shapes and substructures that were combined to create the final piece. Soon you might find that the design that seemed incredibly intricate when taken as a whole is actually an amalgamation of simple geometric elements.

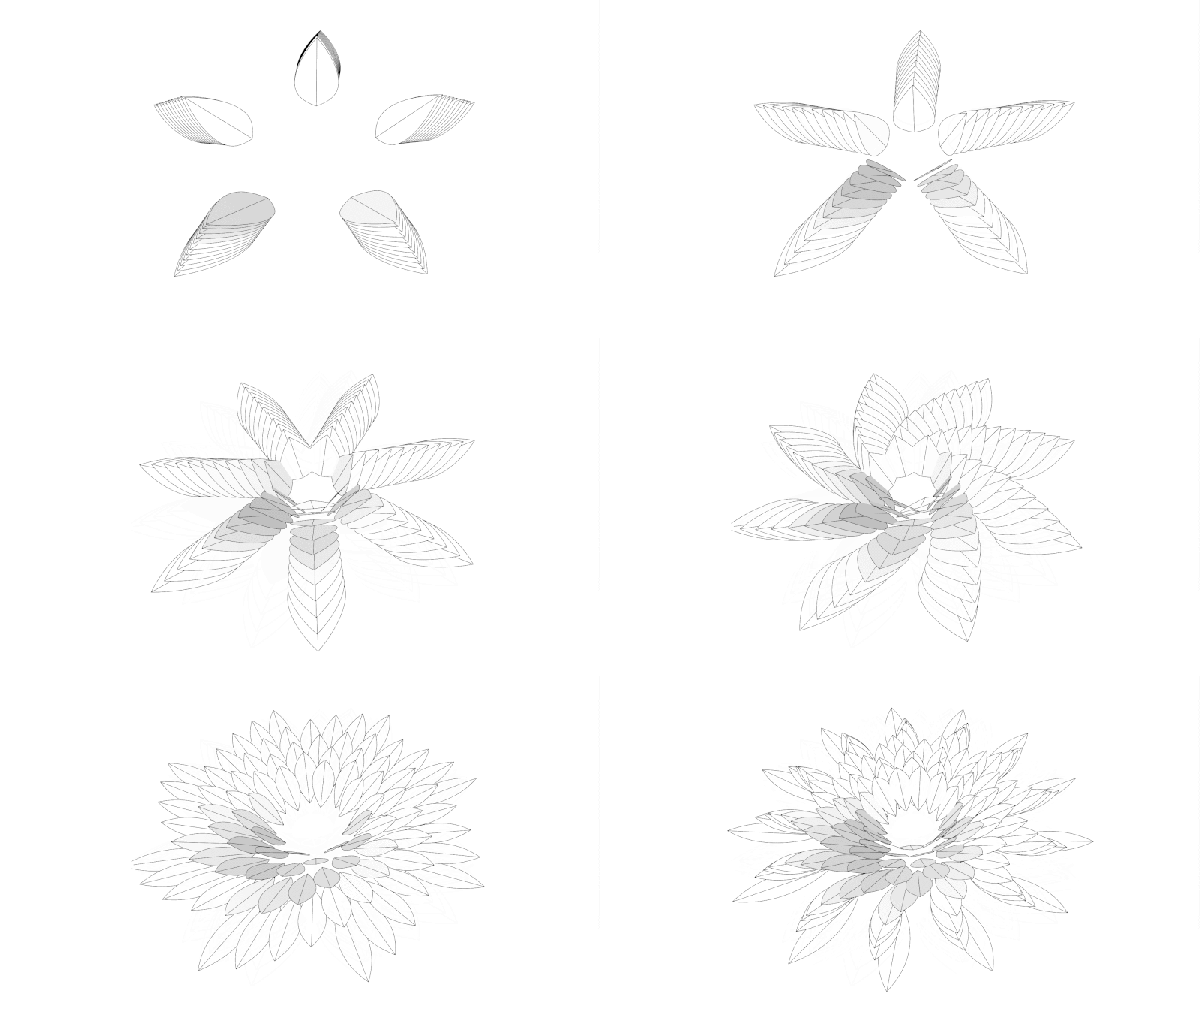
This skill, the ability to see an object for its principle components, is just as important for designing new objects as it is for understanding existing ones. As James McBennett explains in his HackadayU course Designing with Complex Geometry, if you want to master computer-aided design (CAD) and start creating your own intricate designs, you’d do well to start with a toolbox of relatively straightforward geometric primitives that you can quickly modify and reuse. With time, your bag of tricks will be overflowing with parametric structures that can be reshaped on the fly to fit into whatever you’re currently working on.

His tool of choice is Grasshopper, a visual programming language that’s part of Rhino. Designs are created using an interface reminiscent of Node-RED or even GNU Radio, with each interconnected block representing a primitive shape or function that can be configured through static variables, interactive sliders, conditional operations, and even mathematical expressions. By linking these modules together complex structures can be generated and manipulated programmatically, greatly reducing the time and effort required compared to a manual approach.

As with many powerful tools, there’s certainly a learning curve for Grasshopper. But over the course of this five part series, James does a great job of breaking things down into easily digestible pieces that build onto each other. By the final class you’ll be dealing with physics and pushing your designs into the third dimension, producing elaborate designs with almost biological qualities.

Of course, Rhino isn’t for everyone. The $995 program is closed source and officially only runs on Windows and Mac OS. But the modular design concepts that James introduces, as well as the technique of looking at large complex objects as a collection of substructures, can be applied to other parametric CAD packages such as FreeCAD and OpenSCAD.

Designing with Complex Geometry is just one of the incredible courses offered through HackadayU, our pay-as-you-wish grad school for hardware hackers. From drones to quantum computing, the current list of courses has something for everyone.

Continue reading “New Video Series: Designing With Complex Geometry”

Who Flew Across The Atlantic First? The Airborne Boats Of 1919

Aviation history is a bit strange. People tend to remember some firsts but not others and — sometimes — not even firsts. For example, everyone knows Amelia Earhart attempted to be the first woman to fly around the globe. She failed, but do you know who succeeded? It was Jerrie Mock. How about the first person to do it? Wiley Post, a name largely forgotten by the public. Charles Lindbergh is another great example. He was the first person to fly across the Atlantic, right? Not exactly. The story of the real first transatlantic flight is one of aviation hacking by the United States Navy.

Continue reading “Who Flew Across The Atlantic First? The Airborne Boats Of 1919”

No Mask Required: Bring-A-Hack Is Back August 5th

Yes, we’re still in a pandemic and yes, these types of events are still happening over videoconference and not in meat space. But you know what? That means that so many more people have the opportunity to show up and show off their hacks! As long as 1 PM PDT is within your personal uptime, that is. Maybe you can make an exception if not?

Here is your link: the summer edition of Bring a Hack with Tindie and Hackaday will take place on Thursday, August 5th at 1:00 PM Pacific Daylight time (that’s 4pm EDT | 9pm BST/CET). Choose your gnarliest hack of late and go register for the event, which will be held on the Crowdcast video chat platform this time around.

The remote Bring-A-Hack held way back in April was packed with awesome people. Now is your chance to join in! You all have awesome projects from the last few months (we’ve seen a lot of them on these very pages), so come show them off to the hacker elite from around the globe. You know the deal: it really doesn’t matter what level your project is on, so don’t worry about that. As long as you’re passionate about it, we’d love to see it and hear all about the problems you had to overcome and yes, even the mistakes you made. You never know what knowledge you might have that can push someone else’s project over the finish line.

Shine up your hacks, and mark those calendars; here’s a timezone converter if you need it. Reserve your spot now. Seriously, don’t fool yourself into thinking your build isn’t impressive enough — we want to see it. My hack might not even involve a circuit, and that’s enough to pique your interest, right? See you there!

Lord Kelvin’s Contraption Turns Drips Into Sparks

It’s easy to think that devices which generate thousands of volts of electricity must involve relatively modern technology, but the fact is, machines capable of firing sparks through open air predate Edison’s light bulb. Which means that recreating them with modern tools, construction techniques, and part availability, is probably a lot easier than most people realize. The fascinating machine [Jay Bowles] put together for his latest Plasma Channel video is a perfect example, as it’s capable of developing 6,000 volts without any electronic components.

Now as clever as [Jay] might be, he can’t take credit for the idea on this one. That honor goes to Lord Kelvin, who came up with this particular style of electrostatic generator back in 1867. Alternately called “Kelvin water dropper” or “Lord Kelvin’s Thunderstorm”, the machine is able to produce a high voltage charge from falling water without using any moving parts.

Diverging streams means a charge is building up.

Our very own [Steven Dufresne] wrote an in-depth look at how these devices operate, but the short version is that a negative and positive charge is built up in two sets of metallic inductor rings and buckets, with the stream of water itself acting as a sort of wire to carry the charge up to the overhead water reservoir. As [Jay] demonstrates the video, you’ll know things are working when the streams of water become attracted to the inductors they are passing through.

Rather than connecting a separate spark gap up to the water “receivers” on the bottom of his water dropper, [Jay] found the handles on the metal mugs he’s using worked just as well. By moving the mugs closer and farther away he can adjust the gap, and a second adjustment lets him move the vertical position of the inductors. It sounds like it takes some fiddling to get everything in position, but once it’s working, the whole thing is very impressive.

Of course if you’re looking to get serious with high voltage experiments, you’ll want to upgrade to some less whimsical equipment pretty quickly. Luckily, [Jay] has shown that putting together a reliable HV supply doesn’t need to be expensive or complicated.

Continue reading “Lord Kelvin’s Contraption Turns Drips Into Sparks”

Avoiding Repetitive Stress Injury: Invest In Yourself Now, Or Pay Later

There I was, thirty years after I first sat down at an Apple IIe , and I suddenly found myself wondering if I would ever use a computer again without pain. How could I work if I couldn’t use a computer anymore? I had to seriously ask myself this question. It took a bit of a winding road to figure out what was going on and two EMGs to confirm it, but after all these years, it was clear to the medical community that I had developed a repetitive stress injury (RSI) called cubital tunnel syndrome in my left arm.

Yeah, it’s about like that. Image via Kinesis

Cubital tunnel syndrome is like carpal tunnel, but in your elbow instead of your wrist. What a misnomer! Sometimes my pain went all the way from my armpit to my fingertips and made me want to gnaw my own arm off. I don’t think you can really understand neuropathy unless you’ve felt this weird, annoying type of pain firsthand. I hope you never do.

Can you stop and seriously imagine not being able to use a computer for the rest of your life? Or at least feeling that way because doing so causes incredibly annoying pain? I feel like we’re all vaguely aware of the standard list of anti-RSI precautions, but let’s review:

  • maintain good posture — sit with feet flat on the floor, wrists straight, elbows at 90°
  • put the screen an arm’s length away at eye level
  • take frequent short breaks

Yes, those are all fine and good. But there are other things you can do to avoid computer-related RSIs, like using ergonomic inputs, and building a custom setup that fits you exactly. This isn’t a study kiosk at the university library we’re talking about — this is your battlestation! The problem is that many people are stubborn, and won’t go out of their way to do anything to proactively prevent these injuries. But you don’t have to cross a bridge when you come to it if you have a map that shows you a way around the body of water.

Continue reading “Avoiding Repetitive Stress Injury: Invest In Yourself Now, Or Pay Later”

Modified 3D-Printer Solders Through-Hole Components

Surface-mount technology has been a fantastic force multiplier for electronics in general and for hobbyists in particular. But sometimes you’ve got no choice but to use through-hole components, meaning that even if you can take advantage of SMDs for most of the design, you still might need to spend a little time with soldering iron in hand. Or not, if you’ve got a spare 3D printer lying around.

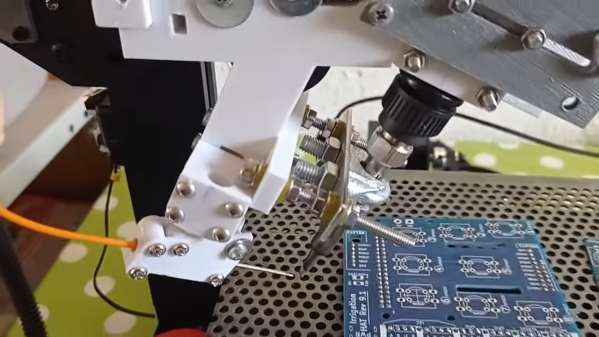
All we’ve got here is a fairly brief video from [hydrosys4], so there aren’t a lot of build details. But it’s pretty clear what’s going on here. Starting with what looks like a Longer LK4 printer, [hydrosys4] added a bracket to hold a soldering iron, and a guide for solder wire. The solder is handled by a more-or-less standard extruder, which feeds it into the joint once it’s heated by the iron. The secret sauce here is probably the fixturing, with 3D-printed jigs that hold the through-hole connectors in a pins-up orientation on the bed of the printer. With the PCB sitting on top of the connectors, it’s just a matter of teaching the X-Y-Z position of each joint, applying heat, and advancing the solder with the extruder.

The video below shows it in action at high speed; we slowed it down to 25% to get an idea of how it is in reality, and while it might not be fast, it’s precise and it doesn’t get tired. It may not have much application for one-off boards, but if you’re manufacturing small PCB runs, it’s a genius solution. We’ve seen similar solder bots before, but hats off to [hydrosys4] for keeping this one simple.

Continue reading “Modified 3D-Printer Solders Through-Hole Components”