Hex Matrix Clock Does It With Six Sides

LED matrixes were once a total headache, requiring careful consideration to make the most of limited I/O pins and available microcontroller resources. These days, addressable LED strings have made it all a cinch. Thus, going a little out of the box isn’t so daunting. [w.r.simpson] did just that with this hex-matrix clock.

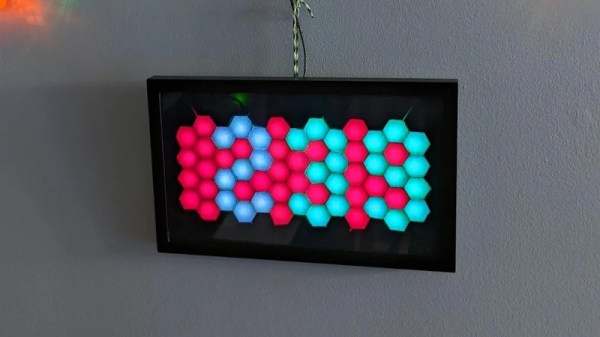
Relying on hexes instead of a normal Cartesian grid requires some attention to how the rows and columns are laid out, but the Instructable goes through the necessary coordinate system to address the display. The whole display was built without a 3D printer, instead relying on some basic craft skills and a picture frame as the enclosure. Strips of WS2812B LEDs were used to build the hexagonal matrix, run by a Adafruit Metro Mini 328. To give each hexagonal pixel, or hexel, a crisp outline, a shadow grid was built using black paper to stop the light bleeding between the display segments when switched on. Smoked plexiglas wasn’t available, so instead, tinted window film was used to darken the front of the display.

The result is impressive; while some glue marks from the shadow grid are visible closeup, from a distance the final product looks incredibly futuristic thanks to the hexagonal layout. We can imagine this would make a great set dressing in a futuristic film clip; we fully expect to see this concept in the background of the next Ariana Grande single. If this build isn’t enough six-sided fun to sate your appetite, consider getting into Super Hexagon too!

Remoticon Video: Pigweed Brings Embedded Unit Testing, Library Integration To Commandline

When it comes to embedded engineering, toolchains are the worst. Getting a new toolchain up and running correctly is often hard, and often prone to breaking when the IDE or other software is upgraded. A plethora of different toolchains for different hardware makes things even more murky, and if you want to get into time-saving tricks like automated testing, you’re in for a wild ride.

Those pain points led to the creation of the Pigweed project. As Keir Mierle demonstrates in this workshop from the 2020 Hackaday Remoticon, Pigweed is a set of libraries to make working with embedded development more hacker-friendly. The collection is accessed via commandline, and coordinates work with existing libraries to deliver unit testing, linting, static analysis, logging, and handling key-value stores, all alongside more commonly called-for tasks like compiling and flashing.

Demonstrated on a Teensy microcontroller and an STM32 Discovery board, the presentation drives home the utility of Pigweed, a Google project that was released as open source back in March of 2020. Graphical IDEs for these platforms are nowhere in sight, yet test firmware is built and flashed to these devices with relative ease. Unit testing, traditionally a sticky subject for on-chip applications, is demonstrated both emulated on the computer side, and running on the boards themselves. As the capabilities of microcontrollers have ballooned in recent years, writing tests for existing functions and confirming them during new development is becoming a must-have in your skillset.

There’s much more shown off here, so grab the workshop repository to follow along. It’s still considered experimental, and the irony of having to learn the intricacies of the Pigweed toolchain to ease the pain of other toolchains is not lost on us. However, most people reading will have their own affinity for the ability to use unified tools and commandline automation; this is a fascinating way to deliver a number of powerful software development techniques to low-level hardware projects.

Continue reading “Remoticon Video: Pigweed Brings Embedded Unit Testing, Library Integration To Commandline”

Making A Kid-Friendly Computer As A Present: Or How To Be The Cool Aunt At Christmas

This article was meant to be finished up before Christmas, so it’ll be a little late whenever you’re reading it to go and prepare this for the holiday. Regardless, if, like me, should you ever be on the lookout for something to give a toddler nephew or relative, it could be worth it to look into your neglected old parts shelves. In my case, what caught my eye was a 9-year-old AMD laptop catching dust that could be better repurposed in the tiny hands of a kid eager to play video games.

The main issues here are finding a decent selection of appropriate games and streamling the whole experience so that it’s easy to use for a not-yet-hacker, all the while keeping the system secure and child-friendly. And doing it all on a budget.

This is a tall order, and requirements will be as individual as children are, of course, but I hope that my experience and considerations will help guide you if you’re in a similar boat.

Continue reading “Making A Kid-Friendly Computer As A Present: Or How To Be The Cool Aunt At Christmas”

Sand Plotter Built With 3D Printer Parts

Sand plotters are beautiful machines. They can make endless patterns, over and over again, only to wipe away their own creation with each new pass. Having seen the famous Sisyphus sand sculpture online, [Simon] decided to make his own.

The build came together quickly, thanks to [Simon]’s well-stocked workshop and experience with CNC motion platforms. The frame was built out of wood, with a combination of hand-cut and lasercut parts. After fabric-wrapping the outer rim turned out poorly, rope was substituted instead for a stylish, organic look. LEDs were installed inside to light the sand for attractive effect. The metal ball is moved through the sand via a magnet attached to an XY platform mounted on the back of the table. The platform is built out of old 3D printer parts, with a Creality CR10S Pro chosen for its ultra-quiet stepper drivers. Initial attempts to make the system near-silent were hung up by the crunching sound of the ball rolling over the sand; this was fixed by instead mounting the ball on a foam pad. While the ball is now dragged instead of rolling, the effect is one of blissful quiet instead of crunching aggravation.

The final build is incredibly attractive, and something we’d love to have as a coffee table as a conversation piece. We’ve seen [Simon]’s work around here before, too – with the water-walking RC car a particular highlight. Video after the break.

Continue reading “Sand Plotter Built With 3D Printer Parts”

NVMe Blurs The Lines Between Memory And Storage

The history of storage devices is quite literally a race between the medium and the computing power as the bottleneck of preserving billions of ones and zeros stands in the way of computing nirvana. The most recent player is the Non-Volatile Memory Express (NVMe), something of a hybrid of what has come before.

The first generations of home computers used floppy disk and compact cassette-based storage, but gradually, larger and faster storage became important as personal computers grew in capabilities. By the 1990s hard drive-based storage had become commonplace, allowing many megabytes and ultimately gigabytes of data to be stored. This would drive up the need for a faster link between storage and the rest of the system, which up to that point had largely used the ATA interface in Programmed Input-Output (PIO) mode.

This led to the use of DMA-based transfers (UDMA interface, also called Ultra ATA and Parallel ATA), along with DMA-based SCSI interfaces over on the Apple and mostly server side of the computer fence. Ultimately Parallel ATA became Serial ATA (SATA) and Parallel SCSI became Serial Attached SCSI (SAS), with SATA being used primarily in laptops and desktop systems until the arrival of NVMe along with solid-state storage.

All of these interfaces were designed to keep up with the attached storage devices, yet NVMe is a bit of an odd duck considering the way it is integrated in the system. NVMe is also different for not being bound to a single interface or connector, which can be confusing. Who can keep M.2 and U.2 apart, let alone which protocol the interface speaks, be it SATA or NVMe?

Let’s take an in-depth look at the wonderful and wacky world of NVMe, shall we?

Continue reading “NVMe Blurs The Lines Between Memory And Storage”

Custom Coil Lets Mouse Charge Without Wires

It’s 2021, shouldn’t all of our devices be able to pull the power they need from the ether? [Sasa Karanovic] certainly thinks so, which is why he recently took it upon himself to add wireless charging capabilities to his desktop computer peripherals. The Qi transmitter and receiver modules are relatively cheap and easy to come by, the trick is in getting them installed.

The keyboard gets non-invasive Qi charging.

For the keyboard, [Sasa] took the path of least resistance. The receiver coil lives inside a little 3D printed box attached to the back, and power is routed through a hacked up right-angle USB cable. It’s a simple addition that doesn’t make any permanent changes to the keyboard; perfect for those who don’t want to risk toasting their gear.

But that wasn’t really an option for the mouse. Obviously the Qi hardware would have to go on the inside, but at a glance it was clear there wasn’t enough room to mount the stock coil. So [Sasa] pulled the original coil apart and rewound it around a small 3D printed jig. This resulting coil was perfectly sized to fit inside the flat area on the left side of the mouse with no apparent degradation in charging ability. Wiring the module up to an unpopulated pad on the PCB allowed him to easily inject the 5 V output into the device’s existing charging circuitry.

We’ve seen plenty of aftermarket Qi charging coils take up permanent residence in various gadgets, but rewinding the coil is a neat trick that we’ve only seen pulled off a couple times in the past. Something to file away mentally should you ever want to wirelessly power up one of your projects.

Continue reading “Custom Coil Lets Mouse Charge Without Wires”

It Isn’t Rocket Science — Wait, Maybe It Is

We don’t know why, but for some reason, the more dangerous something is, the more hacker appeal it seems to have. We like to deal with high temperatures, high voltages, dangerous chemicals, and powerful lasers. So [Tech Ingredient’s] recent video about homemade rocket motors certainly caught our attention. You may need a little commitment, though. The first video (yes, there isn’t just one) is over an hour long.

Turns out, [Tech] doesn’t actually want to use the rockets for propulsion. He needed a source of highly-ionized high-velocity plasma to try to get more power from his magnetohydrodynamic project. Whatever you want to use it for, these are serious-sized motors. [Tech] claims that his design is both powerful and easy to build. He also has a “secret” rocket fuel that he shares. What is it? We won’t spoil the video for you, but it is a sweet surprise.

Continue reading “It Isn’t Rocket Science — Wait, Maybe It Is”