Handheld Slayer Exciter Wand Makes For Easy High Voltage Magic

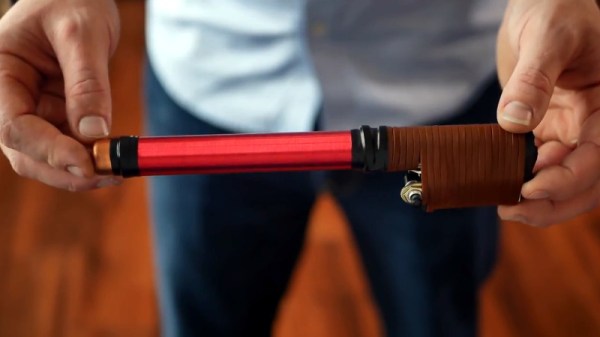
It’s often said that any sufficiently advanced technology is indistinguishable from magic, and when a DIY device lets you light up fluorescent bulbs with a flick of the wrist, it’s certainly not hard to see why. The latest creation from [Jay Bowles], this high voltage wand is actually a Slayer Exciter coil that’s able to boost the output of a standard 9 V alkaline or rechargeable battery high enough to perform some of the wireless power tricks we usually associate with the more complex Tesla coil.

We really can’t overstate how simple it is to build one of these yourself. Sure you’ll still need to wind the coil, but if you can chuck the 1/2 inch acrylic tube into a electric drill you should be able to make short work of it. Once you’ve wound your secondary coil from 32 gauge magnet wire, you only need a couple turns of common doorbell wire to make up the primary.

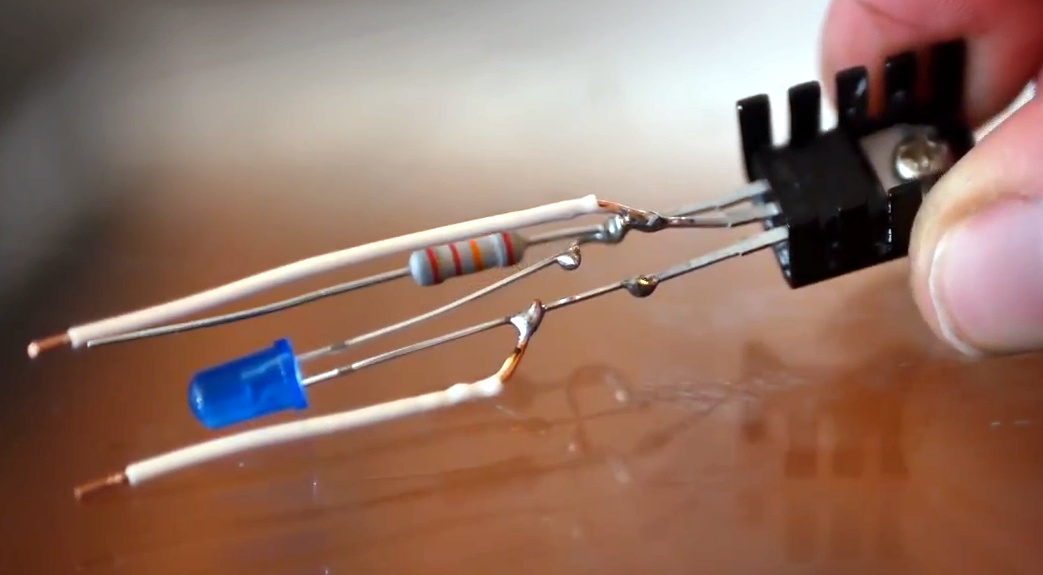
Think there must be some complex electronics hiding in the handle? Far from it. All that’s hidden by that faux-leather wrapping is a transistor to do the high-speed switching, an LED functioning as both the power indicator and the circuit’s diode, and a resistor. [Jay] put it all together dead bug style, but you could do it on a scrap of perfboard if you’d like something a little more robust.

Being a big believer in STEM education, [Jay] says the wand was designed to be as kid-friendly as possible so he could gift it to his young niece and nephew. Inspiring the next generation is certainly something we respect around these parts, though we think there’s plenty of adults who wouldn’t have been disappointed if they unwrapped a gadget like this over the holidays.

If you’d like to play around with a Slayer but aren’t into the whole Harry Potter motif, you might be interested in the larger and more capable version [Jay] built earlier in the year.

Continue reading “Handheld Slayer Exciter Wand Makes For Easy High Voltage Magic”

Stepping Down Voltage With Reliability

The availability of inexpensive electronics modules has opened up a world of opportunity for more complex projects to be completed quickly. Rather than designing everything from scratch, ready-made motor modules, regulators, computer vision modules, and control modules all ready to be put to work after arriving at one’s doorstep. Sometimes, though, these inexpensive electronics aren’t all they’re cracked up to be, so [Jan] decided to produce them from scratch instead.

[Jan] is the creator of several robots, and frequently makes use of 3.3V and 5V step down modules, but was not happy with the consistency offered by the prefab modules. The solution to this was to build them from scratch in a way that makes producing a large amount nearly as easy as ordering them. The boards are based around the SY8105 chip, and are built in two batches for the robotics shop based on the two most commonly needed output voltages. With their design they get exactly what they need every time, without worrying about reliability from a random board shop overseas.

The robotics shop is called RoboticsBrno and they have made the schematics available for anyone that wants to build their own. That being said, the design does not make considerations for low noise since it isn’t required for their use case, but if you’d prefer something simple and reliable this will get the job done. It’s also important to understand the limitations of the parts in a build that are built by a third party, although power supplies are a pretty common area to make improvements on.

Hacking A 3D Pen For Better Performance

When 3D pens first became available, many assumed them to be gimmicky or part of a general fad that would eventually die out. Like most revolutionary technologies, though, they’ve found a firm foothold, especially in the art community where the ability to 3D print in freehand is incredibly valuable. There are still some shortcomings with the technology, though, but [tterev3] recently tore into a 3doodler pen to make some necessary upgrades.

First, this pen has some design choices that are curious, to say the least. The cooling fan runs regardless of temperature, and it has pushbuttons for start and stop rather than a momentary button that controls the extrusion. To fix these issues, as well as change the filament size, improve the cooling, and provide greater control over the extrusion speed, [tterev3] completely rewrote the firmware, changed the microcontroller on the PCB, and made several hardware upgrades to accommodate these changes. He also went ahead and installed a USB-C port for charging, which should be standard practice on all low-voltage consumer electronics by now anyway.

The detail work on this project is impressive, given the small size of the pen itself and the amount of precision hardware needed to make the changes. Especially regarding the replacement of the microcontroller on the board itself, which is an impressive feat even without the incredibly small dimensions. The firmware upgrade is available on his GitHub page as well if you have your own 3doodler that needs modifications, and if you’re still struggling to find uses for these handy devices, we’ve seen them used with interesting effect to build drones.

Hex Matrix Clock Does It With Six Sides

LED matrixes were once a total headache, requiring careful consideration to make the most of limited I/O pins and available microcontroller resources. These days, addressable LED strings have made it all a cinch. Thus, going a little out of the box isn’t so daunting. [w.r.simpson] did just that with this hex-matrix clock.

Relying on hexes instead of a normal Cartesian grid requires some attention to how the rows and columns are laid out, but the Instructable goes through the necessary coordinate system to address the display. The whole display was built without a 3D printer, instead relying on some basic craft skills and a picture frame as the enclosure. Strips of WS2812B LEDs were used to build the hexagonal matrix, run by a Adafruit Metro Mini 328. To give each hexagonal pixel, or hexel, a crisp outline, a shadow grid was built using black paper to stop the light bleeding between the display segments when switched on. Smoked plexiglas wasn’t available, so instead, tinted window film was used to darken the front of the display.

The result is impressive; while some glue marks from the shadow grid are visible closeup, from a distance the final product looks incredibly futuristic thanks to the hexagonal layout. We can imagine this would make a great set dressing in a futuristic film clip; we fully expect to see this concept in the background of the next Ariana Grande single. If this build isn’t enough six-sided fun to sate your appetite, consider getting into Super Hexagon too!

Remoticon Video: Pigweed Brings Embedded Unit Testing, Library Integration To Commandline

When it comes to embedded engineering, toolchains are the worst. Getting a new toolchain up and running correctly is often hard, and often prone to breaking when the IDE or other software is upgraded. A plethora of different toolchains for different hardware makes things even more murky, and if you want to get into time-saving tricks like automated testing, you’re in for a wild ride.

Those pain points led to the creation of the Pigweed project. As Keir Mierle demonstrates in this workshop from the 2020 Hackaday Remoticon, Pigweed is a set of libraries to make working with embedded development more hacker-friendly. The collection is accessed via commandline, and coordinates work with existing libraries to deliver unit testing, linting, static analysis, logging, and handling key-value stores, all alongside more commonly called-for tasks like compiling and flashing.

Demonstrated on a Teensy microcontroller and an STM32 Discovery board, the presentation drives home the utility of Pigweed, a Google project that was released as open source back in March of 2020. Graphical IDEs for these platforms are nowhere in sight, yet test firmware is built and flashed to these devices with relative ease. Unit testing, traditionally a sticky subject for on-chip applications, is demonstrated both emulated on the computer side, and running on the boards themselves. As the capabilities of microcontrollers have ballooned in recent years, writing tests for existing functions and confirming them during new development is becoming a must-have in your skillset.

There’s much more shown off here, so grab the workshop repository to follow along. It’s still considered experimental, and the irony of having to learn the intricacies of the Pigweed toolchain to ease the pain of other toolchains is not lost on us. However, most people reading will have their own affinity for the ability to use unified tools and commandline automation; this is a fascinating way to deliver a number of powerful software development techniques to low-level hardware projects.

Continue reading “Remoticon Video: Pigweed Brings Embedded Unit Testing, Library Integration To Commandline”

Making A Kid-Friendly Computer As A Present: Or How To Be The Cool Aunt At Christmas

This article was meant to be finished up before Christmas, so it’ll be a little late whenever you’re reading it to go and prepare this for the holiday. Regardless, if, like me, should you ever be on the lookout for something to give a toddler nephew or relative, it could be worth it to look into your neglected old parts shelves. In my case, what caught my eye was a 9-year-old AMD laptop catching dust that could be better repurposed in the tiny hands of a kid eager to play video games.

The main issues here are finding a decent selection of appropriate games and streamling the whole experience so that it’s easy to use for a not-yet-hacker, all the while keeping the system secure and child-friendly. And doing it all on a budget.

This is a tall order, and requirements will be as individual as children are, of course, but I hope that my experience and considerations will help guide you if you’re in a similar boat.

Continue reading “Making A Kid-Friendly Computer As A Present: Or How To Be The Cool Aunt At Christmas”

Sand Plotter Built With 3D Printer Parts

Sand plotters are beautiful machines. They can make endless patterns, over and over again, only to wipe away their own creation with each new pass. Having seen the famous Sisyphus sand sculpture online, [Simon] decided to make his own.

The build came together quickly, thanks to [Simon]’s well-stocked workshop and experience with CNC motion platforms. The frame was built out of wood, with a combination of hand-cut and lasercut parts. After fabric-wrapping the outer rim turned out poorly, rope was substituted instead for a stylish, organic look. LEDs were installed inside to light the sand for attractive effect. The metal ball is moved through the sand via a magnet attached to an XY platform mounted on the back of the table. The platform is built out of old 3D printer parts, with a Creality CR10S Pro chosen for its ultra-quiet stepper drivers. Initial attempts to make the system near-silent were hung up by the crunching sound of the ball rolling over the sand; this was fixed by instead mounting the ball on a foam pad. While the ball is now dragged instead of rolling, the effect is one of blissful quiet instead of crunching aggravation.

The final build is incredibly attractive, and something we’d love to have as a coffee table as a conversation piece. We’ve seen [Simon]’s work around here before, too – with the water-walking RC car a particular highlight. Video after the break.

Continue reading “Sand Plotter Built With 3D Printer Parts”