Coin-Operated Graphing Calculator Console

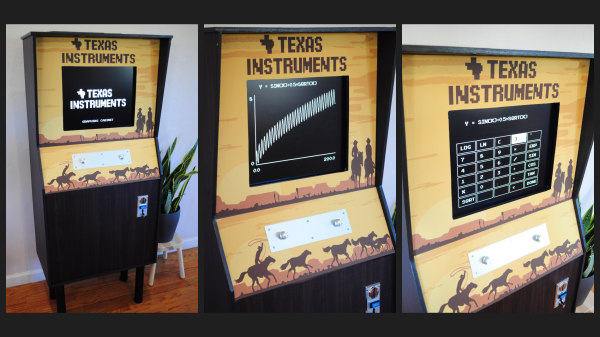
Longtime hacker [Peter Jansen] was so impressed with a piece in The Onion from last year that he decided to build this coin-operated Texas Instruments graphing calculator console on a whim (video below the break — warning vertical orientation).

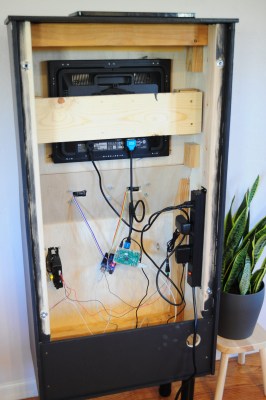
With nothing more to go on than the fake mock-up pictured from the original satirical article, [Peter] was able to scale the dimensions from the photo making a few reasonable assumptions. He built the project over the holidays, enlisting his father and daughter as helpers. The cabinet is framed in 2×3 lumber and faced with wood veneer covered plywood and vinyl overlays for the graphics.

The computing power is from a Raspberry Pi with an Arduino Uno serves as an I/O processor. It was a bit tricky to control a calculator with only two knobs, but he makes it work. However, at 25 cents per plot with no apparent hard-copy capability, this console calculator might be a bit pricey for all but casual plotting over a few beers at the local pub.

You might remember [Peter] from some of his hacks we featured over the years, like his home-brew CT scanner or placing fourth in the first Hackaday Prize contest in 2014 with the open sourced tricorder project.


Continue reading “Coin-Operated Graphing Calculator Console”

A PNG Based Circuit Simulator

We’re sure thousands of hours have been spent in Minecraft implementing digital logic. Inspired by that, [lynnpepin] created a digital logic simulator named Reso that is based on pixels rather than voxels.

There are a few clever things here. First, different colors represent different parts. There are three different colors of wire, output and input wires, XOR gates, and AND gates. OR gates are just output wires, which or all the input wires together. By implementing these gates, Reso is, by definition, Turing complete. Since it’s just a PNG, it is trivial to open it up in GIMP and copy and paste one bit of the circuit multiple times. The different color wires are mainly to help route in a 2d plane, as you don’t have vias. Currently, the image compiles into a graph that is executed. [Lynn] chose code readability and ease of prototyping over premature optimization, so the code isn’t particularly fast. But it is pretty fun, squinting at the pixels that make up the adders and clocks he has on his blog. After giving Reso your image, it outputs a series of images that enumerate the state for several states.

The code is available on Github, and a Rust version has already been written that offers some impressive speed improvements at the expense of not being at feature parity yet. If MS-Paint isn’t your IDE of choice, perhaps a more Javascript-based digital logic simulator might be more to your taste.

Weird Phosphor Conversion LEDs Found In Cheap LED String

[Tim] recently found himself tinkering with a cheap string of LEDs. Far from an advanced, IC-controlled addressable set, these were merely a string with LEDs of four colors that could be switched on and off. However, digging in to the LEDs themselves turned up a curious find.

The LEDs were set up in a parallel/anti-parallel fashion. The two power lines ran the length of the string, with all the LEDs installed across them. If polarity was applied in one direction, the red and yellow LEDs would light up, in the other, the blue and green LEDs would light together.

This raised a question for [Tim], as typically, different LEDs light up at different forward voltages and this can cause issues when running different color LEDs in parallel together. What he instead found was that all the LEDs were actually blue LEDs in their fundamental construction. However, the red, yellow, and green LEDs had all been given a phosphor coating. In these devices, when the blue LED underneath lit up, the phosphor converted the light into the desired color. [Tim] was able to confirm this behaviour by illuminating the phosphor manually using an external UV-A LED.

It’s an interesting choice, but it’s certainly one way of making a multicolored string of LEDs. If you wanna get fancier though, consider studying this tutorial on working with addressable LED strings!

[Thanks to J Peterson for the tip!]

Put A Little Piece Of The James Webb On Your Wall

The James Webb Space Telescope (JWST) has become something of a celebrity here on Earth, and rightfully so. After decades of development, the $10 billion deep space observatory promises to peel back the mysteries of the universe in a way that simply hasn’t been possible until now. Plus, let’s be honest, the thing just looks ridiculously cool.

So is it really such a surprise that folks would want a piece of this marvel hanging up in their wall? No, it’s not the real thing, but this rendition of the JWST’s primary mirror created by [James Kiefer] and [Ryan Kramer] certainly gets the point across.

A CNC router was used to cut the outside shape from a piece of 1/2 inch MDF, as well as put 1 mm deep pockets in the face to accept the hexagonal golden acrylic mirrors. We originally thought the mirrors were also custom made, but somewhat surprisingly, gold-tinted hex mirrors are apparently popular enough in the home decor scene that they’re readily available online for cheap. A quick check with everyone’s favorite a large online bookseller turned global superpower shows them selling for as little as $0.50 a piece.

With a coat of black paint on the MDF, the finished piece really does look the part. We imagine it’s fairly heavy though, and wonder how it would have worked out if the back panel was cut from a piece of thick foam board instead.

Of course this isn’t a terribly difficult design to recreate if you had to, but we still appreciate that the duo has decided to release both the Fusion 360 project file and the exported STL to the public. It seems only right that this symbol for science and discovery should be made available to as many people as possible.

After a dramatic launch on Christmas Day and a perilous flight through deep space, the JWST has performed impeccably. Even though we’re still a several months away from finally seeing what this high-tech telescope is capable of, it’s already managed to ignite the imaginations of people all over the globe.

Tiny Ethernet Cable Arms Race Spawns From Reddit Discussion

If you’ve had any dealings with Cat 5 and Cat 6 cable, and let’s be honest, who hasn’t, you’ve probably wrestled with lengths anywhere from 1 meter to 25 meters if you’re hooking up a long haul. Network admins will be familiar with the 0.1 m variety for neat hookups in server cabinets. However, a Reddit community has recently taken things further.

It all started on r/ubiquiti, where user [aayo-gorkhali] posted a custom-built cable just over 2 inches long. The intention was to allow a Ubiquiti U6-IW access point to be placed on a wall. The tiny cable was used to hook up to the keystone jack that formerly lived in that position, as an alternative to re-terminating the wall jack into a regular RJ45 connector.

Naturally this led to an arms race, with [darkw1sh] posting a shorter example with two RJ-45 connectors mounted back to back with the bare minimum of cable crimped into the housings. [Josh_Your_IT_Guy] went out the belt sander to one-up that effort, measuring just over an inch in length.

[rickyh7] took things further, posting a “cable” just a half-inch long (~13 mm). In reality, it consists of just the pinned section of two RJ-45 connectors mounted back to back, wired together in the normal way. While electrically it should work, and it passes a cable tester check, it would be virtually impossible to actually plug it into two devices at once due to its tiny length.

We want to see this go to the logical end point, though. This would naturally involve hacking away the plastic casings off a pair of laptops and soldering their motherboards together at the traces leading to the Ethernet jack. Then your “cable” is merely the width of the solder joint itself.

Alternatively, you could spend your afternoon learning about other nifty hacks with Ethernet cables that have more real-world applications!

Linux Fu: Fusing Hackaday

Unix and, by extension, Linux, has a mantra to make everything possible look like a file. Files, of course, look like files. But also devices, network sockets, and even system information show up as things that appear to be files. There are plenty of advantages to doing that since you can use all the nice tools like grep and find to work with files. However, making your own programs expose a filesystem can be hard. Filesystem code traditionally works at the kernel module level, where mistakes can wipe out lots of things and debugging is difficult. However, there is FUSE — the file system in user space library — that allows you to write more or less ordinary code and expose anything you want as a file system. You’ve probably seen FUSE used to mount, say, remote drives via ssh or Dropbox. We’ve even looked at FUSE before, even for Windows.

What’s missing, naturally, is the Hackaday RSS feed, mountable as a normal file. And that’s what we’re building today.

Writing a FUSE filesystem isn’t that hard, but there are a lot of tedious jobs. You essentially have to provide callbacks that FUSE uses to do things when the operating system asks for them. Open a file, read a file, list a directory, etc. The problem is that for some simple projects, you don’t care about half of these things, but you still have to provide them.

Luckily, there are libraries that can make it a lot easier. I’m going to show you a simple C++ program that can mount your favorite RSS feed (assuming your favorite one is Hackaday, of course) as a file system. Granted, that’s not amazing, but it is kind of neat to be able to grep through the front page stories from the command line or view the last few articles using Dolphin. Continue reading “Linux Fu: Fusing Hackaday”

When Battery Rebuilds Go Wrong: Understanding BMSs, Spot Welders, And Safety

Batteries are amazing. Batteries are horrible. Batteries are a necessary evil in today’s world of portable everything. If you’re reading this sentence, even if it’s not on a mobile device, somewhere there is a battery involved. They’re that ubiquitous. There’s another thing batteries are: Expensive! And at $350 each for a specialized battery, [Linus] of Linus Tech Tips decided to take battery repair into his own hands.

Rather than do a quick how-to video about putting new cells in an old enclosure, [Linus] does a deep dive into the equipment, skills, and safety measures needed when dealing with Lithium Ion cells. And if you watch the video through, you’ll even get to see those safety measures put to good use!

The real meat of the video comes toward the end however, with its explanation of the different Battery Management Systems (BMS), and a discussion of the difficulty of doing battery repair correctly and safely. Lastly, the video covers something a bit more sinister: Batteries that are made to resist being repaired with new cells; DRM for batteries, so to speak.

Overall we found the video informative, and we hope you do too. You might also enjoy this peek into the chemistry behind your favorite battery types.

Continue reading “When Battery Rebuilds Go Wrong: Understanding BMSs, Spot Welders, And Safety”