Simple Hacks To Make LEGO Train Track Out Of Other Pieces

LEGO trains are fun to play with, but as with any model train, you so seldom have enough track to fulfill your greatest desires. YouTuber [brick_on_the_tracks] has come up with some creative ideas of his own to make track compatible with Lego trains using other techniques.

TRAINED LEGO PROFESSIONALS! DO NOT ATTEMPT IN REAL LIFE!

The most straightforward is to use the LEGO fence piece, first released in 1967. They can be laid in two rows, four studs apart, and they’ll serve as perfectly functional train track. It’s a 100% legal building technique as per the official LEGO rules, too. Official track pieces can be linked up by placing them on a 1-stud-high booster. [brick_on_the_tracks] argues that it’s up to nine times cheaper than using official track, but it depends on how you’re building your layout, and you need to take into account the need for a base plate.

On the sillier side of things, it’s actually possible to use mini-figures as track, too. Again, it’s a 100% legal technique, though the trains don’t run as smoothly compared to the fence track. It’s very amusing, though, and could be a fun addition to a build you’re taking to a local LEGO convention.

If you’re really strapped for cash though, you can go as far as using cardboard. It’s not legal in the LEGO world, and it’s pretty basic, but you could literally make up a layout using nothing but a craft knife and pizza boxes. We’ve actually featured other LEGO train hacks before, like this neat automatic decoupler design.

Continue reading “Simple Hacks To Make LEGO Train Track Out Of Other Pieces”

Finished pipe crimper made from recycled parts

Making A Pipe Crimper From Scrap

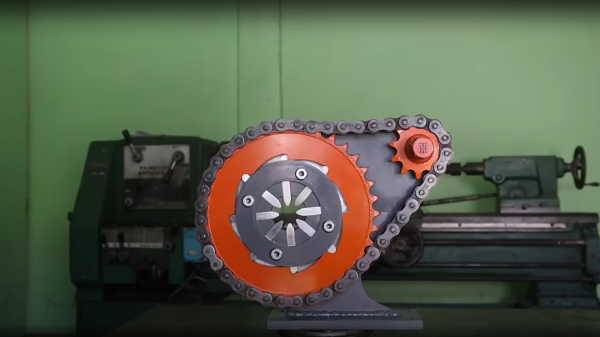
We love upcycling around these parts — taking what would be a pile of rusty scrap and turning it into something useful — and this project from YouTuber [Hands on Table] is no different. Starting with a pair of solid looking sprockets, one big, one small, and some matching chain, a few lumps of roughly hewn steel plate were machined to form some additional parts. A concentric (rear mounted) plate was temporarily welded to the sprocket so matching radial slots could be milled, before it was removed. Next, the sprocket was machined on the inside to add a smooth edge for the crimping fingers (is that the correct term? We’re going with it!) to engage with.

These fingers started life as an off the shelf 3/8″ HSS tool bit, ground down by hand, to produce the desiredInternal view of crimper mechanism shows the fingers and retraction springs crimping profile. A small piece of steel was welded on to each, to allow a small spring to act on the finger, enabling it to retract at the end of the crimping action. We did spot the steel plate being held in place with a small magnet, prior to welding. The heat from that would likely kill off the magnetic field in a short space of time, but they’re so cheap as to be disposable items anyway.
A small ring rides on top of the assembly, bolted to the fixed rear plate. The prevents the crimping fingers from falling out . The fingers are constrained by the slots in the rear plate, so the result is that they can only move radially. As the big sprocket is rotated, they get progressively pushed towards the center, giving that nice, even crimping action. Extra mechanical advantage is provided by driving the small sprocket with a wrench. Super simple stuff, and by the looks of the device in action, pretty effective at crimping the hose fittings it was intended for.

Taking one thing and turning it into something else may well be the very essence of hacking. We’ve seen many hacky upcycling efforts, such as this bench disk sander built from a dryer machine motor. Of course, upcycling is not limited to machines, tools and electronic doodads. Here a trapper hat made out of an old skirt. And why not?

Continue reading “Making A Pipe Crimper From Scrap”

LoRa Air Quality Monitor Raises The Bar On DIY IoT

We’ve seen an incredible number of homebrew environmental monitors here at Hackaday, and on the whole, they tend to follow a pretty predicable pattern. An ESP8266 gets paired with a common temperature and humidity sensor, perhaps a custom PCB gets invited to the party, and the end result are some values getting pushed out via MQTT. It’s a great weekend project to get your feet wet, but not exactly groundbreaking in 2022.

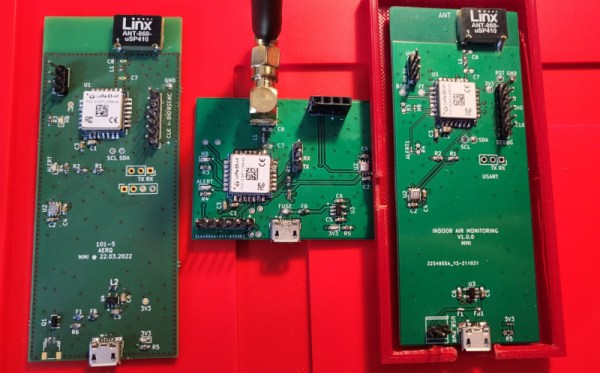
Which is why we find the AERQ project from [Mircea-Iuliu Micle] so refreshing. Not only does this gadget pick up temperature and humidity as you’d expect, but its Bosch BME688 sensor can also sniff out volatile organic compounds (VOCs) and gases such as carbon monoxide and hydrogen. The datasheet actually claims this is the “first gas sensor with Artificial Intelligence (AI)”, and while we’re not sure what exactly that means in this context, it’s a claim that apparently warrants a price tag of $15+ USD a pop in single quantities.

There’s an AI hiding in there someplace.

But the fancy sensor isn’t the only thing that sets AERQ apart from the competition. Instead of a member of the ubiquitous ESP family, it’s using the Wio-E5, a relatively exotic STM32 package that integrates a long-range LoRa radio. [Mircea-Iuliu] has paired that with a Linx USP-410 chip antenna or, depending on which version of the four-layer PCB you want to use, a u.Fl connector for an external antenna. The whole thing is powered by a simple USB connection, and its Mbed OS firmware is setup to dump all of its collected data onto The Things Network.

All told, it’s a very professional build that certainly wouldn’t look out of place if it was nestled into some off-the-shelf air quality monitor. While the high-end detection capabilities might be a bit overkill for home use, [Mircea-Iuliu Micle] points out that AERQ might provide useful insight for those running indoor events as COVID-19 transitions into its endemic stage.

An Amstrad Portable You Won’t Have Seen

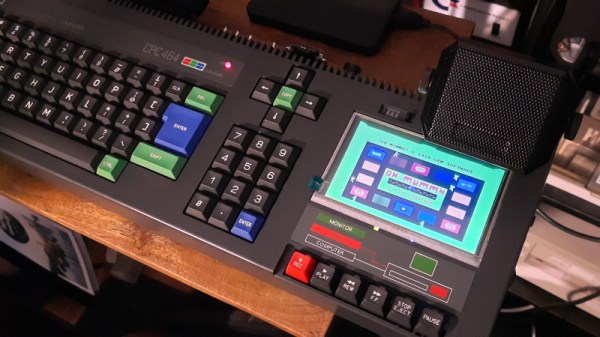
Of all the players in the home computer world in the 1980s, Alan Sugar’s Amstrad was a step ahead in ease of use over its competitors. The Amstrad CPC series of computers came with their own monitors that also had a built-in power supply, and featured built-in data recorders or disk drives as standard. Despite having a line of business computers and an eventual move into PC territory that included portable machines, Amstrad never produced a CPC which wasn’t anchored to the desktop. [Michael Wessel] has taken that challenge on himself with a CPC464 that had a broken cassette recorder, and come up with a creditable take on a portable computer that never was.

Starting with an ethos of not modifying the CPC case more than necessary, the defective tape drive has gone to be replaced with an HDMI TFT screen and a video converter board. In went a 512K RAM expansion, an SD card disk expansion, and a stereo amplifier. A small power supply board also takes power for the unit via USB-C, such that it can operate from a power bank.

The result is a fully functional and hugely expanded CPC that’s as much cyberdeck as it is retrocomputer, and given that if we remember correctly that these machines were CP/M capable it could be of greater use than simply gaming. [Michael] hasn’t entered his creation into our ongoing Cyberdeck Contest, but we think it would make a strong contender.

This isn’t the first Amstrac CPC we’ve shown you, here’s a very different take on a modernized machine.

Continue reading “An Amstrad Portable You Won’t Have Seen”

Monitoring A Cat’s Litter Box Usage With AI

[Estefannie] is a proud cat owner, but one of her cats has a bad habit of eating plastic. That means she needs to keep an eye on that cat’s bowel movements, but with two cats in the house, it’s difficult to know who did what. Thus, she whipped up an AI system to log her cats bathroom visits and give her peace of mind.

It’s not the most glamorous project — [Estefannie] notes she took over 50,000 pictures of her cats using the litterbox to train Microsoft Azure’s Custom Vision model. But after some work, it could readily identify which cat was using the litter box when fed images from a NoIR camera. The system then differentiates between number 1 and number 2 via the time the cat spends in the litter box. It’s not perfect, but it works.

The Raspberry Pi runs a Node.JS server to collate the results, paired with a website front-end for easy data display. That way, anyone on [Estefannie’s] WiFi network can see who did what from a browser. We’ve seen cat litter boxes put on the Internet of Things before, and we’ve even seen people hack litterbox DRM, too.

Continue reading “Monitoring A Cat’s Litter Box Usage With AI”

Militaries Are Rushing To Get Anti-Drone Lasers Operational

Flying drones have been a part of modern warfare for a good few decades now. Initially, most of these drones were built by traditional military contractors and were primarily used by the world’s best-funded militaries. However, in recent conflicts in Syria, Ukraine, and elsewhere have changed all that. Small commercial drones and compact militarized models have become key tools on the battlefield, for offense, defence, and reconnaissance.

With so many of these tiny craft buzzing around, militaries are scrambling for practical ways to shoot them down. Lasers might be just the ticket to do exactly that. Continue reading “Militaries Are Rushing To Get Anti-Drone Lasers Operational”

Custom Printed Knobs In Just A Few Lines Of Code

While not everyone is necessarily onboard for the CAD-via-code principle behind OpenSCAD, there’s no denying the software lends itself particularly well to parametric designs. Using a few choice variables, it’s possible to make a model in OpenSCAD that can be easily tweaked by other users — even if they have zero prior experience with CAD.

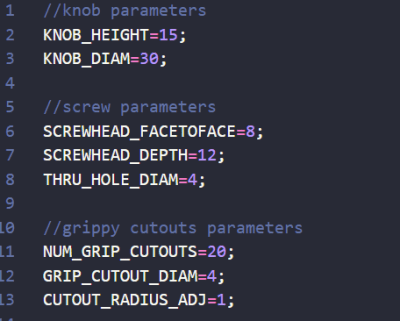
Take for example this parametric-knob-maker written by [aminGhafoory]. The code clocks in at less than 100 lines, but if you’re looking to spin up your own version, all you really need to pay attention to are the clearly labeled variables up at the top. Just plug in your desired diameter and height, fiddle around a bit with the values that get fed into the grip generating function, and hit F7 to export it to an STL ready for printing.

Now admittedly, all the knobs generated with this code will look more or less the same. But that’s the beauty of open source, should you want to print out some wild looking knobs, you can at least use this code as a basis to build on. With the core functionality in place, you just need to concern yourself with writing a new function to generate a grip texture more to your liking.

Of course, if you want to make your OpenSCAD designs even easier for others to modify, you’ll want to look into its impressive customizer capability which replaces manually edited variables with friendly sliders and text input boxes. Projects like the Ultimate Box Maker we looked at back in 2018 are an excellent example of how powerful OpenSCAD can be if you give your design the proper forethought.