A RPI HAT For Synchronized Measurements

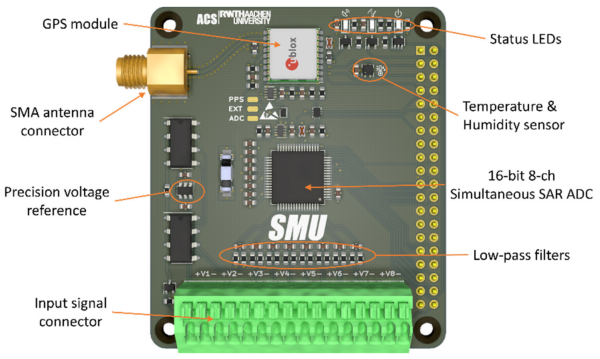
A team from the Institute for Automation of Complex Power System (ACS) at RWTH Aachen University have been working for a while on the analysis of widely distributed power systems. In a drive to move away from highly specialised (and expensive) electronics platforms, they have produced some instrumentation designed to operate with the Raspberry Pi platform, and an open source software stack. They call the platform the SMU (Synchronised Measurement Unit.) The SMU consists of a HAT sitting on an RPi3, inside a 3D printed box that is intended to attach to a DIN rail. After all, this is supposed to be an industrial platform.

Hardware wise, the star of the show is the Texas Instruments ADS8588S which is a 16-bit 8-channel simultaneous sampling ADC. This is quite a nice device, with 200 kSPS throughput and a per-channel programmable front end, packaged in a hacker-friendly 64-pin QFP. What makes this project interesting however, is how they solved the problem of controlling the sampled data acquisition and synchronisation.
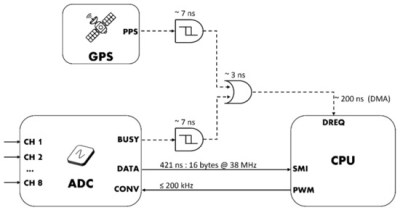
1-PPS and BUSY edges converted to levels, then OR’d to trigger the DMA

By programming the ADC into byte-parallel mode, then using the BCM2837 Secondary Memory Interface (SMI) block together with the DMA, samples are transferred into memory with minimal CPU overhead. An onboard U-Blox Max-M8 GNSS module provides a 1PPS (top of second pulse) signal, which is combined with the ADC busy signal in a very simple manner, enabling both sample rate control as well as synchronisation between multiple units spread out in an installation. They reckon they can get synchronisation to within 180 ns of top-of-second, which for measuring relatively slow-changing power systems, should be enough. The HAT PCB was created in KiCAD and can be found in the SMU GitHub hardware section, making it easy to modify to your needs, or at least adjust the design to match the parts you can actually get your hands on.

Continue reading “A RPI HAT For Synchronized Measurements”

Making Variable Capacitors By Stretching Aluminium Cans

Sometimes when you need a component, the best way to get it is by building it yourself. [North Carolina Prepper] did just that, creating his own trombone-style variable capacitor by stretching some aluminium beverage cans. 

The requirement was for a 26 pF to 472 pF capactitor, for a radio transmitting from 7 MHz to 30MHz. The concept was to use two beverage cans, one sliding inside the other, as a capacitor, with an insulating material in between.

To achieve this, a cheap exhaust-pipe expanding tool was used to stretch a regular can to the point where it would readily slide over an unmodified can, plus some additional gap to allow for a plastic insulating sheet in between. Annealing the can is important to stop it tearing up, but fundamentally, it’s a straightforward process.

The resulting trombone capacitor can readily be slid in and out to change its capacitance. The build as seen here achieved 33 pF to 690 pF without too much hassle, not far off the specs [North Carolina Prepper] was shooting for.

Radio hams are very creative at building their own equipment, especially when it comes to variable capacitors. Video after the break.

Continue reading “Making Variable Capacitors By Stretching Aluminium Cans”

Mechanical Relay Percussion In A Eurorack Format

There are plenty of analog and digital synthesis modules available in Eurorack format. But how about one that actually does physical percussion while capturing the output at the same time? The VU Perc Relay module does just that.

The concept is simple. Eurorack control voltages are fed to a VU meter, which swings about and makes noise when the needle hits a copper strip. This strip is connected to a piezo element which captures the sound. There’s also a relay that gets triggered under such conditions, with that sound also captured by a piezo element. Thus, the input control voltages create real percussion noises with the VU meter and relay, and then capture them for output to the rest of the rack.

Having actual physical sound devices in a compact Eurorack module is neat. The fact that it’s transparent is even cooler, as it lets you see the percussion in action. Notably, the physical nature of this module means you’ll want to place some bubble wrap or other isolating material under your rack when performing on stage with a PA. Otherwise, you risk getting feedback through the piezos.

We see plenty of good Eurorack gear around these parts, like this useful wireless MIDI connection. Video after the break.

Continue reading “Mechanical Relay Percussion In A Eurorack Format”

A 2D Image Makes A 3D Print

When you imagine 3D printed art, it’s easy to envision the different kinds of sculptures and figurines posted online. While these projects take plenty of time and creativity on their own, [César Galera] shows us a different way to make 3D printed art by turning 2D images into fully textured 3D prints.

This project follows a similar technique that stems from lithophanes, which produces an image from light that passes through the object. [César] instead details in the video below the break how to use the ItsLitho tool to build completely opaque black and white images using a multicolored printer.

Lithophanes are built (or printed) by mapping topography to make light easier or harder to pass through in certain places. Areas that appear darker are thicker with more layers, and areas that appear lighter have less. It’s a nifty optical illusion, but these kinds of art blocks aren’t actually multicolored themselves.

The trick is to develop the 3D model using the lithophane tool first to create the different elevations (ensuring that the lowest elevation is still thick enough to be opaque), but retain the different colors on the model when it’s exported. Multi-colored 3D printers will then be able to add gray and black filament as it prints higher and higher elevation. If you don’t have a multi-colored printer, you can add pauses on the 3D print file to switch out filaments after a few layers to achieve a similar effect.

We’re always on the lookout to see the different things we can print, and being able to turn digital artwork into a 3D model is a great example!

Continue reading “A 2D Image Makes A 3D Print”

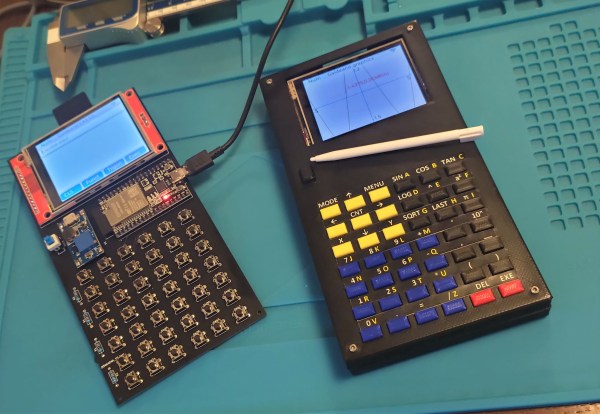
A graphing calculator with a 3D-printed enclosure, with a circuit board next to it

2022 Cyberdeck Contest: The Galdeano Is More Than A Graphing Calculator

Graphing calculators have evolved from expensive playthings for rich nerds to everyday tools for high schoolers worldwide. Even though teenagers nowadays carry powerful internet-connected computers in their pockets, math teachers often prefer them to use a clunky Z80-powered calculator in class, if only because their limited performance reduces the potential for distraction. The worst thing a lazy student can do is play a simple game like Snake or Tetris.

But what if you’re not a student anymore and you want a graphing calculator that has up-to-date hardware and infinite customizability in software? Look no further than [Angel Cabello]’s Galdeano, a handheld that has all the features of a modern graphing calculator plus a lot more. The heart of the device is an ESP32, which sits on a custom PCB that also holds a 6×7 array of push-buttons and a 320×240 touch-sensitive color display. It can be powered through a lithium-polymer battery or, like a classic calculator, through four AAA cells. The entire thing is housed in a 3D printed enclosure with color-coded buttons indicating various built-in functions.

The ESP32 runs MicroPython along with a symbolic math engine called Eigenmath. This enables the Galdeano to  manipulate expressions, perform integration and differentiation, and plot functions. Porting Eigenmath to a memory-constrained platform like the ESP32 was quite a challenge and required a few workarounds, including a memory partition scheme and even a custom compact font with mathematical symbols.

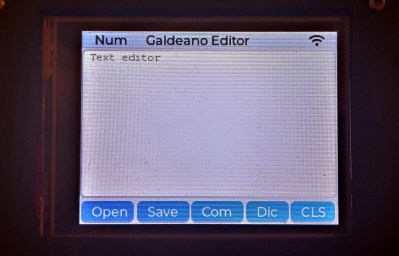
Thanks to the flexibility of MicroPython and the ESP’s WiFi system, the Galdeano is not limited to implementing a calculator: it can also perform various general-purpose tasks ranging from file editing to controlling a set of smart light bulbs. The project page doesn’t mention any games yet, but we’re sure it won’t take long before someone ports Tetris to this system as well.

Of course, even classroom-grade calculators can be pushed to do much more than their designers intended: they can receive GPS signals, run Debian or even perform ray tracing. If you’re looking for a powerful open-source calculator, this BeagleBoard-based machine runs the R statistical computing environment.

Continue reading “2022 Cyberdeck Contest: The Galdeano Is More Than A Graphing Calculator”

Fork And Run: The Definitive Guide To Getting Started With Multiprocessing

Since the early 2000s, the CPU industry has shifted from raw clock speed to core counts. Pat Gelsinger famously took the stage in 2002 and gave the talk the industry needed, stating processors needed specialty silicon or multiple cores to reduce power requirements and spread heat. A few years later, the Core series was introduced with two or four-core configurations to compete with the AMD Athlon 64 x2.

Nowadays, we’re seeing heterogeneous chip designs with big and little cores, chiplets, and other crazy fabrication techniques that are fundamentally the same concept: spread the thermal load across multiple pieces of silicon. This writer is willing to put good money into betting that you’ll see consumer desktop machines with 32 physical cores in less than five years. It might be hard to believe, but a 2013 Intel Haswell i7 came with just four cores compared to the twenty you’ll get in an i7 today. Even an ESP32 has two cores with support in FreeRTOS for pinning tasks to different cores. With so many cores, how to even write software for that? What’s the difference between processes and threads? How does this all work in straight vanilla C98?

Continue reading “Fork And Run: The Definitive Guide To Getting Started With Multiprocessing”

This Simple Light-Controlled Synth Has A Surprisingly Rich Sound

Audio synthesizers can range from vast racks of equipment with modules stitched together by a web of patch cords to a couple of 555s wired together in an Atari punk arrangement. This light-controlled synth comes in closer to the lower extreme of that range, but packs a sonic punch that belies its simplicity.

The project is the latest version of [lonesoulsurfer]’s “Moog Light Synthesizer,” which shares a lot of the circuitry found in his first version a couple of years ago. This one has a lot of bells and whistles, but it all starts with a PWM oscillator that contributes to the mean, growling quality of its sound. There’s also a low-pass filter that’s controlled by a couple of light-dependent resistors, which can be played by blocking them off with a fingertip. A couple of inverters form a drone oscillator that can be switched into the circuit, as well as a 555-based arpeggiator to chop things up a bit.

All those circuits, as well as support for a thirteen-key keyboard, live on one custom PCB. There’s also an off-the-shelf echo/reverb module that’s been significantly hacked to add to the richness of the sound. The custom wood and acrylic case make the whole thing look as good as it sounds.

We noted that [lonesoulsurfer]’s previous “Box of Beezz” drone synth seemed to evoke parts of the “THX Deep Note” at times; similarly, some of the sounds of this synth sound like they’d come from the soundtrack of a [Christopher Nolan] film  — check it out in the video below.

Continue reading “This Simple Light-Controlled Synth Has A Surprisingly Rich Sound”