A Look Back At The USSR’s Mi-6 Helicopter Airliner

Most of us would equate commercial airline travel with fixed-wing aircraft, but civilian transport by helicopter, especially in large and sparsely populated regions, is common enough. It was once even big business in the Soviet Union, where the Aeroflot airline operated passenger helicopters in regular service for many decades. In the mid-1960s they even started work on converting the Mil Mi-6 — the USSR’s largest and fastest helicopter — to carry paying passengers. Unfortunately this never got past a single prototype, with the circumstances described by [Oliver Parken] in a recent article.

This passenger version of the Mi-6 got the designation Mi-6P (for passazhirskyi, meaning passenger) and would have seated up to 80 (3 + 2 row configuration), compared to the Mi-8 passenger variant that carried 28 – 31 passengers. Why exactly the Mi-6P never got past the prototype stage is unknown, but its successor in the form of the Mi-26P has a listed passenger variant and features. Both have a cruising speed of around 250 km/h, with a top of 300 km/h. The auxiliary winglets of the Mi-6 provided additional lift during flight, and the weight lifting record set by the Mi-6 was only broken by the Mi-26 in 1982.

An obvious disadvantage of passenger helicopters is that they are more complicated to operate and maintain, while small fixed wing airliners like the ATR 72 (introduced in 1988) can carry about as many passengers, requires just a strip of tarmac to land and take off from, travel about twice as fast as an Mi-6P would, and do not require two helicopter pilots to fly them. Unless the ability to hover and land or take-off vertically are required, this pretty much explains why passenger helicopters are such a niche application. Not that the Mi-6P doesn’t have that certain je ne sais quoi to it, mind.

Hacking A Quansheng Handheld To Transmit Digital Modes

Have you ever thought about getting into digital modes on the ham bands? As it turns out, you can get involved using the affordable and popular Quansheng UV-K6 — if you’re game to modify it, that is. It’s perfectly achievable using the custom Mobilinkd firmware, the brainchild of one [Rob Riggs].

In order to efficiently transmit digital modes, it’s necessary to make some hardware changes as well. Low frequencies must be allowed to pass in through the MIC input, and to pass out through the audio output. These are normally filtered out for efficient transmission of speech, but these filters mess up digital transmissions something fierce.  This is achieved by messing about with some capacitors and bodge wires. Then, one can flash the firmware using a programming cable.

With the mods achieved, the UV-K6 can be used for transmitting in various digital modes, like M17 4-FSK. The firmware has several benefits, not least of which is cutting turnaround time. This is the time the radio takes to switch between transmitting and receiving, and slashing it is a big boost for achieving efficient digital communication. While the stock firmware has an excruciating slow turnaround of 378 ms, the Mobilinkd firmware takes just 79 ms.

Further gains may be possible in future, too. Bypassing the audio amplifier could be particularly fruitful, as it’s largely in the way of the digital signal stream.

Quansheng’s radios are popular targets for modification, and are well documented at this point.

Hackaday Podcast Episode 278: DIY Subs, The ErgoRing, And Finding NEMA 17

In this episode, Hackaday Editors Elliot Williams and Tom Nardi kick things off with a reminder about the impending deadline for Supercon talk and workshop proposals. From there discussion moves on to the absolutely incredible tale of two brothers who solved a pair of missing person cases with their homebrew underwater vehicle, false data sneaking into OctoPrint’s usage statics, and an organic input device that could give the classic mouse a run for its money.

You’ll also hear about cheap radar modules, open source Xbox mod chips, and lawnmowers from the grocery store. The episode wraps up with a look at the enduring mystique of perpetual motion devices, and the story of a legendary ship that might soon end up being turned into paper clips.

Check out the links below if you want to follow along, and as always, tell us what you think about this episode in the comments!

As always, this week’s episode is available as a DRM-free MP3.

Continue reading “Hackaday Podcast Episode 278: DIY Subs, The ErgoRing, And Finding NEMA 17”

Build A DIY Spinner To Get Your Tempest Game Going

These days, controls in games are fairly standardized by genre. Most RTSs, FPSs, and RPGs all control more or less the same way. But one type of controller that has fallen by the wayside is the paddle, or spinner. [jesster88] is a big Tempest fan, however, and a spinner is crucial. Thus, what else is there to do but whip up one’s own?

Tempest is one of the more difficult classic games to categorize.

The build is based around a wired optical mouse. It’s pulled apart, with its main PCB installed into a 3D printed enclosure. Inside, the optical sensor is pointed at the base of a spinner constructed out of a printed drum and an off-the-shelf knob. The spinner is installed in a skateboard-style bearing for smooth rotation. As it spins, the optical sensor detects the motion and reports it as mouse movement via USB.

[jesster88] uses the device for playing Tempest with MAME. We imagine the technique could be adapted to work with other games that rely on spinner or paddle inputs, too. Meanwhile, if you’re whipping up your own retro game hacks at home, don’t hesitate to let us know!

This Week In Security: Hide Yo SSH, Polyfill, And Packing It Up

The big news this week was that OpenSSH has an unauthorized Remote Code Execution exploit. Or more precisely, it had one that was fixed in 2006, that was unintentionally re-introduced in version 8.5p1 from 2021. The flaw is a signal handler race condition, where async-unsafe code gets called from within the SIGALARM handler. What does that mean?
Continue reading “This Week In Security: Hide Yo SSH, Polyfill, And Packing It Up”

Toyota Heater Switches Learn New Tricks

The look, the feel, the sound — there are few things more satisfying in this world than a nice switch. If you’re putting together a device that you plan on using frequently, outfitting it with high-quality switches is one of those things that’s worth the extra cost and effort.

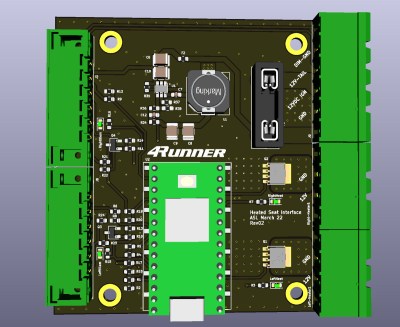
So we understand completely why [STR-Alorman] went to such great lengths to get the aftermarket seat heaters he purchased working with the gorgeous switches Toyota used in the 2006 4Runner. That might not sound like the kind of thing that would involve reverse engineering hardware, creating a custom PCB, or writing a bit of code to tie it all together. But of course, when working on even a halfway modern automobile, it seems nothing is ever easy.

The process started with opening up the original Toyota switches and figuring out how they work. The six-pin units have a lot going on internally, with a toggle, a rheostat, and multiple lights packed into each one. Toyota has some pretty good documentation, but it still took some practical testing to distill it down into something a bit more manageable. The resulting KiCad symbol for the switch helps explain what’s happening inside, and [STR-Alorman] has provided a chart that attributes each detent on the knob with the measured resistance.

But understanding how the switches worked was only half the battle. The aftermarket seat heaters were only designed to work with simple toggles, so [STR-Alorman] had to develop a controller that could interface with the Toyota switches and convince the heaters to produce the desired result. The custom PCB hosts a Teensy 3.2 that reads the information from both the left and right seat switches, and uses that to control a pair of beefy MOSFETs. An interesting note here is the use of very slow pulse-width modulation (PWM) used to flip the state of the MOSFET due to the thermal inertia of the heater modules.

We love the effort [STR-Alorman] put into documenting this project, going as far as providing the Toyota part numbers for the switches and the appropriate center-console panel with the appropriate openings to accept them. It’s an excellent resource if you happen to own a 4Runner from this era, and a fascinating read for the rest of us.

How To Turn Cheap Speakers Into Something A Little Better

[Adam Francis] bought some cheap speaker drivers from AliExpress. Are they any good? Difficult to tell without a set of enclosures for them, so he made a set of transmission line cabinets. The resulting video proves that a decent sounding set of speakers shouldn’t have to cost the earth, and is quite entertaining to watch.

The design he’s going for is a transmission line, in effect a folded half-wave resonant tube terminated at one end and open at the other, with the speaker close to half way along. There is a lot of nuance to perfecting a speaker cabinet, but this basic recipe doesn’t have to be optimum to give a good result.

So after having some MDF cut to shape and glueing it all together, he ends up with some semi decent speakers for not a lot of money. The video is entertaining, with plenty of Britishisms, but the underlying project is sound. We’d have a pair on our bench.

Continue reading “How To Turn Cheap Speakers Into Something A Little Better”