Cataract Surgery For An Old TV

TVs used to be round, and the GE M935AWL is a great example of that. [bandersentv] found one of these ancient sets, but found it had a “cataract”—a large ugly discoloration on the tube. He set about repairing the tube and the set, restoring this grand old piece back to working order.

The video begins with the removal of the round CRT tube. Once it’s extracted from the set, it’s placed in a round garbage can which serves as a handy work stand for the unique device. It’s all delicate work as it’s very easy to damage a picture tube, particularly an old one. Removing the discoloration is quite a job—the problem is caused by adhesive holding the front layer safety glass on, which has going bad over the years. It requires lots of heat to remove. In doing this repair, [bandersentv] notes he’s also giving up the safety of the original extra glass layer on the front of the tube. Worth noting if you’re worried about a given tube’s integrity.

Of course, cleaning the tube is just part of the job. [bandersentv] then gave us a second video in which he returns the tube to its original home and gets the TV back up and running. The quality is surprisingly good given what poor shape the tube was in to begin with.

It’s funny, because modern TV repair is altogether a rather different affair.

Continue reading “Cataract Surgery For An Old TV”

Few Things Are Cheaper Than This Antenna

As far as hobbies go, ham radio tends to be on the more expensive side. A dual-band mobile radio can easily run $600, and a high-end HF base station with the capability of more than 100 watts will easily be in the thousands of dollars. But, like most things, there’s an aspect to the hobby that can be incredibly inexpensive and accessible to newcomers. Crystal radios, for example, can be built largely from stuff most of us would have in our parts drawers, CW QRP radios don’t need much more than that, and sometimes even the highest-performing antennas are little more than two lengths of wire.

For this specific antenna, [W3CT] is putting together an inverted-V which is a type of dipole antenna. Rather than each of the dipole’s legs being straight, the center is suspended at some point relatively high above ground with the two ends closer to the earth. Dipoles, including inverted-Vs, are resonant antennas, meaning that they don’t need any tuning between them and the radio so the only thing needed to match the antenna to the feed line is a coax-to-banana adapter. From there it’s as simple as attaching the two measured lengths of wire for the target band and hoisting the center of the antenna up somehow. In [W3CT]’s case he’s using a mast which would break the $8 budget, but a tree or building will do just as well.

The video on the construction of this antenna goes into great detail, so if you haven’t built a dipole yet or you’re just getting started on your ham radio journey, it’s a great place to get started. From there we’d recommend checking out an off-center-fed dipole which lets a dipole operate efficiently on multiple bands instead of just one, and for more general ham radio advice without breaking the bank we’d always recommend the $50 Ham series.

Continue reading “Few Things Are Cheaper Than This Antenna”

Bakelite To The Future – A 1950s Bluetooth Headset

A decade ago, [Jouke Waleson] bought a Dutch ‘model 1950’ PTT (The Dutch Postal Service) rotary-dial telephone of presumably 1950s vintage manufactured by a company called Standard Electric, and decided it would be neat to hack it to function as a Bluetooth hands-free device. Looking at the reverse, however, it is stamped “10.65” on the bottom, so maybe it was made as recently as 1965, but whatever, it’s still pretty old-tech now.

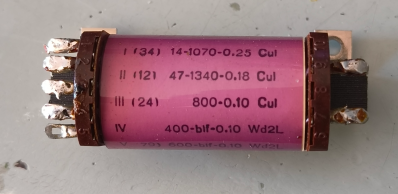
A well-specified transformer?

The plan was to utilise ESP32 hardware with the Espressif HFP stack to do all the Bluetooth heavy lifting. [Jouke] did find out the hard way that this is not a commonly-trodden path in hackerland, and working examples and documentation were sparse, but the fine folks from Espressif were on hand via GitHub to give him the help he needed. After ripping into the unit, it was surprisingly stuffed inside there. Obviously, all the switching, even the indication, was purely electromechanical, which should be no surprise. [Jouke] identified all the necessary major components, adding wires and interfacing components as required, but was a bit stumped at the function of one funky-looking component that we reckon must be a multi-tap audio transformer, oddly finished in baby pink! After renovating some interesting cross-shaped mechanical indicators and wiring up some driving transistors, it was time to get on to the audio interface. Continue reading “Bakelite To The Future – A 1950s Bluetooth Headset”

Small Volumetric Lamp Spins At 6000 RPM

Volumetric displays are simply cool. Throw some LEDs together, take advantage of persistence of vision, and you’ve really got something. [Nick Electronics] shows us how its done with his neat little volumetric lamp build.

The concept is simple. [Nick] built a little device to spin a little rectangular array of LEDs. A small motor in the base provides the requisite rotational motion at a speed of roughly 6000 rpm. To get power to the LEDs while they’re spinning, the build relies on wire coils for power transmission, instead of the more traditional technique of using slip rings.

The build doesn’t do anything particularly fancy—it just turns on the whole LED array and spins it. That’s why it’s a lamp, rather than any sort of special volumetric display. Still, the visual effect is nice. We’ve seen some other highly capable volumetric displays before, though. Video after the break.
Continue reading “Small Volumetric Lamp Spins At 6000 RPM”

3D Printing With A Hot Glue Gun

Face it, we’ve all at some time or other looked at our hot glue guns, and thought “I wonder if I could use that for 3D printing!”. [Proper Printing] didn’t just think it, he’s made a working hot glue 3D printer. As you’d expect, it’s the extruder which forms the hack here.

A Dremel hot glue gun supplies the hot end, whose mains heater cartridge is replaced with a low voltage one with he help of a piece of brass tube. He already has his own design for an extruder for larger diameters, so he mates this with the hot end. Finally the nozzle is tapped with a thread to fit an airbrush nozzle for printing, and he’s ready tp print. With a much lower temperature and an unheated bed it extrudes, but it takes multiple attempts and several redesigns of the mechanical parts of the extruder before he finally ended up with the plastic shell of the glue gun as part of the assembly.

The last touch is a glue stick magazine that drops new sticks into a funnel on top of the extruder, and it’s printing a Benchy. At this point you might be asking why go to all this effort, but when you consider that there are other interesting materials which are only available in stick form it’s clear that this goes beyond the glue. If you’re up for more hot glue gun oddities meanwhile, in the past we’ve shown you the opposite process to this one.

Continue reading “3D Printing With A Hot Glue Gun”

Supercon 2024 Flower SAO Badge Redrawing In KiCad

Out of curiosity, I redrew the Supercon Vectorscope badge schematics in KiCad last year. As you might suspect, going from PCB to schematic is opposite to the normal design flow of KiCad and most other PCB design tools. As a result, the schematics and PCB of the Vectorscope project were not really linked. I decided to try it again this year, but with the added goal of making a complete KiCad project. As usual, [Voja] provided a well drawn schematic diagram in PDF and CorelDRAW formats, and a PCB design using Altium’s Circuit Maker format (CSPcbDoc file). And for reference, this year I’m using KiCad v8 versus v7 last year.

Importing into KiCad

This went smoothly. KiCad imports Altium files, as I discovered last year. Converting the graphic lines to traces was easier than before, since the graphical lines are deleted in the conversion process. There was a file organizational quirk, however. I made a new, empty project and imported the Circuit Maker PCB file. It wasn’t obvious at first, but the importing action didn’t make use the new project I had just made. Instead, it created a completely new project in the directory holding the imported Circuit Maker file. This caused a lot of head scratching when I was editing the symbol and footprint library table files, and couldn’t figure out why my edits weren’t being seen by KiCad.  I’m not sure what the logic of this is, was an easy fix once you know what’s going on. I simply copied everything from the imported project and pasted it in my new, empty project. Continue reading “Supercon 2024 Flower SAO Badge Redrawing In KiCad”

A Look Inside A Canadian Satellite TV Facility

If you’ve ever wondered what goes on in the ground facilities of a satellite TV operation, you could go banging on the doors or your local station. You’d probably get thrown out in short order. Alternatively, you could watch this neat little tour from [saveitforparts].

The tour takes us through a ground facility operated by the Canadian Broadcasting Corporation and Radio Canada in Montreal. The facility in question largely handles CBC’s French language content for the Canadian audience. We’re treated to a look at the big satellite dishes on the roof, as well as the command center inside. Wall to wall screens and control panels are the order of the day, managing uplinks and downlinks and ensuring content gets where it needs to go. Particularly interesting is the look at the hardcore hardware for full-strength transmission to satellites. The video also includes some neat trivia, like how CBC was the first broadcaster to offer direct satellite TV to customers in 1978.

We’ve seen [saveitforparts] tackle some interesting satellite hardware teardowns before, too.

Continue reading “A Look Inside A Canadian Satellite TV Facility”