Make A Secret File Stash In The Slack Space

Disk space is allocated in clusters of a certain size. When a file is written to disk and the file size is smaller than the cluster(s) allocated for it, there is an unused portion of varying size between the end of the file’s data and the end of the allocated clusters. This unused space is the slack space, it’s perfectly normal, and [Zachary Parish] had an idea to write a tool to hide data in it.

The demo uses a usb drive, using the slack space from decoy files to read and write data.

[Zachary]’s tool is in Python and can map available slack space and perform read and write operations on it, treating the disparate locations as a single unified whole in which to store arbitrary files. A little tar and gzip even helps makes things more efficient in the process.

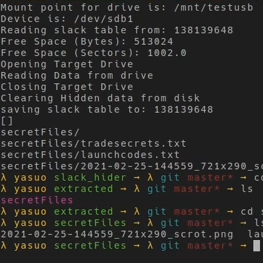
There’s a whole demo implemented on Linux using a usb drive with some decoy files to maximize the slack space, and you can watch it in action in the video embedded below. It’s certainly more practical than hiding data in a podcast!

Note that this is just a demo of the concept. The approach does have potential for handling secret data, but [Zachary] points out that there are — from a serious data forensics point of view– a number of shortcomings in its current form. For example, the way the tool currently structures and handles data makes it quite obvious that something is going on in the slack space.

[Zachary] created this a few years ago and has some ideas about how to address those shortcomings and evolve the tool, so if you have ideas of your own or just want to try it out, the slack_hider GitHub repository is where you want to go.

Continue reading “Make A Secret File Stash In The Slack Space”

Screenshot of Linux in a PDF in a browser

Nice PDF, But Can It Run Linux? Yikes!

The days that PDFs were the granny-proof Swiss Army knives of document sharing are definitely over, according to [vk6]. He has managed to pull off the ultimate mind-bender: running Linux inside a PDF file. Yep, you read that right. A full Linux distro chugging along in a virtual machine all encapsulated within a document. Just when you thought running DOOM was the epitome of it. You can even try it out in your own browser, right here. Mind-boggling, or downright Pandora’s box?

Let’s unpack how this black magic works. The humble PDF file format supports JavaScript – with a limited standard library, mind you. By leveraging this, [vk6] managed to compile a RISC-V emulator (TinyEMU) into JavaScript using an old version of Emscripten targeting asm.js instead of WebAssembly. The emulator, embedded within the PDF, interfaces with virtual input through a keyboard and text box.

The graphical output is ingeniously rendered as ASCII characters – each line displayed in a separate text field. It’s a wild solution but works astonishingly well for something so unconventional.

Security-wise, this definitely raises eyebrows. PDFs have long been vectors for malware, but this pushes things further: PDFs with computational power. We know not to trust Word documents, whether they just capable of running Doom, or trash your entire system in a blink. This PDF anomaly unfolds a complete, powerful operating system in front of your very eyes. Should we think lightly, and hope it’ll lead to smarter, more interactive PDFs – or will it bring us innocent looking files weaponized for chaos?

Curious minds, go take a look for yourself. The project’s code is available on GitHub.

Continue reading “Nice PDF, But Can It Run Linux? Yikes!”

Blinds Automated With Offline Voice Recognition

Blinds are great for keeping light out or letting light in on demand, but few of us appreciate having to walk over and wind them open and shut on the regular. [DIY Builder] resented this very task, so set about creating an automated system to do the job for him.

The blinds in question use a ball chain to open and close, which made them relatively easy to interface with mechanically. [DIY Builder] set up a NEMA 17 stepper motor with an appropriate 3D-printed gear to interface with the chain, allowing it to move the blinds accurately. The motor is controlled via an Arduino Nano and an A4988 stepper motor driver.

However, that only covered the mechanical side of things. [DIY Builder] wanted to take the build a step further by making the blinds voice activated. To achieve this, the Arduino Nano was kitted out with a DFRobot Gravity voice recognition module. It’s a super simple way to do voice recognition—it’s an entirely offline solution with no cloud computing or internet connection required. You just set it up to respond to simple commands and it does the rest.

The result is a voice activated blind that works reliably whether your internet is up or not. We’ve seen some other great projects in this space, too. Video after the break.

Continue reading “Blinds Automated With Offline Voice Recognition”

Upgrading RAM On A Honda Infotainment System

Car infotainment systems somehow have become a staple in today’s automobiles, yet when it comes down to it they have all the elegance of a locked-down Android tablet. In the case of the Honda infotainment system that [dosdude1] got from a friend’s 2016/2017-era Honda Accord, it pretty much is just that. Powered by a dual-core Cortex-A15 SoC, it features a blazin’ 1 GB of RAM, 2 GB of storage and runs Android 4.2.2. It’s also well-known for crashing a lot, which is speculated to be caused by Out-of-RAM events, which is what the RAM upgrade is supposed to test.

After tearing down the unit and extracting the main board with the (Renesas) SoC and RAM, the SoC was identified as being an automotive part dating back to 2012. The 1 GB of RAM was split across two Micron-branded packages, leaving one of the memory channels on the SoC unused and not broken out. This left removing the original RAM chips to check what options the existing pads provided, specifically potential support for twin-die chips, but also address line 15 (A15). Unfortunately only the A15 line turned out to be connected.

This left double capacity (1 GB) chips as the sole option, meaning a total of 2 GB of RAM. After installation the infotainment system booted up, but only showed 1 GB installed. Cue hunting down the right RAM config bootstrap resistor, updating the boot flags and updating the firmware to work around the LINEOWarp hibernation image that retained the 1 GB configuration. Ultimately the upgrade seems to work, but until the unit is reinstalled in the car and tested it’s hard to say whether it fixes the stability issues.

Thanks to [Dylan] for the tip.

Continue reading “Upgrading RAM On A Honda Infotainment System”

Make Custom Shirts With A 3D Print, Just Add Bleach

Bleach is a handy way to mark fabrics, and it turns out that combining bleach with a 3D-printed design is an awfully quick-working and effective way to stamp a design onto a shirt.

Plain PLA stamp with bleach gives a slightly distressed look to this design.

While conceptually simple, the details make the difference. Spraying bleach onto the stamp surface helps get even coverage, and having the stamp facing “up” and lowering the shirt onto the stamp helps prevent bleach from running where it shouldn’t. Prompt application of hot air with a heat gun (followed by neutralizing or flushing any remaining bleach by rinsing in plenty of cold water) helps keep the edges of the design clean and sharp.

We wondered if combining techniques with some of the tips on how to 3D print ink stamps would yield even better results. For instance, we notice the PLA stamp (used to make the design in the images here) produces sharp lines with a slightly “eroded” look overall. This is very much like the result of inking with a stamp printed in PLA. With a stamp printed in flex filament, inking gives much more even results, and we suspect the same might be true for bleach.

Of course, don’t forget that it’s possible to 3D print directly onto fabric if you want your designs to be a little more controlled (and possibly in multiple colors). Or, try silkscreening. Who knew there were so many options for putting designs onto shirts? If you try it out and learn anything, let us know by sending in a tip!

Continue reading “Make Custom Shirts With A 3D Print, Just Add Bleach”

Illustrated Kristina with an IBM Model M keyboard floating between her hands.

Keebin’ With Kristina: The One With The SEGA Pico Keyboard

It’s been a minute since I featured a tiny keyboard, and that’s okay. But if you want to get your feet wet in the DIY keyboarding community, making a little macro pad like [Arnov Sharma]’s Paste Pal is a great place to start.

A macro pad with five switches and a small OLED display.
Image by [Arnov Sharma] via Hackaday.IO
This is a follow-up to his original Paste Pal, which only had two buttons for copy and paste plus an OLED display. This updated version does three more things thanks to a total of five blue (!) switches. The selected command shows up on the screen so you know what you’ve done.

Right now, [Arnov] has the Paste Pal set up to do Copy, Paste, Enter, Scroll Up, and Scroll Down, but changing the assignments is as easy as updating a few lines of code.

Paste Pal Mk. II is at heart a Seeed Xiao SAMD21, which in this case is programmed in Arduino. If you want to make things easier on yourself, you could program it in CircuitPython instead, although [Arnov] includes the Arduino code in his excellent build guide.

Continue reading “Keebin’ With Kristina: The One With The SEGA Pico Keyboard”

Tiny Mouse Ring Uses Prox Sensors

A traditional computer mouse typically fits in the palm of your hand. However, with modern technology, there’s no need for mice to be so large, as demonstrated by [juskim]’s neat little mouse ring. Check it out in the video below.

The concept is simple—it’s a tiny mouse that sits neatly on the end of one of your fingers. You then get the slightly surreal experience of pointing on your computer just by moving a single finger instead of your whole hand.

The project uses a typical optical mouse sensor for movement, as you might expect. However, there are no conventional switches for the left and right mouse buttons. Instead, [juskim] realized a more compact design was possible by using proximity sensors instead. The sensors detect the presence of his fingers on either side of the ring mouse. When one of the fingers is lifted, the absence of the finger triggers a mouse click, either left or right, depending on the finger.

The build started with junk box parts, but hooking up an Arduino Pro Micro dev board and other modules proved too cumbersome to use effectively. Instead, the build relies on an ATTO board, a tiny PCB featuring the same ATmega32U4 microcontroller. Similarly, the build relies on tiny proximity sensors from STM to fit in the “ring” form factor. It’s all wrapped up in a 3D-printed enclosure that fits snugly on the user’s finger.

We’ve seen some other neat mouse rings before, too. Or, if you want something really different, grab some keychains and make a 6DOF mouse.

Continue reading “Tiny Mouse Ring Uses Prox Sensors”