A Simple POV Globe Via APA102

POV builds come in all shapes and sizes, and typically rely on LEDs for their high light output and fast response time. With this in mind, [Great Scott] grabbed some LED strip off the shelf and set about whipping up a POV LED globe.

Being a spinning POV build, it’s necessary to consider how to get power to the rotating elements. [Great Scott] decided to go with a simple solution of putting a LiPo battery on the rotating assembly, which runs the LEDs and Arduino Nano at the heart of the operation. The LEDs in question are of the APA102 type, making them readily addressable and capable of a wide color gamut. It’s all spun by a simple brushed DC motor, running from a separate supply at the base of the platform.

It’s very much a hacker build, held together with duct tape and zipties. Despite this, it looks tidy when in operation, as all of the important hardware is hidden at the centre of the globe. There’s a bit of a vibration problem, but [Great Scott] reckons this can be fixed with some frame modifications.

We’d love to see the build run some more advanced operations, like a representation of the Earth, or some kind of sun clock. If you’re interested in learning more about POV displays, we’ve got the primer you need. Video after the break.

Continue reading “A Simple POV Globe Via APA102”

Digging Into The APA102 Serial LED Protocol

[Tim] got his hands on some APA102 RGB LEDs, which are similar in function to the common WS2812 addressable LEDs seen in many projects we’ve featured. The advantage of APA102 LEDs is that they don’t have the strict timing requirements of the WS2812. These LEDs are controlled with a SPI bus that can be clocked at any arbitrary rate, making them easy to use with pretty much any microcontroller or embedded system.

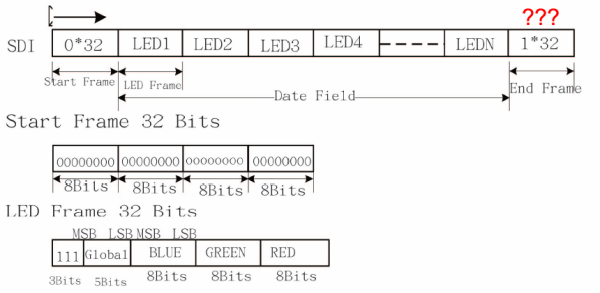
After working with the LEDs, [Tim] discovered that the LEDs function a bit differently than the datasheet led him to believe. [Tim] controlled a strand of APA102 LEDs with an ATtiny85 and connected a logic analyzer between some of the LEDs. He discovered that the clock signal of the SPI interface isn’t just passed through each LED, it actually looks like it’s inverted on the output. After some investigation, [Tim] found that the clock signal is delayed by a half period (which looks like an inversion) before it’s passed to the next LED. This gives the next LED in the strand enough time for data on the data line to become valid before latching it in.

Since the clock is delayed, [Tim] discovered that additional bits must be clocked as an “end frame” to generate clock signals which propagate the remaining data to the end of the strand. Although the datasheet specifies a 32-bit end frame, this only works for strings of up to 64 LEDs. More bits must be added to the end frame for longer strands, which the datasheet doesn’t even mention. Check out [Tim]’s post for more information, where he walks you through his logic analysis of the APA102 LEDs.

The Tools That Lovingly Tore Apart A Vintage Computer Game

The structure of computer game assets can be a bit of a mystery, even more so the older a game is, and some amount of reverse-engineering can be expected when pulling apart a game like 1995’s Night Light.

[voussoir] had fond memories of this game by GTE Entertainment, which had an interesting “flashlight” mechanic to serve the exploration theme. Spooky shapes in dark rooms would be revealed to be quite ordinary (and therefore not scary at all) once illuminated with a flashlight, which was directed by the mouse.

Extracting game assets was partly straightforward, thanks to many of them being laid out in a handy folder structure, with .bmp files for each level in a modest resolution. But there were also some unusual .mov files that were less than a second long, and those took a little more work to figure out.

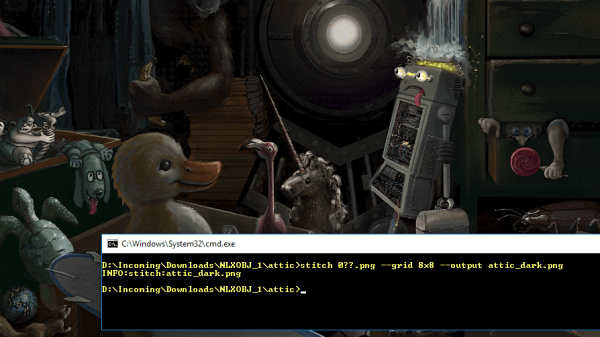
It turns out that these unusual movie files were 80 frames in length, and each frame was a tile of a larger image. [voussoir] used ffmpeg to extract each frame, then wrote a Python script to stitch the tiles together. Behold! The results are high-resolution versions of each level’s artwork. Stitching the first 16 frames into a 4×4 grid yields a 1024×768 image, and the remaining 64 frames can be put into a 8×8 grid for a fantastic 2048×1376 version. The last piece was extracting audio, but sadly the ISO [voussoir] was using seems to have had errors, and not all the audio survived.

With intact assets in hand, [voussoir] was able to re-create the core of the game, which can be seen about halfway down into the writeup. Audio clues play simply while the flashlight effect is re-created in the browser with the game’s original level artwork, and it’s enough to ring those nostalgia bells. It’s a pretty successful project, even though not all of the assets have been tracked down, and not all of the audio was able to be extracted due to corruption. If you have any insights on that front, don’t keep them to yourself! Send [voussoir] an email, or chime in here in the comments.

Reverse engineering has a strong history when it comes to games, and has manifested itself in sometimes unusual ways, like the time Atari cracked the NES. Had the subsequent legal challenge gone differently, the game landscape might have looked very different today.

Third Time’s The Charm For This Capable Cyberdeck

For those who decide to build their own personal cyberdeck, it’s often as much about the journey as it is the final product. The recent write-up that [mickwheelz] put together about the process that lead him to build his own bespoke mobile computer is a perfect example. He went through three distinct design phases to create something that had what he describes as a “retro-futuristic, hand-built, utilitarian aesthetic”, and we think you’ll agree the final product is right on target.

At Hackaday we’re strong believers that you can learn just as much from a failed attempt as you will from a rousing success, which is why we especially appreciate the way [mickwheelz] has documented this project. The basic layout and general bill of materials for his hypothetical cyberdeck had been sorted out in his head for about a year, but it took a few attempts until everything came together in a way he was happy with. Rather than pretend those early missteps never happened, he’s decided to present each one and explain why it didn’t quite work out.

This laser-cut acrylic design was difficult to assemble.

Frankly both of his earlier attempts look pretty slick to us, but of course the only person who’s opinion really counts when it comes to a good cyberdeck is the one who’s building it. The original acrylic design was a bit too fiddly, and while his first attempt at 3D printing the computer’s frame and enclosure went much better, it still left something to be desired.

The final result is a clean and straightforward design that has plenty of room inside for a Raspberry Pi 4, UPSPack V3 power management board, 10,000 mAh battery, internal USB hub, and a AK33 mechanical keyboard. Topside there’s a 7” 1024×600 IPS LCD with touch overlay that’s naturally been offset in the traditional cyberdeck style, and on the right side of the enclosure there’s a bay that holds a KKMoon RTL-SDR. Though that could certainly be swapped out for something else should you decide to print out your own version of this Creative Commons licensed design.

In our 2020 review we noted the incredible influx of cyberdeck builds we’d seen over the last 12 months, and judging by just what we’ve seen in just these last few weeks, 2021 should be another bumper year for these unique computers.

House Training A Military TA-1024A Field Telephone

After spotting some interesting military phones at a museum, [CuriousMarc] wondered what it would take to retrofit these heavy duty pieces of telecom equipment for civilian use. He knew most of the internals would be a lost cause, but reasoned that if he could reverse engineer key elements such as the handset and keypad, he might be able to connect them to the electronics of a standard telephone. Luckily for us, he was kind enough to document the process.

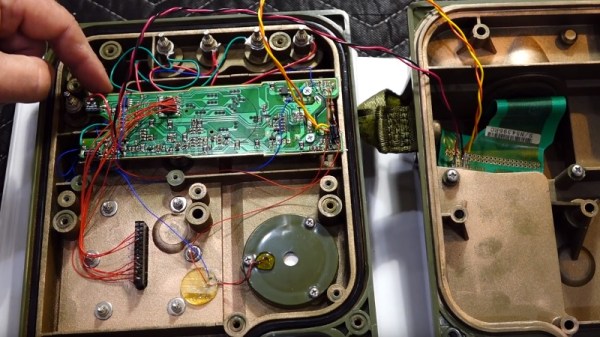
There were a number of interesting problems that needed to be solved, but the first and perhaps largest of them was the unusual wiring of the keypad. It wasn’t connected in the way modern hackers like us might expect, and [CuriousMarc] had to end up doing some pretty significant rewiring. By cutting the existing traces on the PCB with a Dremel and drilling new holes to run his wires around the back, he was able to convert it over to a wiring scheme that contemporary touch tone phones could use.

An adapter needed to be fabricated to mount a basic electret microphone in place of the original dynamic one, but the original speaker was usable. He wanted to adapt the magnetic sensor that detected when the handset was off the hook, but in the end it was much easier to just drill a small hole and use a standard push button.

The main board of the phone is a perfect example of the gorgeous spare-no-expense construction you’d expect from a military communications device, but unfortunately it had to go in the bin. In its place is the guts of a lowly RCA phone that was purchased for the princely sum of $9.99. [CuriousMarc] won’t be able to contact NORAD anymore, but at least he’ll be able to order a pizza. The red buttons on the keypad, originally used to set the priority level of the call on the military’s AUTOVON telephone network, have now been wired to more mundane features of the phone such as redial.

While this is fine for a one-off project, we’d love to see a drop-in POTS or VoIP conversion for these phones that didn’t involve so much modification and rewiring. Now that we have some documentation for things like the keypad and hook sensor, it shouldn’t be hard to take their idiosyncrasies into account with a custom PCB. Dragging vintage gear into the modern era is always a favorite pastime for hackers, so maybe somebody out there will be inspired to take on the challenge.

Continue reading “House Training A Military TA-1024A Field Telephone”

New Part Day: ATtiny102 And 104

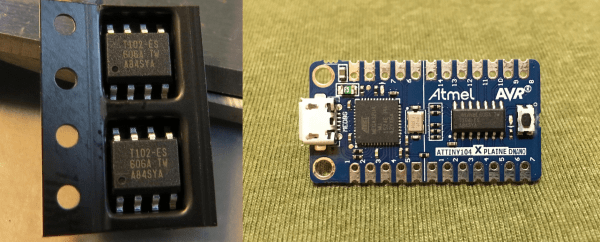
Atmel put out some new, small microcontroller chips early this year, and we’re just now starting to think about how we’d use them. The ATtiny102 and ATtiny104 (datasheet) sell for about a buck (US) and come in manageable SOIC packages with eight and fourteen pins respectively. It’s a strange chip though, with capabilities that fit somewhere between the grain-of-rice-sized ATtiny10 and the hacker-staple ATtiny25-45-85 series.

The ATtiny104 has a bunch of pins for not much money. It’s got a real hardware USART, which none of the other low-end AVRs do, and it’s capable of SPI in master mode. It has only one counter, but it’s a 16-bit counter, and it’s got the full AVR 10-bit ADC instead of the ATtiny10’s limited 8-bit ADC. The biggest limitation, that it shares with the ATtiny10, is that it has only 1 KB of program flash memory and 32 bytes (!) of RAM. You’re probably going to want to program this beast in assembler.

Read on for more reviews, and check out [kodera2t]’s video review at the end.

Continue reading “New Part Day: ATtiny102 And 104”

Hacklet 102 – Laundry Projects

Ah laundry day. The washing machine, the dryer, the ironing, and the folding. No one is a fan of doing laundry, but we (I hope) are all fans of having clean clothing. Hackers, makers, and engineers are always looking for ways to make a tedious task a bit easier, and laundry definitely is one of those tedious tasks. This week we’re checking out some of the best laundry projects on Hackaday.io!
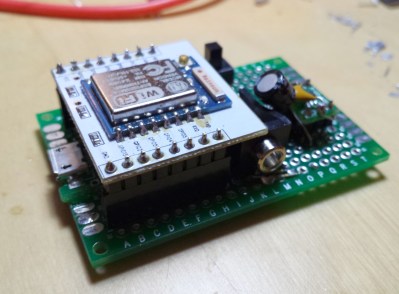
laundrifyWe start with [Professor Fartsparkles] and Laundrify. Anyone who’s shared a washer and dryer with house or apartment mates will tell you how frustrating it can be. You bring your dirty laundry downstairs only to find the machines are in use. Wait too long, and someone has jumped in front of you. Laundrify fixes all that. Using a current sensor, Laundrify can tell if a machine is running. An ESP8266 monitors the current sensor and sends data up to the cloud – or in this case a Raspberry Pi. Users access this laundry as a service system by opening up a webpage on the Pi. The page includes icons showing the current status of each machine. If everything is in use, the users can join a queue to be notified when a machine is free.
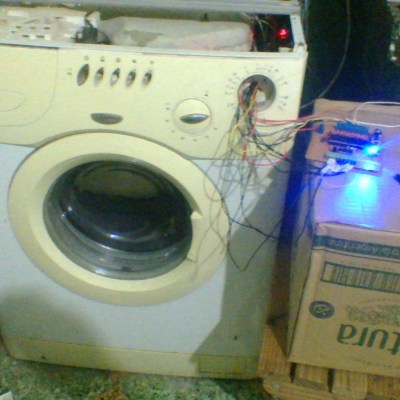
 

borgmachineNext up is [Jose Ignacio Romero] with Borg Washing Machine. [Jose] came upon a washer that mechanically was perfect. Electrically was a different story. The biggest issue was the failing mechanical timer, which kept leaving him with soapy wet clothing. Washing machine timers boil down to mechanically timed multipole switches. They’re also expensive to replace. [Jose] did something better – he built an electronic controller to revitalize his washer. The processor is a PIC16F887. Most of the mains level switching is handled by relays. [Jose] programmed the new system using LDmicro, which is a ladder logic implementation for microcontrollers. For the uninitiated, ladder logic is a programming language often used on industrial Programmable Logic Controller (PLC) systems. The newly dubbed borg machine is now up and running better than ever.


hackitgreen

Next we have [Michiel Spithoven] with Hot fill washing machine. In North America, most washing machines connect to hot and cold water supplies. Hot water comes from the home’s water heater. This isn’t the case in The Netherlands, where machines are designed to use electricity to heat cold water. [Michiel] knew his home’s water heater was more efficient than the electric heater built into his machine. [Michiel]  hacked his machine green by building an automated mixing manifold using two solenoid valves and a bit of copper pipe. The valves are controlled by a PIC microprocessor which monitors the temperature of the water entering the machine. The PIC modulates the valves to keep the water at just the right temperature for [Michiel’s] selected cycle. [Michiel] has been tracking the efficiency of the new system, and already has saved him €97!
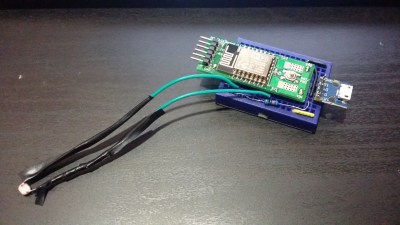
 

laundrespFinally we have [Mark Kuhlmann] with LaundrEsp. [Mark’s] washing machine has a nasty habit of going off-balance and shutting down. This leaves him with soggy clothing and lost time re-running the load. [Mark] wanted to fix the problem without directly modifying his machine, so he came up with LaundrEsp. When the machine is running normally, a “door locked” light is illuminated on the control panel. As soon as the washer shuts down – due to a normal cycle ending or a fault, the door unlocks and the light goes out. [Mark] taped a CdS light detecting resistor over the light and connected it to an ESP8266. A bit of programming with Thinger.io, and [Mark’s] machine now let’s him know when it needs attention.

If you want to see more laundry projects check out our brand new laundry project list! If I missed your project, don’t take me to the cleaners! Drop me a message on Hackaday.io, and I’ll have your project washed, folded, and added to the list in a jiffy. That’s it for this week’s Hacklet. As always, see you next week. Same hack time, same hack channel, bringing you the best of Hackaday.io!