Arduino Brings USB Mouse To Homebrew Computer

When building your own homebrew computer, everything is a challenge. Ultimately, that’s kind of the point. If you didn’t want to really get your hands dirty with the nuts and bolts of the thing, you wouldn’t have built it in the first place. For example, take the lengths to which [rehsd] was willing to go in order to support standard USB mice on their 6502 machine.

Code for mapping mouse movement to digital output.

The idea early on was to leverage existing Arduino libraries to connect with a standard USB mouse, specifically, the hardware would take the form of an Arduino Mega 2560 with a USB Host Shield. There was plenty of code and examples that showed how you could read the mouse position and clicks from the Arduino, but [rehsd] still had to figure out a way to get that information into the 6502.

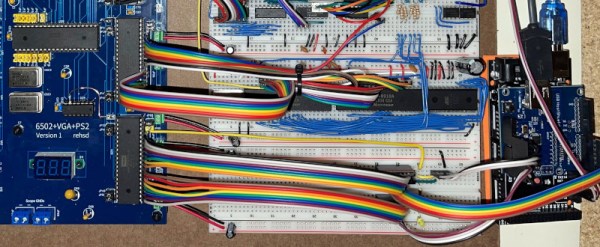
In the end, [rehsd] connected one of the digital pins from the Arduino to an interrupt pin on the computer’s W65C22 versatile interface adapter (VIA). Then eleven more digital pins were connected to the computer, each one representing a state for the mouse and buttons, such as MOUSE_CLICK_RIGHT and MOUSE_LEFT_DOWN.

Admittedly, [rehsd] says the mouse action is far from perfect. But as you can see in the video after the break, it’s at least functional. While the code could likely be tightened up, there’s obviously some improvements to be made in terms of the electrical interface. The use of shift registers could reduce the number of wires between the Arduino and VIA, which would be a start. It’s also possible a chip like the CH375 could be used, taking the microcontroller out of the equation entirely.

From classic breadboard builds to some impressively practical portable machines, we’ve seen our fair share of 6502 computers over the years. Despite the incredible variation to be found in these homebrew systems, one thing is always the same: they’re built by some of the most passionate folks out there.

Continue reading “Arduino Brings USB Mouse To Homebrew Computer”

A $5 Graphics Card For Homebrew Computers

While not very popular, building a homebrew computer can be a fun and rewarding process. Most of the time, though, the video capabilities of these computers is as bare bones as it can get – running headless, connected to a terminal. While this is an accurate reproduction of the homebrew computers of the 1970s and 80s, there’s a lot to be said about a DIY computer with an HDMI-out port.

[spencer] built a Z-80-based homebrew computer a few years ago, and while connecting it to a terminal was sufficient, it was a build that could use a little more pizzazz. How did he manage to stuff a terminal in a tiny project box? With everyone’s favorite five dollar computer, the Raspberry Pi Zero.

The computer [spencer] built already had serial inputs, outputs, power, and ground rails – basically, a serial port. The Raspberry Pi also has TX and RX pins available on the 40-pin header, and with a stupidly simple board that [spencer] whipped up in KiCad, he could plug a Pi into the backplane of his homebrew computer. A few setup scripts, and a few seconds after turning this computer on [spencer] could mash a keyboard and wail away on some old school BASIC.

This isn’t a use case that is the sole domain of the Pi Zero. A Parallax Propeller chip makes for a great video terminal with inputs for PS/2 keyboards and mice. A largish AVR, with the requisite NTSC video library, also makes for a great video interface for a homebrew computer. The Pi Zero is only five dollars, though.


Raspberry_Pi_LogoSmall

The Raspberry Pi Zero contest is presented by Hackaday and Adafruit. Prizes include Raspberry Pi Zeros from Adafruit and gift cards to The Hackaday Store!
See All the Entries

A Graphics Card For A Homebrew Computer

One of [aepharta]’s ‘before I die’ projects is a homebrew computer. Not just any computer, mind you, but a fabulous Z80 machine, complete with video out. HDMI and DisplayPort would require far too much of this tiny, 80s-era computer, and it’s getting hard to buy a composite monitor. This meant it was time to build a VGA video card from some parts salvaged from old equipment.

When it comes to ancient computers, VGA has fairly demanding requirements; the slowest standard pixel clock is 25.175 MHz, an order of magnitude faster than the CPU clock in early 80s computers. Memory is also an issue, with a 640×480, 4-color image requiring 153600 bytes, or about a quarter of the 640k ‘that should be enough for anybody.’

To cut down on the memory requirements and make everything a nice round in base-2 numbers, [aepharta] decided on a resolution of 512×384. This means about 100k of memory would be required when using 16 colors, and only about 24 kB for monochrome.

The circuit was built from some old programmable logic ICs pulled from a Cisco router. The circuit could have been built from discrete logic chips, but this was much, much simpler. Wiring everything up, [aepharta] got the timing right and was eventually able to put an image on a screen.

After a few minutes, though, the image started wobbling. [aepharta] put his finger on one of the GALs and noticed it was exceptionally hot. A heatsink stopped the wobbling for a few minutes, and a fan stopped it completely. Yes, it’s a 1980s-era graphics card that requires a fan. The card draws about 3W, or about two percent of a modern, high-end graphics card.

DUO Portable: A Homebrew Computer With Keyboard And Display

duo

[Jack] is famous ’round these parts for his modern reinterpretations of very early computers. He’s created a computer entirely out of logic chips, a microcontroller-powered multicore box, and even a very odd one-instruction computer. For his latest project, he’s stepped up his game and made something that’s actually fairly useful: a microcontroller-powered system with an integrated keyboard and display.

The DUO Portable, as [Jack] calls his new toy, is built around an ATMega1284P microcontroller. Also on this board is a serial EEPROM that acts as a very small drive, a 102×64 pixel graphic display, and enough tact switches to create a QWERTY keyboard.

The DUO Portable boots to a primitive operating system where files can be created, edited, and saved. The programming language for this computer  is called DCPL – the DUO Portable Command Language – and can be used to create anything from a simple ‘Hello World’ program to a block-building game.

Like all of [Jack]’s homebrew computer projects, he’s written an emulator that can be run in a browser. There’s also video of [Jack] playing around with the DUO Portable available below.

Continue reading “DUO Portable: A Homebrew Computer With Keyboard And Display”

The Most Minimal Homebrew Computer

Perfection is achieved not when there is nothing more to add, but when there is nothing left to fail. Going by that metric, [Stian]’s three-chip 6502 homebrew computer is the epitome of perfection. It’s a real, working, homebrew retrocomputer using only three chips: a CPU, some RAM, and a microcontroller to bootstrap the computer and provide a video output,

The key to this minimalist build is having the entire boot process controlled by an ATMega16 microcontroller, This interfaces to the 6502 through a dual-port SRAM, a 1 kilobyte Cypress CY7C130. This dual-port RAM allows the CPU and microcontroller to access the same bit of memory, making it easy to bootstrap a computer from a bit of AVR code.

Output is provided with [Stian]’s ATMega video text generator putting a 37×17 characters on any television with an RCA jack. While input isn’t handled yet, [Stian] says it should be possible with his AVR PS/2 keyboard library.

While other 6502 homebrew computers such as [Quinn Dunki] Veronica can reach unparalleled heights of complexity, there is a lot to be said about the minimalism of [Stian]’s three-chip computer. With some clever coding and a modified parts list, it may well be possible to put a retrocomputer in the hands of everyone with a bare minimum of cost and parts.

The Coolest Homebrew Computer Gets Its Own Case

SONY DSC

When you’re building one of the best homebrew computers ever created, you’ll also want a great case for it. This was [Simon]’s task when he went about building an enclosure for his Kiwi microcomputer.

We were introduced to the Kiwi last year as the end result of [Simon] designing the ultimate computer from the early to mid-1980s. Inside is a 68008 CPU, similar to the processor found in early Macs and Amigas, two SID chips taken from a Commodore 64, Ethernet, support for IDE hard drives and floppy disks, and a video display processor capable of delivering VGA resolution video at 32-bit color depth. Basically, if this computer existed in 1982, it would either be hideously expensive or extraordinarily popular. Probably both, now that I think about it.

The case for the Kiwi was carefully cut from ABS sheets, glued together with acetone, and painted with auto body paint by a friend. It’s a great piece of work, but the effort may be for naught; [Simon] is reworking the design of his Kiwi computer, and hopefully he’ll be spinning a few extra boards for everyone else that wants a piece of the Kiwi.

Building The Best Homebrew Computer Ever

A few days ago when I posted a homebrew Motorola 68000 computer spectacular, I briefly mentioned a truly spectacular homebrew computer built by [Simon Ferber]. When I posted a link to a Youtube demo of his 68k board, he was working on a website to document the architecture  design, hardware, and software. That website is now up (cache if you need it) and now we can all get a good look at the best homebrew computer ever built.

Built around the 68008 CPU – slightly less capable than the 68000 found in the original Macs, Amigas, and the TI-89 – [Simon]’s Kiwi computer has peripherals out the wazoo. A Yamaha V9990 Video Display Processor provides a 640×480 display with 32k colors. Two SID chips taken from a Commodore 64 provide stereo chiptune audio, and a floppy disk controller, IDE/ATA bus, and CS8900A Ethernet controller provide all the practical functionality you’d expect from an awesome computer.

On the software side of things, [Simon] is running Enhanced Basic 68k, but of course he can’t just use BASIC to fiddle around with all the cool chips on the Kiwi. With that in mind, he came up with a C-based toolchain that included porting libc to the Kiwi.

Like any good homebrew computer project, all the schematics, a bit of code, and a BOM are provided. [Simon] is currently working on (slightly) redesigning the PCB layout of the Kiwi, and we’ll be happy to see those files released. Anyone up for a Kiwi PCB group buy?