Building A MiniPET Is Better With Friends

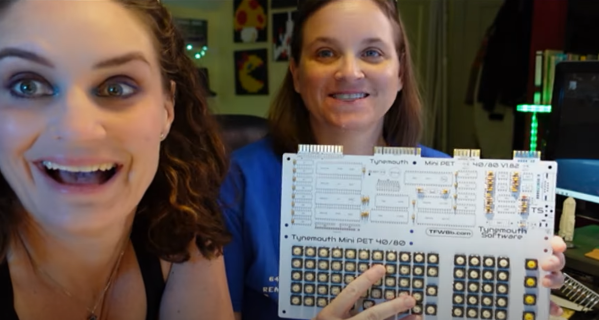
[Taylor and Amy] love taking on retro computer projects. This week they’re building a MiniPET from Tynemouth and The Future is 8 Bit.  It’s a pretty awesome kit which sadly isn’t available anymore. Taylor bought one of the last ones as part of a charity sale at the 2023 Vintage Computer Festival Southwest.

If you haven’t seen their YouTube channel yet, check it out! The two have been best friends since 1984. Their channel has just the right mix of education and comedy, with pacing fast enough to keep things interesting. It’s really refreshing to see two people enjoying a project together.

The MiniPET is of course a reproduction of the hardware in the Commodore PET, the machine which predated the VIC-20 and of course the Commodore 64. The kit starts with installing a few discrete parts — resistors,  capacitors, and diodes.  Then come the IC sockets. [Taylor and Amy] ran into a bit of trouble when it came time to install the chips. While installing the 40-pin 65C21 Peripheral Interface Adapter (PIA), one pin bent under the socket. [Taylor] popped the chip back out, and replaced it — which resulted in 3 bent pins!

Anyone who’s installed new DIP parts has been through this. The pins are always bent out a bit from the factory. The old “Bend it in using a table” method usually works — but if you want perfect pins, try a pin straightener. These versatile tools can even be 3D printed.

Once the pin problems are solved, it’s time to power up the kit and see if it will work.  That’s when we get to see that magic moment when a project first comes to life. Check out the video – you’ll see what we mean.

Continue reading “Building A MiniPET Is Better With Friends”

Arduino Brings USB Mouse To Homebrew Computer

When building your own homebrew computer, everything is a challenge. Ultimately, that’s kind of the point. If you didn’t want to really get your hands dirty with the nuts and bolts of the thing, you wouldn’t have built it in the first place. For example, take the lengths to which [rehsd] was willing to go in order to support standard USB mice on their 6502 machine.

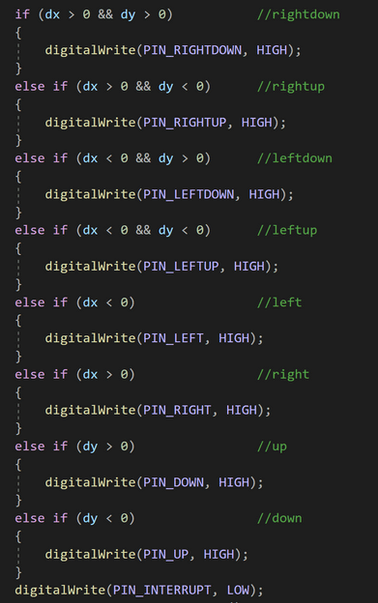
Code for mapping mouse movement to digital output.

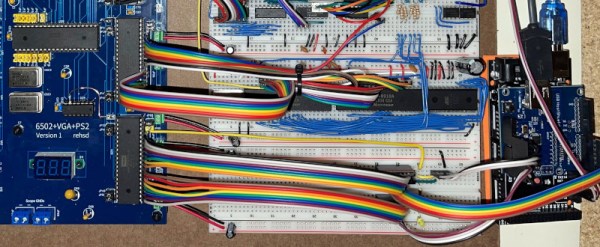
The idea early on was to leverage existing Arduino libraries to connect with a standard USB mouse, specifically, the hardware would take the form of an Arduino Mega 2560 with a USB Host Shield. There was plenty of code and examples that showed how you could read the mouse position and clicks from the Arduino, but [rehsd] still had to figure out a way to get that information into the 6502.

In the end, [rehsd] connected one of the digital pins from the Arduino to an interrupt pin on the computer’s W65C22 versatile interface adapter (VIA). Then eleven more digital pins were connected to the computer, each one representing a state for the mouse and buttons, such as MOUSE_CLICK_RIGHT and MOUSE_LEFT_DOWN.

Admittedly, [rehsd] says the mouse action is far from perfect. But as you can see in the video after the break, it’s at least functional. While the code could likely be tightened up, there’s obviously some improvements to be made in terms of the electrical interface. The use of shift registers could reduce the number of wires between the Arduino and VIA, which would be a start. It’s also possible a chip like the CH375 could be used, taking the microcontroller out of the equation entirely.

From classic breadboard builds to some impressively practical portable machines, we’ve seen our fair share of 6502 computers over the years. Despite the incredible variation to be found in these homebrew systems, one thing is always the same: they’re built by some of the most passionate folks out there.

Continue reading “Arduino Brings USB Mouse To Homebrew Computer”

The Ultimate 1541 Talk by Michael Steil, presented at the Vintage Computer Festival West

The Ultimate Commodore 1541 Drive Talk: A Deep Dive Into Disks, Controllers, And Much More

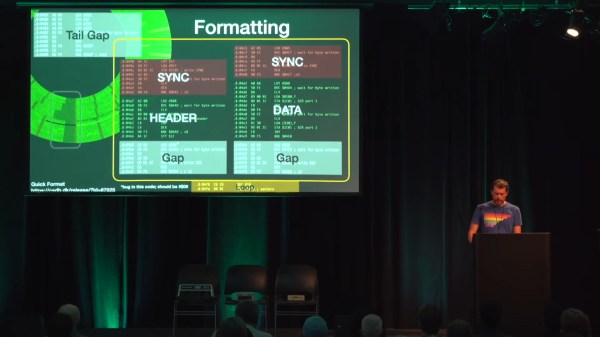
When we think of retrocomputing, it’s very often the computers themselves that get all the glory.  There’s nothing wrong with this of course- the computers of the late 70’s and 80’s were incredible machines that were chock full of hacks in their own right. But some of the most interesting hacks of the day happened not in the computers, but rather in their peripherals. A devotee of such periphery is [Michael Steil], who was driven to compile years of research, knowledge, and hard data into The Ultimate Commodore 1541 Drive Talk which you can view below the break.

In the talk, [Michael] covers the physical disk composition and construction, the disk drives, controller hardware, and the evolution thereof. The bit-by-bit breakdown of the tracks, sectors, and header information on the disks themselves is fascinating, as is the discussion of various copy protection techniques used by vendors to prevent piracy at a time when sneakernet was in full swing.

The descent into the circuitry of the controller reveals a venerable 6502 CPU which powered many vintage computers. Further discussion divulges the secrets for getting higher performance from the 1541 drive using innovations that are as recent as 2013.

A computer historian and archaeologist, [Michael] discusses how using modified vintage hardware is sometimes enough to save your old floppy collection. He also shows how modern interfaces that read disks all the way down to the magnetic flux level can be used to reconstruct missing data.

[Michael] masterfully lays bare the complexity, engineering, and hackery that went into storing less than 200kb of data. Whether you’re a Commodore enthusiast or not, your appreciation for the 32GB USB stick collecting dust on your desk is bound to grow!

We’ve covered [Michael]’s exploits before, and you may wish to check out the Ultimate Apollo Guidance Computer Talk or the Ultimate Gameboy Talk. Do you have your own favorite retrocomputer hacks and insights to share? Be sure to let us know via the Tip Line!

Continue reading “The Ultimate Commodore 1541 Drive Talk: A Deep Dive Into Disks, Controllers, And Much More”

How The Dis-integrated 6502 Came To Be

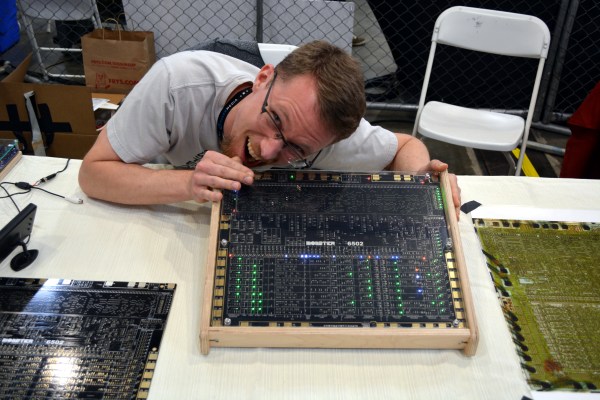
I made a bee line for one booth in particular at this year’s Bay Area Maker Faire; our friend [Eric Schlaepfer] had his MOnSter 6502 on display. If you missed it last week, the unveiling of a 6502 built from discrete transistors lit the Internet afire. At that point, the board was not fully operational but [Eric’s] perseverance paid off because it had no problem whatsoever blinking out verification code at his booth.

I interviewed [Eric] in the video below about the design process. It’s not surprising to hear that he was initially trying to prove that this couldn’t be done. Unable to do so, there was nothing left to do but devote almost six-months of his free time to completing the design, layout, and assembly.

What I’m most impressed about (besides just pulling it off in the first place) is the level of perfection [Eric] achieved in his design. He has virtually no errors whatsoever. In the video you’ll hear him discuss an issue with pull-up/pull-down components which did smoke some of the transistors. The solution is an in-line resistor on each of the replacement transistors. This was difficult to photograph but you can make out the soldering trick above where the 3-pin MOSFET is propped up with it’s pair of legs on the board, and the single leg in the air. The added resistor to fix the issue connects that airborne leg to its PCB pad. Other than this, there was no other routing to correct. Incredible.

The huge schematic binder includes a centerfold — literally. One of the most difficult pieces of the puzzle was working out the decode ROM. What folds out of this binder doesn’t even look like a schematic at first glance, but take a closer look (warning, 8 MB image). Every component in that grid was placed manually.

I had been expecting to see some tube-based goodness from [Eric] this year. That’s because I loved his work on Flappy Bird on a green CRT in 2014, and Battlezone on a tube with a hand-wound yoke last year. But I’m glad he stepped away from the tubes and created this marvelous specimen of engineering.

Bendërbrau Now A Reality

It appears to be 5 o’clock somewhere as everyone seems to have only one thing on their mind. [Simon] set out to make his own Bender Brewer from the television show Futurama. But he made sure to include some key functions from episodes in the series. First and most notable Bender’s stomach contains a beer brewing kit, we think a coffee roaster would have been better, but to each their own.What we hackers love best is the ‘brains‘ of Bender, a 6502 processor controlled via remote to play a selection of 15 random sayings, including the infamous “Bite my shiny metal”, well, you know.

Finally, yes, we do realize this project was started and finished about 2 years ago. We like to think we allowed it time to ferment.

[Thanks Leo]