Simple Add-On Makes Cheap Plasma Cutter Suitable For CNC Use

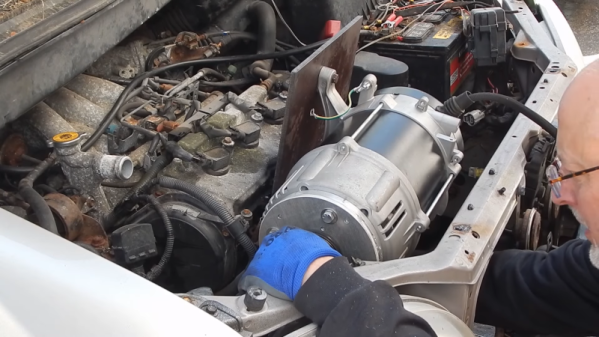
Plasma cutters are ridiculously cheap these days, just cruise by the usual online sources or your local Harbor Freight if you’ve got any doubt about that. But “cheap” and “good” don’t always intersect on a Venn diagram, and even when they do, not every plasma cutter is suitable for use on the spanking new CNC table you’re building. But luckily, there’s a mod for that.

As [Jake von Slatt] explains it, there are two kinds of plasma cutters on the market: high-frequency (HF) start and pilot arc start. The basic difference is that HF start cutters, which comprise the majority of cheap cutters on the market, need direct electrical contact with the workpiece to start the cutting action. Pilot arc torches, which are more suitable for CNC cutters, can strike the arc through a separate conductor without the need to contact the workpiece.

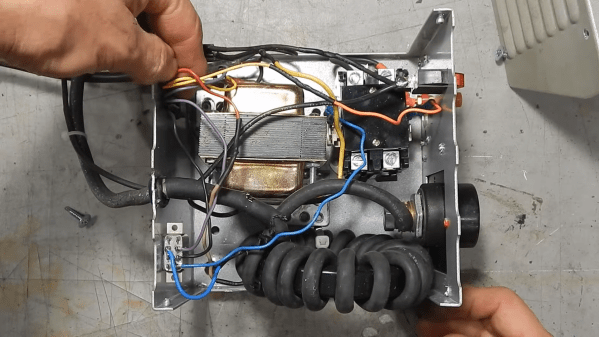
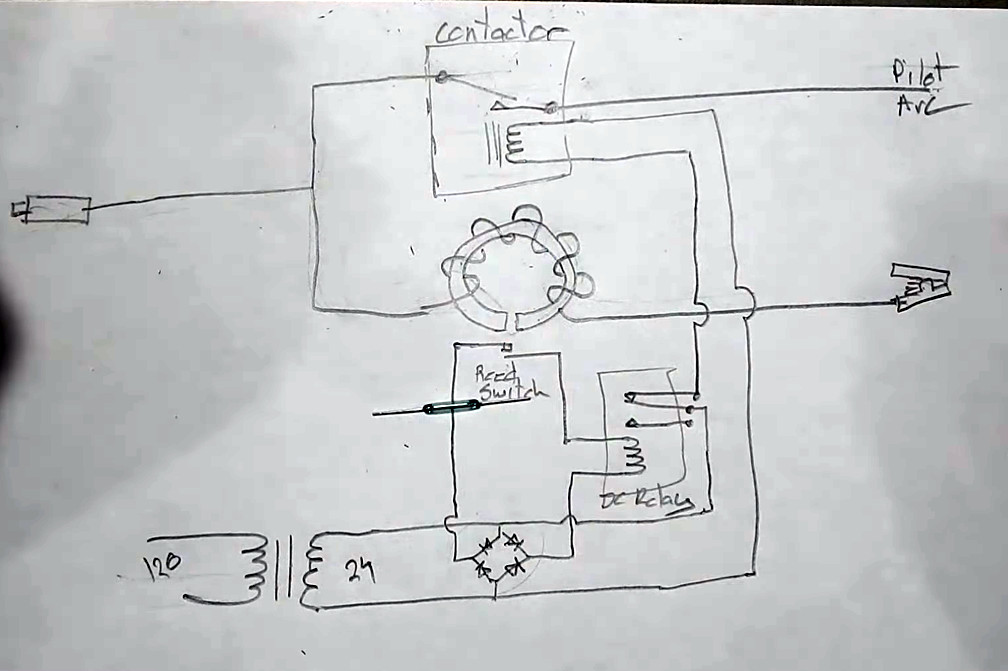
While there are homebrew bodges that claim to turn an HF torch into a pilot arc, [Jake]’s approach is a bit more complicated, and necessarily so. His add-on box intercepts the ground clamp — which is actually the positive conductor for plasma cutting — and switches it through a heavy-duty HVAC contactor. The 24 VDC coil of the contactor is controlled by a homebrew current sensor made from a huge toroid ferrite core wrapped with 20 turns of 6 AWG welding wire.

Before winding, the core is split in two and epoxied back together with a small magnetic reed switch bridging the gap. A simple 24 VDC power supply runs the whole thing. When the torch starts, the nozzle is connected to ground through the contactor, but as soon as the arc strikes and starts pulling cutting current through that toroid, the magnetic field closes the reed switch, which opens the contactor via a small DC relay. This removes the connection between the nozzle and ground, leaving the plasma to carry all the cutting current.

We’ve featured many, many CNC plasma cutter tables before, but most of these builds have concentrated on the table more than the cutter. It’s a refreshing change to get some insider tips on what kinds of cutters work best, and how to adapt what you’ve got for the job.

Continue reading “Simple Add-On Makes Cheap Plasma Cutter Suitable For CNC Use”

That’s Not A Junker… That’s My Generator

If you live somewhere prone to power outages, you might have thought about buying a generator. The problem is that small generators are cheap but — well — small. Big generators are expensive. [Jake von Slatt] had an idea. He has a “yard car” which we thought might be a junk car but, instead, it is an old car he uses to drive around his yard doing tasks. It has a winch and a welder. Now it has a big generator, too. You can follow the project in the three videos found below.

The project started with a scrap generator with a blown motor. Of course, the car has a motor so — in theory — pretty simple. Remove the generator from the motor and graft it to the car’s motor. But the details are what will kill you.

Continue reading “That’s Not A Junker… That’s My Generator”

Wimshurst

3D Printed Wimshurst Machine

Steampunk extraordinaire [Jake von Slatt] has released his latest creation. This time he’s built a Wimshurst machine from mostly 3D printed parts. The Wimshurst machine is an electrostatic generator and was originally invented in the late 1800’s by James Wimshurst. It uses two counter-rotating disks to generate an electrostatic charge which is then stored in two Leyden jars. These jars are also connected to a spark gap. When the voltage raises high enough, the jars can discharge all at once by flashing a spark across the gap.

[Jake’s] machine has a sort of Gothic theme to it. He designed the parts using Autodesk’s 123D Design. They were initially printed in PLA. Skate bearings were used in the center of the disks to ensure a smooth rotation. The axle was made from the fiberglass shaft of a driveway reflector. The vertical supports were attached the base with machine screws.

The Leyden jars were made from sections of clear plastic tube. The caps for the jars were 3D printed and are designed to accept a short length of threaded 1/8″ pipe. Copper wire was used for the interior contacts and are held in place with electrical tape. The metal sectors on each disk were made from pieces of cut aluminum tape.

You may be wondering how this machine works if it’s almost entirely made out of plastic. [Jake] actually painted most of the parts with a carbon paint. This makes them electrically conductive and he can then use the parts to complete electrical circuits. Unfortunately he found this to be rather ineffective. The machine does work, but it only produces sparks up to 1/2″ in length. For comparison, his other machine is capable of 6″ sparks using similar sized Leyden jars.

[Jake] actually tried rebuilding this project using ABS, thinking that the PLA may have been collecting moisture from his breath, but the result is still only 1/2″ sparks. He suspects that the bumpy surface of the plastic parts may be causing the charge to slowly leak away, preventing a nice build up. He’s released all of his designs on Thingiverse in case any other hackers want to give it a whirl.

Refurbishing A Vibratory Tumbler With A Dryer Motor

vibe

[Jake von Slatt] of the Steampunk Workshop is at again, this time refurbishing a cheap vibratory tumbler that had died after just one project.

The original Eastwood tumbler looked nice, but obviously didn’t go through much life-cycle testing at the company that designed it. Upon taking it apart, [Jake] discovered that the bearings in the motor were shot — after only a few hours of operation! Because of this he decided to start from scratch, keeping only the bowl, lid, and of course, the tumbling media.

[Jake’s] redesign makes use of Volkswagen brake drums for a very heavy duty base, a custom machined ball bearing plate made out of scrap aluminum, a flexible motor coupling made by welding a heavy spring onto two shafts, some more springs to balance the bowl, and a reclaimed dryer motor. It might not look pretty, but we think it’ll last a wee bit longer than the original.

He’s calling it his latest feat of post-apocalyptic engineering by using only parts on hand, and while we’d have to agree that his use of scrap material is impressive, we’d like to see him be able to power his rebuilt Bridgeport Mill off the grid when the apocalypse hits!

As always, he’s made an excellent video describing the project — don’t forget to check it out after the break.

Continue reading “Refurbishing A Vibratory Tumbler With A Dryer Motor”

A Table Saw To Cut Solar Panels

saw

Steampunker extraordinaire [Jake von Slatt] loves the idea of solar-powered garden lights soaking up the sun’s rays during the day and powering a LED in the evening. Commercially available solar lanterns, as [Jake], you, me, and everyone else on the planet have discovered, are universally terrible and either don’t have solar panels large enough to charge a battery, or only last a year or so. [Jake]’s solution was to make his own solar lanterns and in the process he came up with a great way of cutting his own solar panels.

[Jake] turned to ebay to source 100 3″ x 6″ solar panels for about $30. These are broken panels, factory rejects, but still are able to produce the 0.5 Volts they should. Since these are rather large panels for a solar lantern, [Jake] needed a way to cut these panels into manageable sizes.

To cut the panels, [Jake] made a box to fit a Dremel with a right angle attachment and a port for a vacuum cleaner. There’s a sled for the panels with markings at 40, 80, 75, and 150 mm so the panels can be quickly cut to size with a diamond cutting wheel.

After the boards are cut, [Jake] checks them out with a multimeter to be sure they’re producing the half volt they should. After that, it’s a simple matter of soldering them together and adding them to his solar lanterns.

Make Your Own Custom IPhone Back Glass

[Jake von Slatt] is at it again; putting his own artistic spin on ordinary items. This time around it’s the glass on the back of an iPhone. It kept breaking and after a few replacements he wanted to try to replace the glass with a piece of etched brass. But part way through that experiment, he figured out how to use toner transfer to develop these stunning custom iPhone glass back plates.

The first step is to source the correct replacement back for your phone. These are made of two parts, the glass and a plastic backer. By carefully heating and wedging the two parts with some popsicle sticks he was able to separate the pieces. Next, he cleans and buffs the glass, preparing it for the artwork he is about to apply. Toner transfer paper, just like that used for PCB resist, is used to print and adhere a design to the underside of the glass. From there he hand paints over the black outline to achieve the results seen above.

It takes time and patience, but shouldn’t be any harder than etching a circuit board.

Rebuilding A Bridgeport Mill

It looks like the Internet’s resident steampunker is moving up a century or two. [Jake Von Slatt] rebuilt the CNC portion of a Bridgeport Series II mill so it can interface with a computer. It’s a feat even more impressive than moving the mill into [Jake]’s garage.

The first step of the build was tearing out the BOSS 5 industrial microcomputer and replacing it with a Win XP laptop running ArtSoft’s Mach 3. This allows G-code to be displayed directly on the screen. The old power supply for the mill did give [Jake] a few problems. The Gecko stepper drivers that replace the old electronics couldn’t handle the voltage of the old power supply. That can be dealt with by opening the transformer and removing a few turns of wire.

[Jake] has been sending in a few of his hacks as of late, so it’s good to see Hack a Day has another fan, especially one of [Mr. Von Slatt]’s caliber. There is a problem with the mill modifications though – [Jake] hasn’t figured out how to program it. If any HaD readers would like to chime in on the best way to program G-code for the mill, feel free to leave a message in the comments.