In this weeks Hacklet we’re looking at household hacks. Not necessarily globally connected home automation hacks, but task specific hacks that we want in our lives yesterday!
We’ve all had it happen, you’re burning the midnight oil on a project when you realize it’s garbage night. The mad dash to collect empty anti-static bags, last night’s Chinese food, and the rest of the trash before actually venturing outside in the dark.
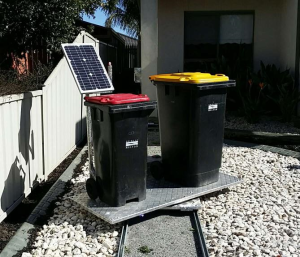 [Mehmet-cileli] doesn’t have to deal with any of that, thanks to My Bins, his automated trash and recycling can moving system. Normally the bins are stationed near the house. Each garbage night, the system springs into action. The cans and their platform pivots 90 degrees. The entire system then rolls along a track to the curb. Once the cans have been collected, everything rolls back ready for more trash. We just hope [Mehmet’s] garbage men are nice enough to put the bins back on their platform!
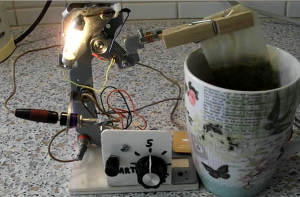 Next we have the perfect cup of tea. [Marcel] kept forgetting his tea while it was steeping. After ending up with ink a few times, he built this Automatic Tea Timer. A button starts the timer, and after a few minutes, the tea bag is automatically lifted and a light illuminates to let you know your tea is ready. [Marcel] used a
 Raspberry Pi Arduino 555 simple R-C timer circuit to create his delay. The lift arm is a discarded hard drive read arm. The light bulb limits current through the voice coils.
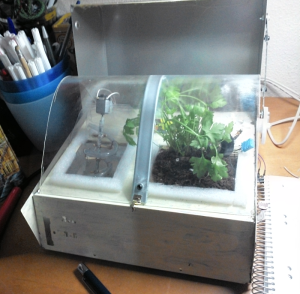 [Juan Sandu] always has veggies with his Smart Small Greenhouse. [Juan] has created a desktop sized greenhouse that gives plants what they crave. No, not Brawndo, we’re talking water, warmth, and light. An Arduino Uno uses sensors to monitor humidity, temperature, light, and moisture. Based upon one of two pre-set plant types, the system determines when to water, turn on lights, or even power up a fan to keep temperatures plant friendly. [Juan] is still working on his greenhouse, but his code is already up on Github.
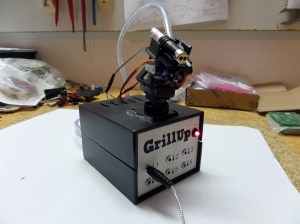 Next up is [nerwal] with his entry in The Hackaday Prize, GrillUp. GrillUp is a remote grill temperature monitoring system with a cooling spray. Up to 6 food grade thermometers provide GrillUp with its temperature data. If things are getting a bit too hot, Grillup cools the situation down by spraying water, beer, or your favorite marinade. The system is controlled over Bluetooth Low Energy from an android smart phone. A laser pointer helps to aim the water spray. Once the cooling zones are set up, the system runs automatically. It even has a sprinkler mode, where it sprays everything down.
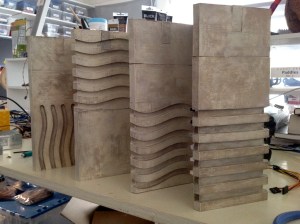 Every hacker’s house needs some Sci-fi mood lights, right? [spetku and maehem] round out this weeks Hacklet with their Fifth Element Stone Mood Lighting. Originally an entry in the Hackaday Sci-fi contest, these mood lights are based on the elemental stones in everyone’s favorite Bruce Willis movie. The lights are 3D printed in sections which stack over foamboard cores. The actual light comes from a trio of RGB LEDs. LED control is from the same brain board which controls the team’s Robot Army. The lights are designed to open up just like the ones in the movie, though fire, earth, wind, and water are not required. The servos [spetku and maehem] selected weren’t quite up to the task, but they mention this will be remedied in a future revision.
That’s a wrap for this week’s Hacklet. As always, see you next week. Same hack time, same hack channel, bringing you the best of Hackaday.io!
 The project featured in this post is a semifinalist in The Hackaday Prize.

 While the tight new engine was quickly losing RPM, the propeller and belt system still had quite a bit of inertia. As the video after the break shows, the belts started flapping and caught on the propeller blades. The front right prop tip caught the double-sided toothed belt, pulling it up and over the propeller. The other end of that same belt lives on the right rear prop. It too caught a propeller blade, snapping the composite blade clean off its hub. The bent steel pulley axles are a testament to the forces at work when things went wrong.
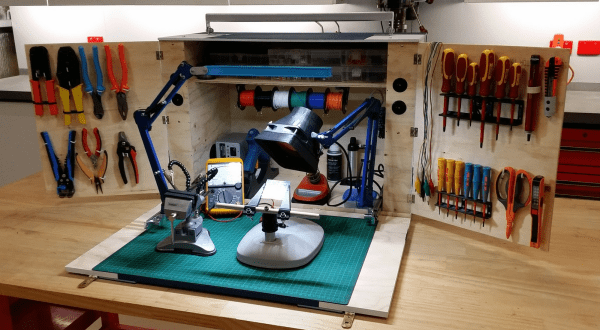
 The basic box is built from a single sheet of 7mm plywood. The front work area is a smaller piece of 12mm plywood. Working with 7mm plywood did prove to be a challenge – [Tez] had to use some very small screws for his hinges. The basic box construction was easy though – [Tez] used a pneumatic nailer and PVA (wood) glue.


 ] rounds out this week’s Hacklet with his


