Modern Tools From Old Table Saws

Somehow or another, the modern hackerspace isn’t centered around table saws, drill presses, band saws, lathes, or mills. The 3D printer and laser cutter are the tools of the future. No one has yet figured out how to build a 3D printer or laser cutter out of several hundred pounds of cast iron, so until then [Chad] will lead the charge modifying old table saws into these modern machine tools.

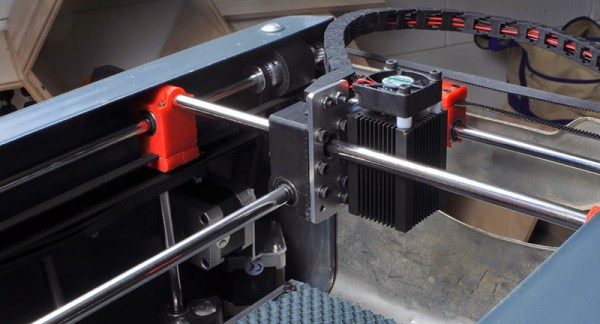
The build logs for the laser engraver and 3D printer are pic heavy and text lean, but there’s enough detail to make a few educated guesses. Both of these machines use Craftsman table saws from the early to mid 1950s for the chassis. Inside each chassis, the rails, belts, and shafts that make up a Cartesian bot are installed, and the electronics are tucked gently inside.

There’s a lot of creativity in this build; the electronics for the 3D printer are tucked away in the shell of the old motor. For the laser cutter, the focus adjustment is the same knob that used to lock the blade at an angle.

While this may look like a waste of two beautiful tools, keep in mind these are equivalent to contractor saws you can pick up at Home Depot for $500 today. They’re not professional cabinet saws, they just look really pretty. They’re still a solid piece of metal, though, and refurbishing the frames into useful tools is probably the best thing you could do with them.

Thanks [Frankie] for the tip.

Hackaday Links Column Banner

Hackaday Links: March 29, 2015

Every once in a while, the Hackaday Overlords have a Hardware Developers Didactic Galactic in San Francisco. Last week was #06 featuring [Mike Estee] from Othermill and Hackaday writer [Joshua Vasquez] talking about synthesizing an SPI slave in an FPGA. Video here.

It’s no secret that [Fran] is building a DSKY – the part of the Apollo guidance computer that was on-screen in Apollo 13. It’s time for a project update, and here’s where she stands: if anyone has a source of JAN-spec Teledyne 420 or 422-series magnetic latching relays (they’re in a TO-5 package), contact [Fran]. The backplane connector has been identified; it’s a Teradyne I/O 100 series connector with a 120mil spacing. Contact [Fran] if you know where to get them.

Let’s say you want a carbon fiber quadcopter frame. What’s the most reasonable thing you can do? 3D print a CNC machine, obviously. That’s a 200mm FPV racer cut from 1mm and 3mm carbon fiber sheets, but the real story here is the CNC machine. It’s a PortalCyclone, and even the cable chains are 3D printed.

What does an AMOLED display look like up close? Pretty cool, actually. That’s 20x magnification, and it’s not a Bayer filter. Can anyone fill us in on the reason for that?

Laser cutters are tricky if you want to do grayscale or half tones. [oni305] made an Inkscape extension to generate better GCode for engraving with a laser cutter.

19″ racks have no dimensions that are actually 19″. Also 2x4s aren’t 2 inches by four inches. Somehow, a 2×4 server rack works.

Measuring Alcohol Content With Time Of Flight Sensors

[Chris] is a homebrewer – the tasty kind – and wanted a way to track the rate of specific gravity against temperature. Tracking temperature is easy, all you need is a 1-wire temperature probe hooked up to the microcontroller of your choice. Logging the rate of fermentation isn’t as simple, but with a time of flight sensor, a hydrometer, and some pool toys, [Chris] kludged something together that works reasonably well.

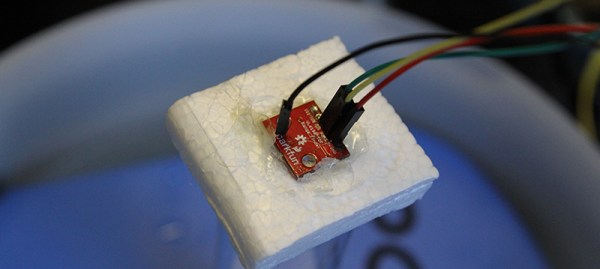
Specific gravity, and thus fermentation, has been measured for centuries with hydrometers. Not wanting to complicate matters with electronic sensors, [Chris] built a floating cage for his hydrometer out of a clear tube, a kick board, and a few bits of styrofoam. By placing a Sparkfun time of flight sensor at the top of the tube, and lowering the hydrometer into his fermentation bucket, [Chris] can measure the height of the hydrometer above the level of the liquid in his fermentation bucket.

Both the temperature and specific gravity are logged to a Raspberry Pi, and after combing through this data [Chris] can see a big ‘bump’ in the specific gravity due to a mass of foam, tapering down to the desired values after a day or so.

Apple ][ Disk Emulation

A while ago, [Steve] over at Big Mess ‘O Wires created a device that would emulate old Macintosh disk drives, storing all the data on an SD card. No, it’s not SCSI; the early Apples had a DB-19 connector for connecting 400 and 800kB disk drives. It’s a great piece of hardware for bootstrapping that old Mac you might have sitting around. Apple ][s, IIs, and //s use an extremely similar connector for their disk drives. A few rumors on some forums led [Steve] to experiment with some ancient bromide-stained boxes, and the results are interesting to say the least.

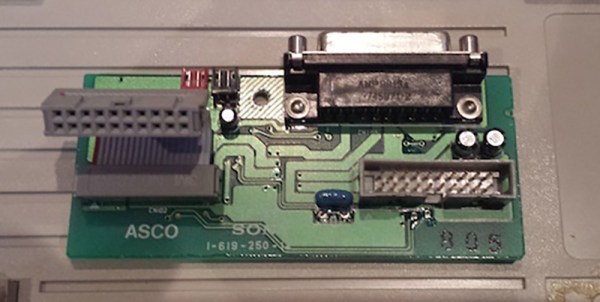
After pulling out an old //e and IIgs from storage, [Steve] found his Macintosh Floppy Emulator didn’t work with the Apples. This was due to the way Apples could daisy chain their disk drives. There’s an extra enable signal on the connector that either brings Drive 1 or Drive 2 into the circuit. Macs don’t care about this signal, but Apples do. Luckily the 800kB drives for the IIgs have an extra board that handles this daisy chain and drive eject circuitry.

After removing this extra board from a IIgs drive and connecting it to the Floppy Emu, everything worked beautifully. With schematics and a working circuit in hand, it’s now a piece of cake to build an adapter board for using the Macintosh Floppy Emu with Apples, or to build that circuit into a future revision of the Floppy Emulator.

Considering how much trouble [Steve] had bootstrapping these Apples without an SD card to Floppy drive emulator, we’re thinking this is great. The current way of making an Apple II useful is ADTPro, a program that uses audio to communicate with Apples over the cassette port. In case you haven’t noticed, microphone and headphone ports on laptops are inexplicably disappearing, making a hardware device like a SD card floppy emulator the best way to bring disk images to 30-year-old hardware.

Arduino IDE Support For The ESP8266

Despite a wealth of tutorials for setting up and writing code for the ESP8266 WiFi module, there has not been much of anything on programming this cheap wireless module with the Arduino IDE. Finally, this has changed. After many months of coding, the Arduino IDE supports the ESP8266 module.

The Arduino IDE support was announced on the ESP8266 community forum. Setup is fairly simple with downloads for Linux, OS X, and Windows. This isn’t an ESP8266 shield, either: you can write code for the ESP module, connect the serial pins, and hit the program button.

The basic functions of the Arduino IDE – pinMode, digitalRead, digitalWrite, and analogRead – are available. Most of the WiFi functions work just like the WiFi shield library.

There are a few things that aren’t written yet; PWM doesn’t work, as the ESP8266 only has one hardware PWM source. SPI and I2C slave mode aren’t done yet, and uploading sketches via WiFi needs a little bit of thought. That said, this is a great introduction to programming the ESP module. If the Arduino IDE isn’t your thing, you could always do it the cool way with [CNLohr]’s programming tutorial we featured last week.

Speaking CAN With Open Source Hardware

You can buy a dongle with a weird industrial connector that fits under the dash of any car on the road for $15. This is just a simple ODB-II transceiver meant for reading error codes and turning a Crown Vic into a police interceptor. There’s a lot more to the CAN Bus than OBD-II; robots and industrial control units, for instance, and Hackaday alum [Eric] has developed an open source tool for all things CAN.

[Eric] built this tool because of a lac of open-source tools that can talk CAN. There are plenty of boards floating around that can reset codes in a car using OBD-II, but an open hardware CAN device doesn’t really exist.

The CANtact is a small board outfitted with a USB port on one end, a DE-9 port on the other, and enough electronics to talk to any CAN device. The hardware on the CANtact is an STM32F0 – an ARM Cortex M0 that comes with USB and CAN interfaces. This chip connects to a Microchip CAN transceiver, and that’s pretty much all you need to talk to cars and industrial automation equipment. If doing something legal, moral, or safe with the CAN bus in your car isn’t your thing, Wired reports you can digitally cut someone’s brake lines.

On the software side of things, the CANtact can interface with Wireshark and the CANard Python library. All the files, from hardware to software, are available on the Github. Oh, CANtact was at Black Hat Asia, which means [Eric] was at Black Hat Asia. We should have sent stickers with him.

Transmitting HD Video From A Raspberry Pi

It’s been a few years since the RTL-SDR TV Tuner dongle blew up the world of amateur radio; it’s a simple device that listens in on digital television frequencies, but it’s one of those tools that’s just capable enough to have a lot of fun. Now, we have a transmitting dongle. It’s only being used to transmit live HDTV from a Pi, but that in itself is very interesting and opens up a lot of possible builds.

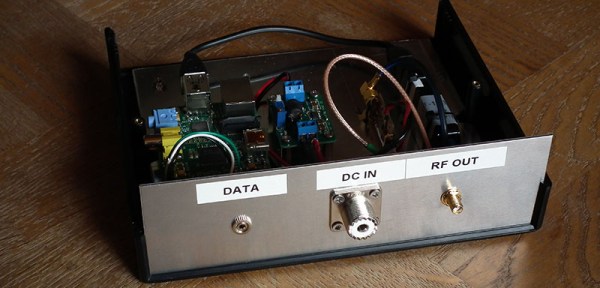
The key piece of hardware for this build is a UT-100C DVB-T modulator. It’s a $169 USB dongle capable of transmitting between 1200-1350 MHz, and with a special edition of OpenCaster it’s possible to transmit over-the-air TV. There’s no amplifier, so you won’t be sending TV very far, but it does work.

On the Raspberry Pi side of the build, the standard camera captures H.264 video with raspivid, which is converted to a DVB compliant stream using ffmpeg. These are well-worn bits of software in the Raspberry Pi world, and OpenCaster takes care of the rest.

While this seems like the perfect solution to completely overbuilt quadcopters, keep in mind transmitting on the 23cm band does require a license. Transmitting in the UHF TV bands is a bad idea.