CoreXY For A Dry Erase Plotter

After years of playing DnD, it’s finally [Mike]’s turn to be a DM. Of course he can’t draw maps with his hands, so that means building a tabletop plotter.

[Mike] is basing his tabletop game plotter on the Makelangelo, a polar plotter that draws images on a vertical platform with the help of two motors in the corner. This is a tabletop plotter, so the usual vertical arrangement wouldn’t work, but there are some projects out there that use the CoreXY system for a similar horizontal build.

The tabletop CoreXY system is built from rigid aluminum yard sticks, 3D printed parts, two very cheap stepper motors, an Arduino, and a whole lot of string. It’s a very inexpensive build and because [Mike] is using metal rulers for the frame, it’s also very low profile – a nice advantage for table top sessions.

So far, [Mike] has the axes of the plotter moving, with a servo and pen mechanism next on the build plan. He has a few neat ideas for how to plot these dungeon maps by vectoring bitmap images and sending them to the Arduino, something we’ll probably see in a an upcoming build log.

You can check out a video of [Mike]’s build below.

Continue reading “CoreXY For A Dry Erase Plotter”

Making Membrane Keypads From Scratch

A few years ago, [Paul]’s son got a simple electronic toy that plays funny noises and sings to him. The son loves the toy, but after months and months of use, the toy was inevitably broken beyond repair. Figuring an ‘electronic box that plays sounds’ wouldn’t be a hard project to replicate, [Paul] set out on making his own. The electronics weren’t hard, but custom membrane keypads are hard to come by. No matter, because it’s actually pretty easy to build your own.

Membrane switches are usually made with silkscreen conductive inks on fancy plastic, but that’s not a requirement to build your own. All you really need are four layers – a ‘front decal’, a ‘top foil’ layer for the rows, a ‘bottom foil’ layer for the columns, and a ‘cutout’ layer that provides enough separation between the rows and columns.

[Peter] laid out the four layers in Illustrator, printed the layers, and covered the rows and columns with copper tape. The cutout layer is the crucial part that keeps the layers separated until the button is pressed, and that was just a piece of card stock with strategically placed holes.

Once the rows, columns, and other layers were glued up, [Peter] could connect this keypad up to a microcontroller. The code is very easy with the Arduino keypad library, and should stand up to the rigors of being handled by a child.

New Part Day: Silent Stepper Motors

Some of the first popular printers that made it into homes and schools were Apple Imagewriters and other deafeningly slow dot matrix printers. Now there’s a laser printer in every office that’s whisper quiet, fast, and produces high-quality output that can’t be matched with dot matrix technology.

In case you haven’t noticed, 3D printers are very slow, very loud, and everyone is looking forward to the day when high-quality 3D objects can be printed in just a few minutes. We’re not at the point where truly silent stepper motors are possible just yet, but with the Trinamic TMC2100, we’re getting there.

Most of the stepper motors you’ll find in RepRaps and other 3D printers are based on the Allegro A498X series of stepper motor drivers, whether they’re on breakout boards like ‘The Pololu‘ or integrated on the control board like the RAMBO. The Trinamic TMC2100 is logic compatible with the A498X, but not pin compatible. For 99% of people, this isn’t an issue: the drivers usually come soldered to a breakout board.

There are a few features that make the Trinamic an interesting chip. The feature that’s getting the most publicity is a mode called stealthChop. When running a motor at medium or low speeds, the motor will be absolutely silent. Yes, this means stepper motor music will soon be a thing of the past.

However, this stealthChop mode drastically reduces the torque a motor can provide. 3D printers throw around relatively heavy axes fairly fast when printing, and this motor driver is only supposed to be used at low or medium velocities.

The spreadCycle feature of the TMC2100 is what you’ll want to use for 3D printers. This mode uses two ‘decay phases’ on each step of a motor to make a more efficient driver. Motors in 3D printers get hot sometimes, especially if they’re running fast. A more efficient driver reduces heat and hopefully leads to more reliable motor control.

In addition to a few new modes of operation, the TMC2100 has an extremely interesting feature: diagnostics. There are pins specifically dedicated as notification of shorted outputs, high temperatures, and undervolt conditions. This is something that can’t be found with the usual stepper drivers, and it would be great if a feature like this were to ever make its way into a 3D printer controller board. I’m sure I’m not alone in having a collection of fried Pololu drivers, and properly implementing these diagnostic pins in a controller board would have saved those drivers.

These drivers are a little hard to find right now, but Watterott has a few of them already assembled into a Pololu-compatible package. [Thomas Sanladerer] did a great teardown of these drivers, too. You can check out that video below.

Continue reading “New Part Day: Silent Stepper Motors”

Real World AdBlock

Every day your eyeballs are assaulted by advertisements on your box of cereal, billboards, t-shirts, magazines, milk cartons, plastered on the side of buses, buildings, bananas, and written in the sky. [Reed], [Jonathan], [Tom], and [Alex] came up with a solution to this: a Brand Killer that censors all the advertisements and brands you see every minute of every day. It’s a real-world adblock that you can build right now.

The team’s system uses a custom head mounted display made from cardboard, goggles, a webcam, and a seven-inch display. The software for the system uses Python and OpenCV to monitor the images from the webcam, compares them against a list of brands and logos, and filters them out with an unobtrusive blur.

Right now the system just has a few brands and logos that include Dr. Pepper, Hershey’s, McDonalds, Facebook, Starbucks, and clear evidence this was built at UPenn, Wawa and Tastykake. In the video below, the detection and tracking of these various brands is very good. The system is also stereoscopic, meaning this is wearable all day, every day, without a loss of depth perception.

Continue reading “Real World AdBlock”

Hacklet 31 – Software Tools

For every computer error, there are two human errors, and one of them is blaming the computer. Whenever a human blames a computer for something, there are two tools, and one of them is the computer.

Not all of your nifty tools need to be fancy robots, CNC machines, or nifty Robertson screwdrivers; a computer is equally capable of being a fantastic tool, provided it has the right software. For this week’s Hacklet, we’re going through some of the best software tools on hackaday.io.

6653681421957570397
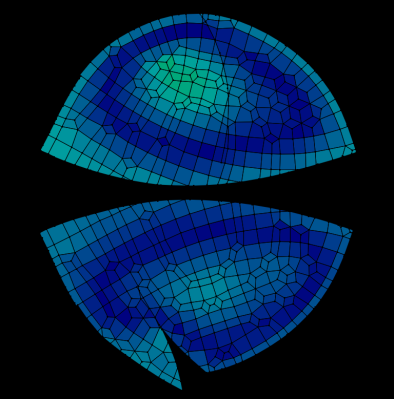
[Alan] was inspired to build a software tool for making sewing patterns. Sewing patterns are usually designed for the ‘average’ person, but if you’re making custom wearables, you should end up with a piece of clothing that fits perfectly.

The first project [Alan] is using this tool for is a fleece cap that fits the contour of his head. He captured a 3D mesh of his head, imported the mesh into Blender, and unwrapped the resulting mesh. The two halves of the hat were then plotted with a Silhouette Cameo, cut out of fleece, and sewn together. The result is a beanie that fits perfectly around [Alan]’s head. It’s an extremely cool and novel application of 3D modeling, and if you ever need to wrap a 3D object with a 2D material, this is the project you want to check out.

5869061407871295021 
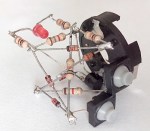
And you thought the autorouter in Eagle was bad.

[Anderson] built a tool called Pyrite that will take a schematic and build a layout in three-dimensional space. He calls them Volumetric Circuits, and it’s basically the point-to-point wiring found in old radios and amplifiers taken to the next level. We featured this project before, and there haven’t been many updates since then. Maybe giving [Anderson]’s project a few skulls will help motivate him to get back to the project.

133031421839442989 
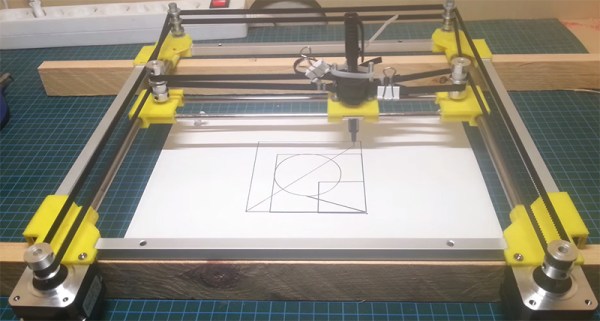
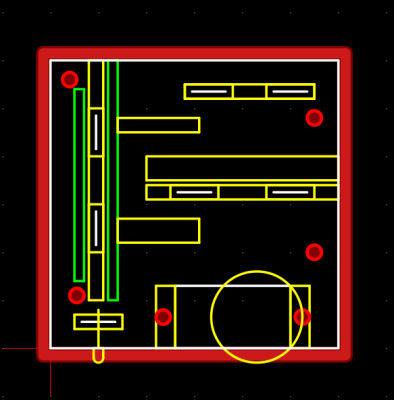
Not satisfied with the existing free and open source CAM programs, [Snegovick] started work on his own.

[Snegovick] calls his project BCAM, and it’s exactly what you need to mill holes in PCBs, cut gears with a CNC router, engrave plastic, and anything else a 2.5 axis CNC machine can do. The project is written in Python, and yes, the source is available. Supported operations include drilling, path following, offset path following, and pocketing.

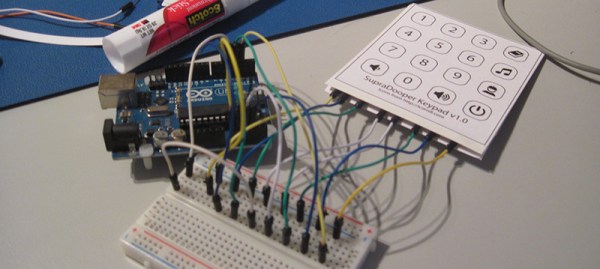
Write enough microcontroller projects, and you’ll eventually come up with your own library of common code that does one thing and one thing well. If you’re smart, you’ll reuse that code in future projects. [ericwazhung] is cutting through the hard part of developing all this code and released some things that are useful in a whole lot of projects.

Included in the commonCode library are the usual ‘heartbeat LED’, non-blocking input, a standard interface for AVR timers, bitmaps of text characters, DC motor control, and a whole bunch more. Extremely useful in any event.

That’s it for this round of the Hacklet, bringing you the best hackaday.io has to offer.

Making Mittens For A Smartphone

For those of us in the slightly inhospitable parts of the northern hemisphere, it’s freaking cold outside. Spring can’t come sooner, and smartphones won’t work if you’re wearing normal gloves. Smartphones will work if you sew a few bits of conductive thread into your gloves, but if you prefer mittens, you’re out of luck. That’s alright, because [Becky] at Adafruit has great guide for knitting your own smart phone mittens.

Intellectually, the concept of weaving fabric is fairly simple – it’s just interlaced threads that form a flexible sheet. Sewing, too, is fairly straightforward. Knitting, on the other hand, is weird. It’s a single string tied to itself that forms a 3D shell. If you’ve ever picked up a pair of knitting needles, you’ll soon realize whoever invented knitting is perhaps the greatest forgotten genius in all of human history. Lucky, then, that [Becky] has a lot of links that go through how to knit, and how to turn yarn into a pair of mittens with this pattern.

To make these mittens work with a smartphone, [Becky] is using a stainless conductive yarn stitched into the thumb and fingertips of the mitten. It works, and now you can use your touchscreen device no matter how cold it is.

Continue reading “Making Mittens For A Smartphone”

Bipolar Bot For Drawing Spirals

[Bart Dring] is well known around these parts for Makerslide, the buildlog.net laser cutter, and a collaboration with Inventables for the Carvey CNC machine. They’re all popular projects and all very useful. This one, not so much. It’s a bipolar bot that doesn’t take itself too seriously, and this year’s build for [Bart]’s usual gonzo CNC machine for ORD Camp.

The Bipolar Bot – yes, that’s its name – is pretty much a SCARA bot. There are two NEMA 14 steppers in the joint of two arms, each of which are bolted to a bearing on a base plate with the other end holding a pen. That’s it as far as the mechanics go, but the software is extremely interesting.

The steppers are driven by an Arduino with the help of a tool that converts Cartesian Gcode to the bipolar Gcode the machine requires. There’s a bit of math involved, but nothing of note if you can code some trig functions

Right now the bipolar bot is busy drawing stuff that looks like it came right off a spirograph. You can see a video of that below.

Continue reading “Bipolar Bot For Drawing Spirals”