[Ben Krasnow] Discusses The Heat Treatment Of Steel

steel

For home metallurgy, there are two sources of information for the heat treatment and tempering of steel. The first source is academic publications that include theoretical information, while the second includes the home-spun wisdom of blacksmiths who learn through trial and error. [Ben Krasnow] put up a great video that tries to bridge that gap with some great background information with empirical observations to back up his claims.

For investigating the hardness of steel, a few definitions are in order. The first is stiffness, or the ability of a material to ‘spring back’ after being flexed. The second is strength, specifically yield strength, which is the amount of strain a material can withstand before being permanently deformed.

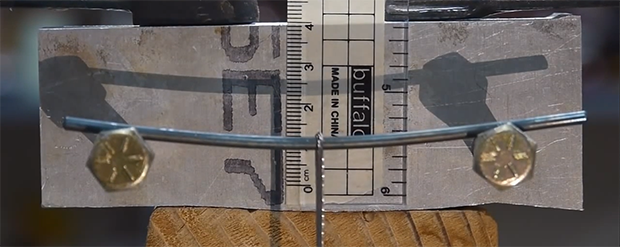
[Ben] did all these experiments with a 1/8″ W1 steel drill rod. As it came from McMaster, this rod could handle a bit of force before becoming permanently bent, and in terms of stiffness was much better than a piece of coat hanger wire [Ben] had lying around. After taking a piece of this drill rod, heating it up to a cherry red and quenching it in water, [Ben] successfully heat treated this steel to a full hardness. After putting it on his testing jig, this full hardness steel didn’t deform at all, it simply broke.

Full hardness steel is basically useless as a structural material, so [Ben] tried his hand at tempering pieces of his drill rod. By putting a few pieces in a kiln at the requisite temperature, [Ben] was able to temper his drill rods to be stronger than the stock material, but not as terribly brittle as a full hard rod.

Continue reading “[Ben Krasnow] Discusses The Heat Treatment Of Steel”

3D Printering: Pastestruders

printering

While bits of plastic are the usual material for 3D printers, there are hundreds of other materials that are equally well suited for 3D printing. One of the most famous is chocolate, a material so popular and easy to manipulate inside an extruder there are even Kickstarters for 3D printed chocolate bars.

teapotThere are many more materials deserving of being 3D printed, though: wax for lost wax castings, other foodstuffs for improbably shaped edibles, and ceramics so I can finally print a life-sized, functional version of the Utah Teapot.

Unfortunately, for all the progress of plastic extrusion, little has been done about extruding pastes, foods, and clay with a 3D printer. The RepRap paste extrusion working group is fairly close to being dead, so let this volume of 3D Printering explore what has been done in the world of paste printing.

Continue reading “3D Printering: Pastestruders”

A GPU For An Arduino

GPU

As the creator of the Gameduino, a shield that adds a VGA port and graphics capability to any Arduino, [James] knows a little something about generating high quality video with a microcontroller. His latest project, the Gameduino 2, blows his previous projects out of the water. He’s created an Arduino shield with a built-in touchscreen that has the same graphics performance as the Quake box you had in the late 1990s.

The power behind this shield comes from a single-chip graphics solution called the FTDI EVE. This isn’t the first time we’ve heard about the FTDI EVE, but this is the first instance of a project or product using this very cool embedded graphics engine. The Gameduino 2 uses an FT800 graphics chip over an SPI connection to give a 480×272 TFT touch panel the same graphical capabilities as a Voodoo 2 graphics card. From the video, [James] is able to put thousands of sprites on a screen, as well as simple 3D animation, and extremely impressive 2D animations using only an Arduino.

While the Gameduino 2 is designed to be a game console you program yourself, we’re thinking this would be even more useful as a display for standalone projects.

Breadboarding With A ARM Microcontroller

NXP’s LPC1114 ARM microcontroller is in a class all of it’s own. ARM microcontrollers are a dime a dozen, but this fabulous chip is the only one that’s housed in a hacker and breadboard friendly PDIP package. However, breadboard setups usually won’t have the luxuries of a true development platform such as flashing the part, single stepping through the code, and examining memory. [Steve] found an interesting solution to this problem that involves a Dremel and hacking up even more hardware.

[Steve] found a few LPC1769 dev boards that include a debugger and a way to program these chips. Simply by hacking off the programmer and debugger portion of this dev board with a Dremel tool, [Steve] had an easy to use interface for his breadboardable ARM.

After connecting the power rails to his breadboarded chip, [Steve] connected his programmer up and set up a gcc toolchain. For about $25, he has a breadboard friendly ARM microcontroller with full debugging capabilities.

This isn’t the first time we’ve seen a few people play with this DIP28 ARM chip; someone even milled this 600 mil chip down to 300 mils for even easier prototyping. Still, this is the best and cheapest way we’ve seen yet to turn this ARM into a proper prototyping platform.

How Do You Build A Relay CPU?

relay

The Hackaday tips line is always full of the coolest completed projects, but only rarely do we see people reaching out for help on their latest build. We’ll help when we can, but [Tim]’s relay-based CPU has us stumped.

[Tim] already has the design of his relay CPU completed with a 12-bit program counter, sequencer, ALU, and a transistor-based ROM. The problem he’s having deals with the mechanics and layout of his homebuilt CPU. Right now, all the relays (PC pin, we guess) are glued top-down to a piece of cardboard. This allows him to easily solder the wires up and change out the inevitable mistakes. This comes with a drawback, though: he’s dealing with a lot of ‘cable salad’ and it’s not exactly the prettiest project ever.

The ideal solution, [Tim] says, would be a PCB with through-hole plating, but this isn’t easy or cheap for the home fab lab. We’d suggest some sort of wire wrap setup, but proper wire wrap sockets and protoboards are for some reason unreasonably expensive.

If you have an idea on how to do the mechanical layout and connections of a relay-based computer, drop a note in the comments. [Tim] has a very cool project here, and it would be a shame if he were to give up on it due to a lack of tools.

Video below, and if you’re having a problem with a project, feel free to send it in.

Continue reading “How Do You Build A Relay CPU?”

The Greenest Wall-Powered Clock

clock

Some of the most inefficient appliances in the home are AC mains-powered clocks. You can’t exactly turn them off and they use a whole lot of energy considering how often they’re looked at. [t3andy] came up with a great low power AC Mains clock that is only on 3% of the time. As a neat bonus, it also looks really, really cool.

[t3andy] is using a Teensy 3 as the brains of this clock, and the serial interface on the board provides a relatively easy means of setting the time without having to use buttons or tact switches. The clock face consists of 13 neopixels, with two red pixels showing the hour and a single green pixel showing the minutes. The time is measured with a DS3232 I2C real time clock with a battery backup.

The design is remarkably efficient since the LEDs are off 97% of the time, only being lit at the top of the minute. There are provisions for IR control and a PIR sensor to display the time whenever it’s needed, but that would obviously mean a hit to the energy efficiency.

A Simple Forth Development Board

forth

Forth is a very interesting programming language. It’s very flexible and is extremely efficient on low powered hardware, but unfortunately not very popular simply due to the fact that it’s not very popular. There were a few Forth-based microcomputers built in the 1980s, but these were largely unsuccessful.

[Leon] is a Forth aficionado and came up with his own Forth development board in the hopes of Forth making a comeback. It’s a very small and cheap board – only about $12 in parts – but it’s still extremely powerful and a fun platform for investigating Forth.

Compared to other programming languages found in 80s microcomputers, Forth is just weird. It’s a stack-based language, so instead of adding two numbers like 3 + 4, Forth uses postfix notation (or Reverse Polish Notation) so the same statement is expressed as 3 4 +. It’s a much more efficient way for computers to handle data, and some claim it’s more efficient for humans as well.

[Leon] created his own board able to be programmed in Forth, shown above, that uses an ATMega328 microcontroller. He’s using AmForth to put Forth on his system, but also extended the base AmForth install with his own floating point version. making this version of Forth at least as powerful as any 80s microcomputer or ATMega development board is today.

[Leon] put together a great demo of the capabilities of Forth and his dev board. You can check that out below.

Continue reading “A Simple Forth Development Board”