Recording Off A Reel-to-reel With A Credit Card Reader

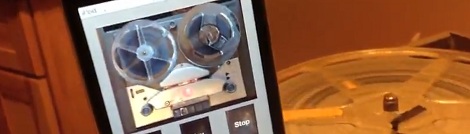
If you’ve got a few reel-to-reel recordings of 1940s radio, how do you transfer those to a digital medium? [Evan Long] and his dad used a credit card reader built for the iPhone to transfer a vintage [Art Kassel] recording from magnetic tape to the digital domain of .MP3s.

A few months ago, we saw what goes into these Square credit card readers. They’re just a magnetic tape head with a resistor an 1/8″ jack that plugs directly into the headphone jack of any iDevice. Because there’s no hardware limitation of what the Square credit card reader can do, [The Long boys] decided to back up some old reel-to-reel tapes with an iPod Touch.

[Evan] and his father needed to perform a few modifications to the credit card reader; the tape head pressed against the plastic case too tightly to allow feeding 70-year-old tape through the device. After bending a bit of metal the credit card reader was ready to record the dulcet tones of the Big Band era.

It’s a neat build, and anything that reuses proprietary hardware (however limited) is alright in our book. Nice job, guys.

Detecting Cosmic Rays With 18 Geiger Tubes

What do you do if you have 18 Geiger tubes lying around? [Robert] had an interesting idea to build a cosmic ray detector and hodoscope to observe the path cosmic rays take while flying through his lab.

[Robert]’s cosmic ray detector works by detecting the output 9 Geiger tubes on the y-axis and 9 Geiger tubes on the x-axis with a coincidence circuit. When a cosmic ray flies through the detector, it should trigger two tubes simultaneously. By graphing which of the two tubes were triggered on an array of 81 LEDs, [Robert] not only knows when a cosmic ray is detected, but where the cosmic ray was.

The detectors do pick up a little background radiation, but thanks to [Robert]’s coincidence circuit, he can be fairly certain that what he’s recording are actually high-energy cosmic rays.

Before building the 9×9 hodoscope, [Robert] built a similar drift hodoscope that simply plots the path a cosmic ray takes through an array of Geiger tubes. You can check out videos of both these cosmic ray detectors after the break.

Continue reading “Detecting Cosmic Rays With 18 Geiger Tubes”

Two Software Defined Radio Hacks From Our Resident SDR Guru

It seem [Balint] is becoming somewhat of a SDR guru around these parts; in the past few months, he’s gotten a USB TV tuner receiver working with GNU Radio, started a software defined radio tutorial YouTube channel, and even used this project to listen in on conversations between airplanes and air traffic control. This time, [Balint] is back using this cheap USB TV tuner for radio direction finding and running HDSDR in Linux and OS X.

[Balint]’s radio direction finding presentation goes over traditional means of direction finding using the doppler effect and mechanically rotated antennas. Because [Balint] is dealing with frequencies around 150MHz (about 2 meter wavelength), building a physical direction finding setup requires spinning antennas at around 40,000 RPM; much to fast for any hardware build. [Balint]’s solution was to attach 4 antennas around the circumference of a circle and electronically switch between them many thousands of times a second. [Balint] put up a wiki page going over all the theory and implementation details of his build.

[Balint] also put wrote up a neat app to control software defined radios – including the Realtek TV dongle –  over a network. Spread over a wide enough geographic area, it could become extremely easy for anyone to play air traffic controller. The BorIP Server can also be used to run HDSDR in Linux and OS X under Wine; just connect HDSDR to the network loopback on the same machine, and you get around Wine’s distaste for accessing hardware natively.

Awesome work, and we can’t wait to see what comes out of [Balint]’s laboratory next.

Edit: instead of the dongle, [Balnt] is using a ‘real’ software radio board. A lot of people are messaging him asking if the same method of direction finding is possible with the dongle. Here’s what [Balint] has to say:

The trick, as I see it, would be to create some (more or less simple) additional hardware to take the clock signal straight off the dongle’s on-board oscillator and divide it down for use with the antenna switch, i.e. 28 MHz à tens of kHz (this is the bit that’s done in ‘software’ on the FPGA). One problem still remains however: the counter needs to remain calibrated against the known direction the antenna was pointing at the time – otherwise a stop/start of the data stream from the dongle will mean the direction will go out of sync by 90/180/270 degrees each stop/start. Perhaps someone will figure out an elegant solution for this slight hurdle!

So there you go. Up for a challenge?

ArduSat Puts Arduino Experiments In Space

CubeSats are nothing new – hundreds have been launched into Earth orbit by schools and universities over the past decade. Like anything cool, an Arduino eventually gets thrown into the mix. That’s what the folks behind ArduSat are doing: they’re launching an Arduino-laden satellite into orbit with a bunch of sensors to enable anyone to become a citizen space scientist.

On board the ArduSat is a suite of sensors including a spectrometer, Geiger counter, IR light sensor, electromagnetic wave sensor, a temperature sensor, gyroscope, accelerometer, magnetometer, GPS unit, CO2 sensor, and of course a few cameras. The rewards for this Kickstarter are fairly interesting: backers who pledge $500 are able to buy a week’s worth of time using the ArduSat sensors for your own personal experiment.

As for how this Arduino-powered satellite is getting a ride up to Low Earth Orbit, the team plans to send an application into NASA for the CubeSat Launch Initiative ride-along program. If NASA selects the ArduSat, it’ll get a ride into space along with other CubeSats on a larger commercial launch. If the ArduSat isn’t selected by NASA, the team behind this satellite has secured funding to piggyback on a commercial launch.

Tip ‘o the hat to [HackTheGibson] for sending this in.

Adding Wireless To The Raspberry Pi

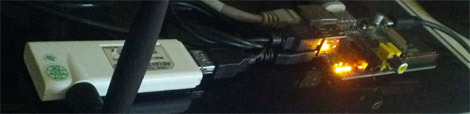
For those of us who haven’t received their Raspberry Pis yet, it may come as a bit of a shock to realize the RasPi doesn’t have an on board WiFi adapter. While the Model B RasPi has an RJ45 Ethernet plug, but the Model A must rely on USB-bound networking dongles. [Mike] over at Mitch Tech put up a great guide to using a Realtek WiFi dongle with his Raspberry Pi.

Stock, the standard Debian install recommended by the folks at Raspberry Pi has the drivers for the Realtek WiFi adapter, but no firmware. [Mike] goes over how to get the firmware for this series of WiFi adapters to keep the kernel from complaining. Interestingly, [Mike]’s instructions also work for a slew of Realtek-based wireless dongles, so the installation instructions should work for a bunch of adapters available from DealExtreme or eBay.

[Mike] also has a guide for installing Quake 3 on a RasPi. Combine these two builds and you’ve got the perfect setup for a Raspberry Pi LAN party. Anyone want to host?

Putting An Atari POKEY In Your Pocket

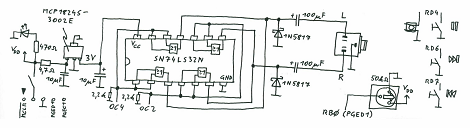
The Atari POKEY served as the main I/O chip on the venerable Atari 400/800 and XL/XE 8-bit computers. While a chip designed to get voltages from game paddles and scanning a matrix of keyboard switches wouldn’t normally be remembered 30 years later, the POKEY had another function: generating very, very distinctive music and sound effects for those old Atari games. [Markus Gritsch] wanted a portable version of the POKEY, so he emulated one on a modern microcontroller. Now he’s able to take those old Atari chiptunes where ever he goes.

The build uses the Another Slight Atari Player by emulating a 6502 and POKEY chip inside [Markus]’ PIC32MX-based microcontroller. There’s not much physical hardware [Markus] had to deal with – the board is built on a QFP proto board [Markus] picked up with a few buttons and a jack added for some simple I/O.

This isn’t [Markus]’s first attempt at portabalizing chiptunes – last year, we saw a truly awesome portable SID player that used the same PIC32 microcontroller and an emulated 6502. Between the Atari SAP Music Archive and the High Voltage SID Collection, [Markus] has more than enough chiptunes for days of listening pleasure.

Mini Maker Faire In Eugene, OR This Weekend

[Rick Osgood] wrote in to tell us about the Eugene, OR Mini Maker Faire going on this weekend. The event is being hosted on the grounds of the Science Factory with a lot of help from the Eugune Makerspace

So far, Steamworks Cycles, the South Eugene Robotics Team, Oregon Rocketry and Eugene Rocketery will be at the Maker Faire showing off their skills and wares. It looks like an excellent place to spend the day, with events hosted by the Science Factor and the Eugene Makerspace all day long.

Tickets are $4.00 a pop; easy enough on our wallets, but unfortunately the official Hackaday transporter pad won’t be ready in time for this weekend. If anyone would like to write a blog post about the sights and sounds of the Eugene Mini Maker Faire, send it in and we’ll put it up.