Printing Point-to-point Circuits On A 3D Printer

[CarryTheWhat] put up an Instructable on his endeavours in printing circuit boards for solder free electronics. He managed to print a flashlight where the only non-printed parts are a pair of batteries and a couple of LEDs.

The circuit is a weird mix of point to point and Manhattan style circuit construction; after modeling a printed plastic plate, [CarryTheWhat] added a few custom component holders to hold LEDs, batteries, and other tiny electronic bits.

To deliver power to each electronic bit, the components are tied off on blue pegs. These pegs are attached to each other by conductive thread much like wirewrap circuit construction.

Right now, the circuits are extremely simple, but they really remind us of a few vintage ham radio rigs. While this method is most likely too complex to print 3D printer electronics (a much desired and elusive goal), it’s very possible to replicate some of the simpler projects we see on Hackaday.

[CarryTheWhat] put the models and files up on GitHub if you’d like to try out a build of your own.
A 3D Printed, Electromechanical Computer

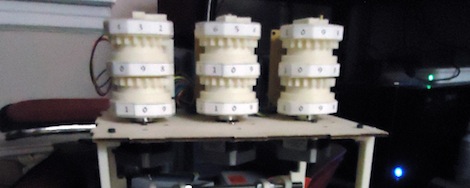
If you had a machine that could print complex mechanical parts in an hour or so, what would you do? [Chris] is doing the coolest thing we can imagine and is building an electromechanical computer from 3D printed parts.

You may remember [Chris] from his efforts to getting his tiny, 1/10th scale Cray-1 supercomputer up and running. Even though he has the OS on a disk, actually booting the machine is a bit of a problem; much the same as his electromechanical computer project. Late last year we saw [Chris] building a few gears for his computer, but now he’s got a punch card reader that looks very much like a Jacquard loom.

Even though the computer doesn’t actually do anything yet, it’s amazing to think that [Chris] is building out of plastic that will run computer programs. You can check out the video of [Chris]’ video of his punch card reader after the break.

Continue reading “A 3D Printed, Electromechanical Computer”

Controlling A Propeller Wirelessly With Bluetooth

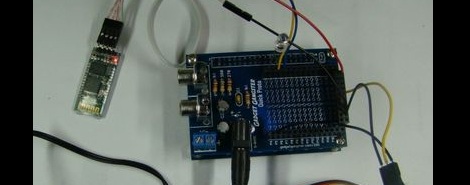
[Jeff] from Gadget Gangster sent in a great tutorial on connecting a cheap Bluetooth module to a Parallax microcontroller. In addition to getting a terminal to the Propeller up and running from his computer, [Jeff] was able to toggle IO pins and even control servos and Android devices – perfect for your next wireless robot.

Connecting the Bluetooth module to the Propeller dev board was easy enough – just two wires for power and two for transmitting and receiving. The computer side of the setup was easy as well; just entering a Bluetooth passcode. Once that was done, the Propeller could talk to the computer and vice versa.

Of course, without the ability to control pins on the microcontroller wirelessly the build was for naught. [Jeff] wrote a simple blinking LED demo. After that, a servo was connected and the build finished off by connecting to an Android terminal.

Although it’s a relatively simple build, we’ve noticed the Propeller doesn’t get much love around the Internet. While it may not have won the microcontroller holy war, it’s nice to see an underrated mcu getting some attention.

Reverse Engineering A Plasma Dot Matrix Display

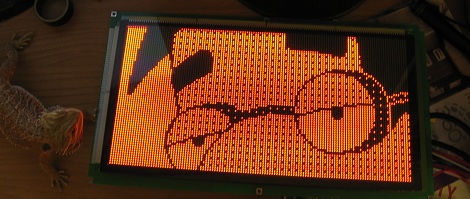
A while back, [DragonMinded] picked up a bunch of old arcade and pinball parts from a guy on Craigslist. These parts sat around for a while until a really neat plasma dot matrix display was found in the corner of a box in his garage. Doing the only reasonable thing, [DragonMinded] figured out how to interface this ancient display with a microcontroller.

After extensive Internet research on his display, [DragonMinded] could only find a one page datasheet for his APD-128G064A-1 display. Luckily, this datasheet had voltage requirements, and since the display only had six input pins he could probe the circuit to see what goes where.

After generating a crude schematic, [DragonMinded] prototyped a driver circuit with an Arduino. When the function of each pin was discovered, the Arduino libraries were discarded and replaced with raw register access.

It was a fair amount of work, but [DragonMinded] eventually got to the point where he could draw anything he wanted on the screen. Next on the to-do list is turning it into a terminal or Twitter machine, as with all good display hacks.

Turning A Light Off Over The Internet

Because reaching over a few feet to turn off a switch is too much to bear for [Bruce], he connected his desk lamp to the Internet. It’s a pretty cool build that’s the perfect tutorial for connecting just about anything to the internet.

For his build, [Bruce] used an Arduino with a relay attached to an output pin. When the Arduino receives a signal on its serial port, a tiny voltage is applied to the relay, turning on the light.

This could have been done with an Arduino Ethernet, but the PHP script [Bruce] went with is a little more versatile. Whenever someone pulls up this digital light switch web page, they can turn [Bruce]’s desk lamp on and off.

For an introduction to connecting bare bones projects to the Internet, we’re really liking [Bruce]’s build. Just try no to go crazy with that link and leave the failure testing to the professionals. You can check out the demo video after the break.

Continue reading “Turning A Light Off Over The Internet”

Meet Stompy, Your New Robotic Overlord

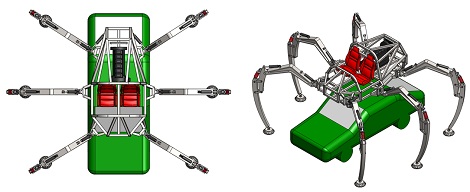
In case you weren’t already depressed about not starting a summer project already, a couple of guys are building a gigantic rideable hexapod they call Stompy.

The project leaders, [Gui Cavalcanti], [Dan Cody], and [James Whong] have worked on a few crazy robotics projects before like PETMAN and BigDog. Stompy won’t be a military-backed project like the others (we sincerely hope), so they’re enlisting the help of fellow makers at Artisan’s Asylum to complete a 15-foot diameter, 1-2 ton rideable hexapod before the end of August.

Right now, the team is still in the planning and preliminary testing stages. So far, they’ve built a 1/2 scale model of one leg to figure out the control systems, and getting the repurposed forklift motor up and running. It may not look like much now, but we’re sure the team is going to have a very fun time building Stompy.

You can check out the updates and progress of Stompy on the Project Hexapod blog

A Fantastic Acrylic Light Display

As a retired industrial designer, [Dave] has a lot of time to do what we’d all like to do: sit around in a workshop and make stuff. His latest project, an acrylic light display of an Indian motorcycle looks fantastic and betrays his designer heritage.

The base of the light display is made up of a laminate of a few 1/4″ pieces of Poplar carved on [Dave]’s CNC machine. These pieces were glued together with a slot routed into the top for the arcylic panel. Instead of going with a few LEDs for the light source, [Dave] used a small cold cathode fluorescent lamp with the requisite inverter tucked away inside the base. This is the same setup he used in an earlier project, and judging from that the Indian motorcycle display looks great on the inside.

After giving the wooden base a few coats of lacquer, [Dave] milled a piece of acrylic with an Indian motorcycle motif he created himself. It’s a great piece of work, sure to brighten up his very awesome workshop.