The Trials Of Digital Design Class

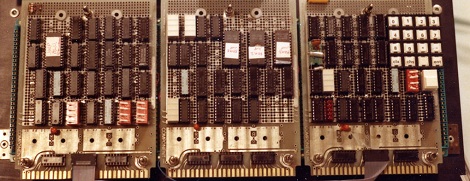
Late last week, we saw a rather clever combination lock build that used only a single 74xx logic chip. [J. Peterson] read this post, and in a battle royale of geek one upmanship sent us a write up of the logic chip computer he built nearly 30 years ago at the University of Utah.

Around 1982 or 1983, [J. Peterson] took the Digital Hardware Lab at the University of Utah. The class was split into two semesters; during the fall semester, students would build a four digit, stack-based calculator that could add and subtract. That may sound easy, but everything – including reading the keyboard, multiplexing LEDs, and performing the mathematical operations – was done with gates and latches.

After Christmas break, the poor souls who had just finished their calculator were presented with another challenge due in four short months. The calculator built during the fall would turn into a full-blown computer, functionally similar to a PDP-8.

After months of work, and seeing the 70 people who showed up on the first day of class in September dwindle down to a handful in late April, [J. Peterson]’s computer was complete. The test program ran through a couple iterations, and the computer was immediately disassembled.

An awesome tale of digital design from only a generation ago. And you thought Verilog was hard.
Building A Media Player With An MSP430

A media player based on an Arduino and SD card has been done to death several times over, but that doesn’t mean we can’t appreciate [Matt]’s MSP430 audio player. It’s a very nice piece of work that supports a FAT16 file system and only takes up 54 bytes of RAM.

To make his dream of a 430 media player a reality, [Matt] based his work on the DIY Life Talking MSP430 project. Unlike this previous attempt to play music with a ‘430 and SD card, [Matt] threw in a full FAT16 file system, allowing him to drag and drop audio files on his computer to the SD card.

Right now [Matt]’s build can play a stereo audio file through its speakers, but the sound quality over a mono file is greatly reduced. The maximum sample rate is 16kHz; a ‘good enough’ sample rate if you’re listening with terrible headphones. In the video after the break, [Matt] plays this awesome Symphony of Science on his homebrew media player. We’re guessing his camera doesn’t do his project justice, but it’s still impressive nonetheless.

Continue reading “Building A Media Player With An MSP430”

Soccer Simulator Rules A Child’s Birthday Party

[youtube=http://www.youtube.com/watch?v=gKACRU4LKfM&w=470]

Being a dedicated father, soccer coach, general tinkerer, and electrical engineer, [Dave] decided to build a soccer simulator video game for his son’s 6th birthday party. The concept behind the game is to put a soccer ball on a tee and have an eager line of six-year-olds kick the ball into the goal. A video of a goalie is projected behind the net, and sensors in the goal will determine if the player scored a goal or not.

The first part of [Dave]’s project was getting footage of a goalie diving for a soccer ball. Luckily, [Dave] is friends with [Mark Macdonald], a former NCAA goalie. After 10 minutes in the park with [Mark] and a 720p camera, [Dave] had all the footage needed to build his video game.

To detect where the soccer ball passed into the goal, [Dave] built a small soccer goal studded with infrared LEDs and infrared beam break sensors. Combined with a small switch underneath the ball tee, the software knows the time of flight and where the ball crossed into the goal. The game processes these two numbers to determine if it’s a goal, or was caught by the retired pro goalie.

The kids at the birthday party lined up to play [Dave]’s soccer game – a huge achievement getting 6-year-olds to wait their turn. We admit that we’d like to have a go at this game, although we’re pretty sure we saw an arcade version of this game years and years ago.

Powering A Robot With A Macbook Battery

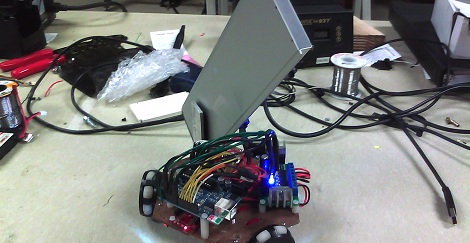
When [Soo-Hyun]’s friend had an Apple Macbook Pro battery that began to swell, his friend did the reasonable thing and donated it to be used in a robot. Now [Soo-Hyun]’s kiwi drive robot is powered by a gigantic LiPo battery, giving it a huge range and a very fast top speed.

The defunct laptop battery that formerly powered a 15″ macbook pro is three battery packs of two cells in parallel, delivering 12.6 Volts. To get the power to the robot, [Soo-Hyun] etched a simple PCB that fit into the slot in the battery. A little bit of soldering later, and mounting the battery as a shark fin because of the 8×8 inch limitation of maze-solving robots, the power plant was complete.

Using a bulging LiPo battery probably isn’t the smartest idea (listen for the great line, “it got the camera and my face” at 4:08), but as long as [Soo-Hyun] keeps an eye on the battery as it’s charging, it should be alright.

Check out the video of the robot zipping around on 12.6 Volts after the break.

Continue reading “Powering A Robot With A Macbook Battery”

Quieting A Pendulum Clock Every Night

[Vinnie] has a wonderful old clock from his grandmother; it’s an exquisite antique with a real mechanical movement and a charming set of bells that ring every hour. Unfortunately, those chimes are a bit of a disturbance to neighbors at 2 o’clock in the morning. Previously, [Vinnie] had been stopping the clock every evening, and hoped he would remember to start the pendulum in motion 12 hours later. This was a chore, so he decided to automate the process.

The build is simple and clever; a small stepper motor is mounted in the clock just underneath the pendulum. Every 12 hours, the stepper motor moves a lever and slowly stops the pendulum over the course of a dozen or so seconds, silencing the clock movement. Twelve hours later, the motor turns again setting the pendulum in motion.

The parts count for this build is very low – basically just an ATmega88, a Darlington array to drive the stepper, and a 32.768kHz crystal. We can think of a few friends and relatives with loud clocks in their house, so we might have to build a few of these to give away.

Take a look at the demo video after the break to see how [Vinnie] stops his grandmother’s clock every night.

Continue reading “Quieting A Pendulum Clock Every Night”

The RC Transmitter That Does Everything

[Demetris] sent in a project he’s been working on over the last year. It’s called the Open Source Radio Control, and promises to be a modular platform for every imaginable remote control transmitter need. If you’d like to control a bipedal android or a 3D aerobatic model plane, the OSRC can do it while transmitting video from the cockpit down to your hands.

Last summer, we caught wind of the OSRC project to build an extensible and open source remote control radio that would do anything; from displaying video from the cockpit to serving as the brain of a UAV rig, the OSRC promised to do everything.

A fully decked out OSRC can be had for about $1400, putting it in the upper echelon of remote control radios. For that price, though, you get a fully customizable radio with your choice of shoulder buttons and a 4.8 inch LCD that receives a video feed from the cockpit of your favorite model. The base unit starts out around $700; still very expensive for a remote control radio, but reasonable when you consider all the possible upgrades.

[Demetris] and the rest of the team put together an outrageously long yet surprisingly beautiful video showing off a few features of the OSRC. You can check that out after the break.

Continue reading “The RC Transmitter That Does Everything”

Display Made Out Of Hundreds Of Seven Segment LEDs

While huge LED panels are a relatively common project du jour for people wanting to flex their engineering muscle, we’re taken aback by the sheer beauty of [Skot9000]’s huge LED display made of seven-segment displays. He calls the build DigitGrid, and it’s a wondrous display the likes of which we’ve never seen.

To build a display based on seven-segment LEDs, [Skot] went with a modular approach in designing the DigitGrid. To power and control all these seven-segment displays, [Skot] used a Texas Instruments TLC5920 to run four 4-digit displays as a single module. Four of these modules connect together to form a row of 32×2 digits, and eight rows of digits come together to make a 512-digit display. With seven LEDs for each digit, that works out to 3,584 4,096 individual LEDs for the entire panel.

To power and control this gigantic array of LED displays, each row uses a PIC16F microcontroller which, in turn, is controlled by an FPGA. After several hours of writing Verilog, [Skot] had a reasonably good hunk of software that allowed him to send frames from his computer to the display. The results, quite simply, are amazing. [Skot] managed to put up a short film showing off the animation capabilities of his new display, and it’s a wonder to behold. You can check that video out after the break.

Continue reading “Display Made Out Of Hundreds Of Seven Segment LEDs”