Halloween Hacks: Terrifying Mask Follows You Everywhere

It’s less than 5 days away from Halloween and the projects to scare small children are pouring in. [Noel] sent in his robotic Halloween mask he’s been working on, and the only way his build could be any better is by placing it underneath a child’s bed.

[Noel] took the mask he used last year and stuffed a few styrofoam craft balls inside to ‘fill it up.’ Two LEDs and a PIR sensor were fitted into the eyes of the mask and a few more electronics added to the brain. A servo was fitted to the base of the project to turn the head left and right.

The build uses a Gizduino Arduino clone with an Adafruit Wave shield. After a little bit of wiring up the LEDs, PIR sensor and neck servo, [Noel] had a bit of coding ahead of him. He ran into a problem with the WaveHC and Servo libraries because they both used the same timer. After finding a another software-based servo libraries, he had a reasonably terrifying project to put in front of a bowl of candy.

Check out the video below for a demo of [Noel]’s work.

Continue reading “Halloween Hacks: Terrifying Mask Follows You Everywhere”

Nintenduo Stuffs An NES And SNES In The Same Case

[lovablechevy] loves her Retro Duo console, especially since it takes up less space than the NES and SNESĀ it has replaced. There’s a small problem though: the Retro Duo isn’t 100% compatible with her old Nintendo cartridges. Battletoads is a deal breaker for her, so she builtĀ Nintenduo, an NES/SNES console that uses all original Nintendo hardware.

The Queen of Bondo began her project with a top-loading NES and the smaller revision of the SNES. There’s a Photobucket gallery showing the innards lovingly placed in their new plastic home.

Not only can [lovablechevy] play classics like Paperboy, Donkey Kong Country, and the Super Mario RPG that are incompatable with the Retro Duo, all the accessories like the Zapper and Power Pad now work.

The finished build is very small; not much bigger than an SNES 2, and is nearly dwarfed by the gigantic NES cartridges. She posted a video of herself trying not to shoot the stupid Duck Hunt dog with her Nintenduo. Check it out after the break.

Continue reading “Nintenduo Stuffs An NES And SNES In The Same Case”

Millivolt Meter Nixie Clock

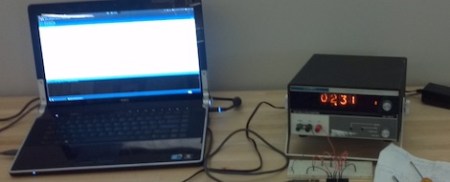
Surprisingly, up until a year ago, [Jimmy] hadn’t seen a Nixie tube. Awful we know, but he has come around to the beauty of glowing numbers in a tube. He recently found an old millivolt meter in a junk pile that used Nixie tubes. The wondrous orange glow beckoned him, so [Jimmy] decided to build a clock.

Just about all of the Nixie clocks we’ve seen (including non-clock builds) rely on building a controller for the Nixie tubes. The controllers range from Nixie Arduino shields to the good ‘ol 74141 IC. [Jimmy] realized he didn’t need to bother with controlling the tubes in an already functional millivolt meter – he only needed to send the right voltage.

For his clock build, [Jimmy] used an Arduino to output a voltage through a bunch of resistor dividers. For example, if the time is 12:30, the output voltage will be 12.30mV. Using this technique, the values for the needed resistors don’t exist, so a little bit of PWM means the Arduino keeps fairly good time.

There’s one added bonus of [Jimmy]’s clock – because the voltage varies around 0.01mV, the finished project acts like a digital version of Lord Vetinari’s clock. It may not be perfect, but at least a nice piece of equipment was saved from the trash.

Halloween Hacks: Death Throws A Party

If you him the Grim Reaper, Azrail, Magere Hein, or simply, ‘Death,’ he sure throws a good party. [Victor] has an anatomical model of a skeleton at his job named [Hein], and for his birthday party, his coworkers decided to throw [Hein] a party.

[Victor]’s first skeleton-based build was last summer. The twinkle of the summer sun in [Hein]’s eye socket made for a great occasion to dress the skeleton up in some summer garb. [Hein] was dressed in a fashionable Hawaiian shirt and put in a window along a corridor. Of course, a skeleton is no good if there’s no element of surprise, so [Hein] held disposable camera that flashed every time someone walked by.

[Hein]’s birthday spectacular required something a bit more shocking. A blowout whistle was added to [Hein]’s mandible. With a PIR sensor and a TI Launchpad, [Hein] was commanded to blow the whistle every time someone walked by.

[Victor]’s builds may not have the shock value – or even be as scary as Halloween necessitates – but he’s got a few good ideas for what could become a great yard display. Check out the video after the break to see [Hein] greeting [Victor]’s coworkers.

Continue reading “Halloween Hacks: Death Throws A Party”

Laser Cut 3D Sculptures Remind Us Of An Old Playstation

[Paul] a.k.a. [VoidFraction] put up the source and documentation for his sculptures made with laser cut polygons.

For computing his triangles, [Paul] developed LcAgl, an algorithm that transforms a 3D model into the AutoCAD file needed to cut a whole bunch of triangles and connectors. This file was shot over to a laser cutter and after a confusing assembly, [Paul] can make just about any low polygon count model he wants.

For his sculptures, [Paul] uses Coroplast, a type of corrugated plastic commonly used in political campaign signs. Coroplast is lightweight and flexible, a bonus when [Paul] is fitting his triangles together. The connecting tabs are made from acrylic – a very rigid material, so the triangles are held tightly in place.

Since the models in most 3D games are just a bunch of polygons anyway, this technique reminds us of the first 3D console games. [Paul]’s rhino looks like it walked off the set of a low polygon game like Virtua Fighter or Jumping Flash!.

Altoid Tin Etching Tutorial

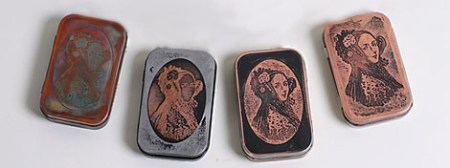
Eminent steampunker [Jake Von Slatt] wrote a small article on etching candy tins for The Steampunk Bible, but the limited space available in the book didn’t allow for a full exposition. To make amends for his incomplete tutorial, he posted this walk through to compliment the Bible’s article.

The process is very similar to the many tutorials we’ve seen on home-etching PCBs using the toner transfer method. Removing the paint from the Altoid tin, creating a mask, printing it on the Sunday circulars, and taking an iron to the tin is old hat for home fabbers.

Unlike PCB manufacturing, [Mr. Von Slatt] doesn’t bother with Ferric Chloride or other nasty chemicals – he does everything with electrolysis. After adding a few tablespoons of table salt to a bucket of water, [Jake] takes a DC power supply and connects the positive lead to the lid and the negative lead to the base. a bit of electrical tape around the corners of the lid keeps the metal from getting too thin.

A nice Copper finish can be applied to a finished tin by swabbing on a solution of Copper Sulfate – a common ingredient in “Root Kill” products. Of course that’s not a necessary step; you can easily enjoy and elegant Altoid tin bare metal.