Have you heard about this One? At least three United States senators have, and they want to know what Amazon plans to do with all the biometric data collected by the Amazon One program. It’s their new contactless payment method that uses your unique palm print instead of cards or phones to make purchases, gain access to venues of work and play, and enter or pay in whatever other spaces Amazon can invade down the line. The idea is that one day, we’ll all be able to leave our homes without any form of money or ID of any kind, because we’ll all be stored away in Bezos’ big biometric file cabinet.
We tossed this one around in the writer’s room back when the Amazon One concept was nothing but a pile of buzzwords and a render or two, but these kiosks are now active in 50+ Whole Foods and Amazon 4-Star locations across the US. Here’s the deal: you can only sign up at a participating store that has a kiosk, because they have to scan your palms into the system. We were worried that the signup kiosk could easily take fingerprint scans at the same time, but according to the gifs in Morning Brew’s review, it just uses another of their point-of-sale palm scanners along with a touch screen and a card reader. But you still have to hover your entire hand over it, so who’s to say that the scan ends where the fingers begin?
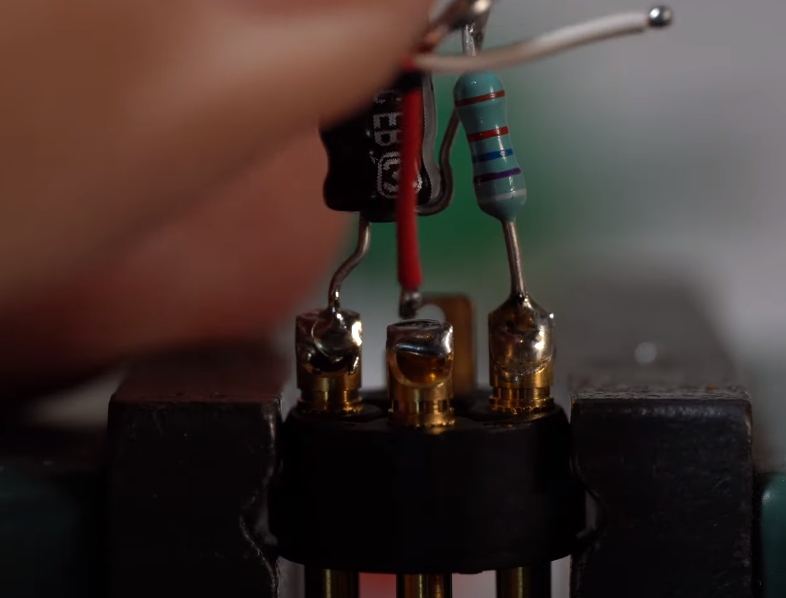
Theoretically, ambisonic microphones allow you to perfectly encode the soundscape around you and recreate it from the focal point of any direction. To do this, you need at least four microphone capsules and some math. Ambisonic microphones have been around for 50 years, but [DJJules] wanted to bring ease of use to these tools and push them into the open source fold.
As you’ll see in the video below, there were a few iterations before this one. Everything changed for the better when [DJJules] found out about TSB25905 capsules. These are electret condenser mics with 1″ diaphragms and built-in EMI/RFI-suppressing capacitors. Another big help was deciding to color code everything from the XLR cable boots to the cable sleeves to the electrical tape that’s protecting each of the P48 resistor-capacitor pairs inside the XLR plugs.
[DJJules]’ buddy [Tom] designed and printed a single piece that holds the four capsules in a perfect tetrahedral array, and an elegant two-piece basket that protects the mics and provides a base for a one of those furry windscreens. The mics and the basket are separated with four silicone plugs designed for quadcopters that provide both isolation and vibration dampening.
If you want to make one of these yourself, [DJJules] has STLs for both a normal microphone stand and another for GoPro mounts. Check out the build video after the break and the sound demos on Instructables.
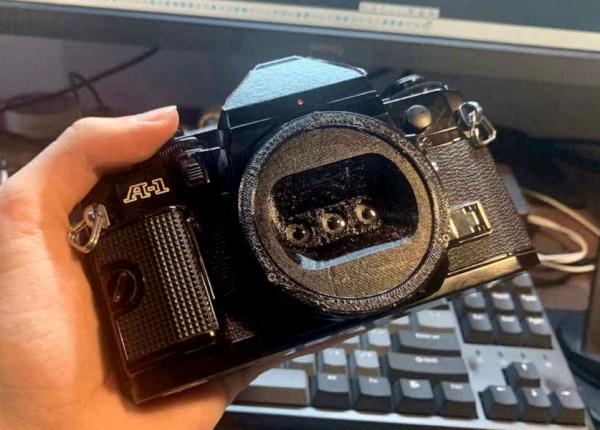
Have you ever heard of a wigglegram? They are made by shooting multiple pictures at once using multiple lenses, and the the resulting stitched-together ‘gram is kind of a gif version of a stereographic image. It looks 3D, and it — well, it wiggles. The ones with a boomerang effect (i.e. a good loop) are especially prized.
The only real drawback is that the camera has to be close to the subject because the three lenses are so tightly packed. Another drawback is that there is no viewfinder while using this lens. There have to be divider walls between the three lenses to keep the images separate, and these walls have to extend all the way into the camera body. The Canon A-1’s viewfinder mirror does not allow for this, so [Joshua] pushed it up out of the way.
[Joshua]’s initial design approach to finding the ideal lens distance from the film plane was to do a bunch of calculations, but he ended up Goldilocks-ing it and iterating a bunch of times until it was just right. If you have a Canon SLR and want to build one of these, you’re in luck as far as the STLs go.
You may have noticed that I neglected to write an introductory paragraph for the last one of these — I was just too excited to get into the keyboards and keyboard accessories, I guess. I can’t promise that I’ll always have something to say up here, but this week I definitely do: thank you for all the tips I’ve received so far! The readers are what make Hackaday great, and this little keyboard roundup column is no exception. Fabulous fodder, folks!
Kamina Chameleon
This is [deʃhipu]’s daily driver. Vroom!Like any keyboard enthusiast worth their soldering iron, [deʃhipu] keeps trying for the ultimate keyboard — ideally, one that runs CircuitPython and makes a great daily driver for high-speed typing.
The latest version is the Kamina, a one-piece split with a SAMD21 brain that is slim and narrow without being cramped. [deʃhipu] started by splitting the Planck layout, spreading it, adding a number row, and eventually, an extra column of Kailh Chocs on the right hand. One-piece splits are great as long as the split suits your shoulders, because everything stays in place. When you do move it around, both halves move as one and you don’t have to mess with the positioning nearly as much as with a two-piece. And of course, since he designed it himself, it fits.
The really cool thing here is the center module concept. It’s functional, it looks nice, and as long as it doesn’t get in the way of typing, seems ideal. So far, [deʃhipu] has made a couple different versions with joysticks, encoders, and buttons, and is currently working on one with a Home button made for cell phones to take advantage of their built-in optical trackpads.
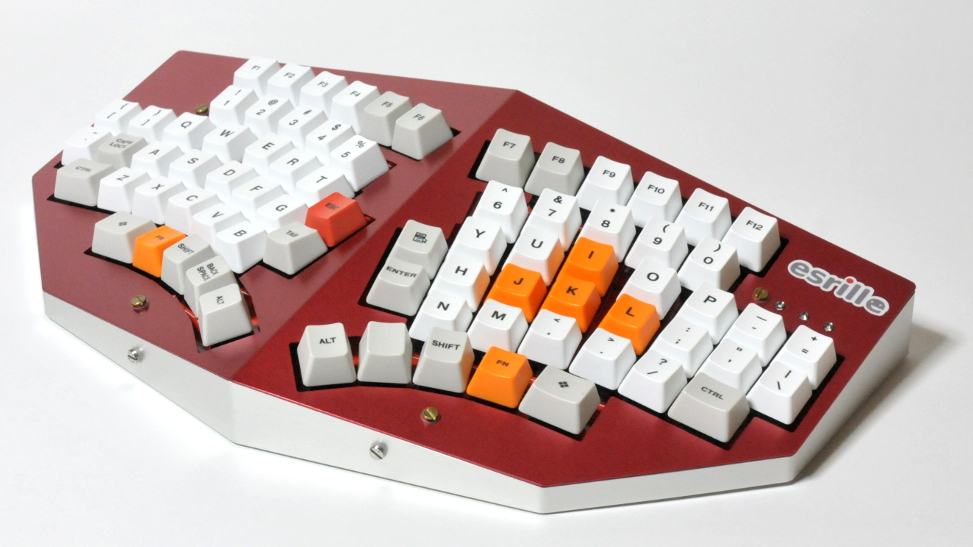
Esrille NISSE Looks Nice
This is the Esrille NISSE keyboard and it comes in two sizes! Okay, the two sizes don’t look that different, but the key spacing specs say otherwise. To me, this looks like an Alice with a better and ortholinear layout. These bat-wing beauties are new to me, but they’ve been around for a few years now and are probably difficult to stumble upon outside of Japan. Although Esrille doesn’t seem to make any other keyboards, they do make a portable PC built on the Raspberry Pi compute module.
I love me a one-piece split when its done properly, and this one seems to be pretty darn close to perfect. How do I know? You can print out a paper-craft version to try out either of the two sizes. I didn’t take it quite that far, but you can bet that I opened the smaller size’s image in a new tab and put my hands all over the screen to test the layout.
I especially like the thumb clusters and the inside keys on this thing, but I think the innermost thumb keys would be too painful to use, and I would probably just use my index finger. I would totally buy one of these, but they’re a little too expensive, especially since the smaller one costs more. (What’s up with that?) The great news is that the firmware is open-source. Between that and the paper-craft models, a person could probably build their own. Check out [xahlee]’s site for a review and a lot more pictures of the NISSE and similar keebs.
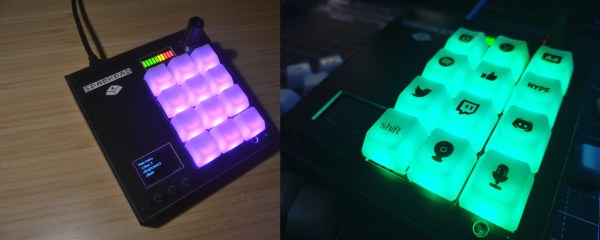
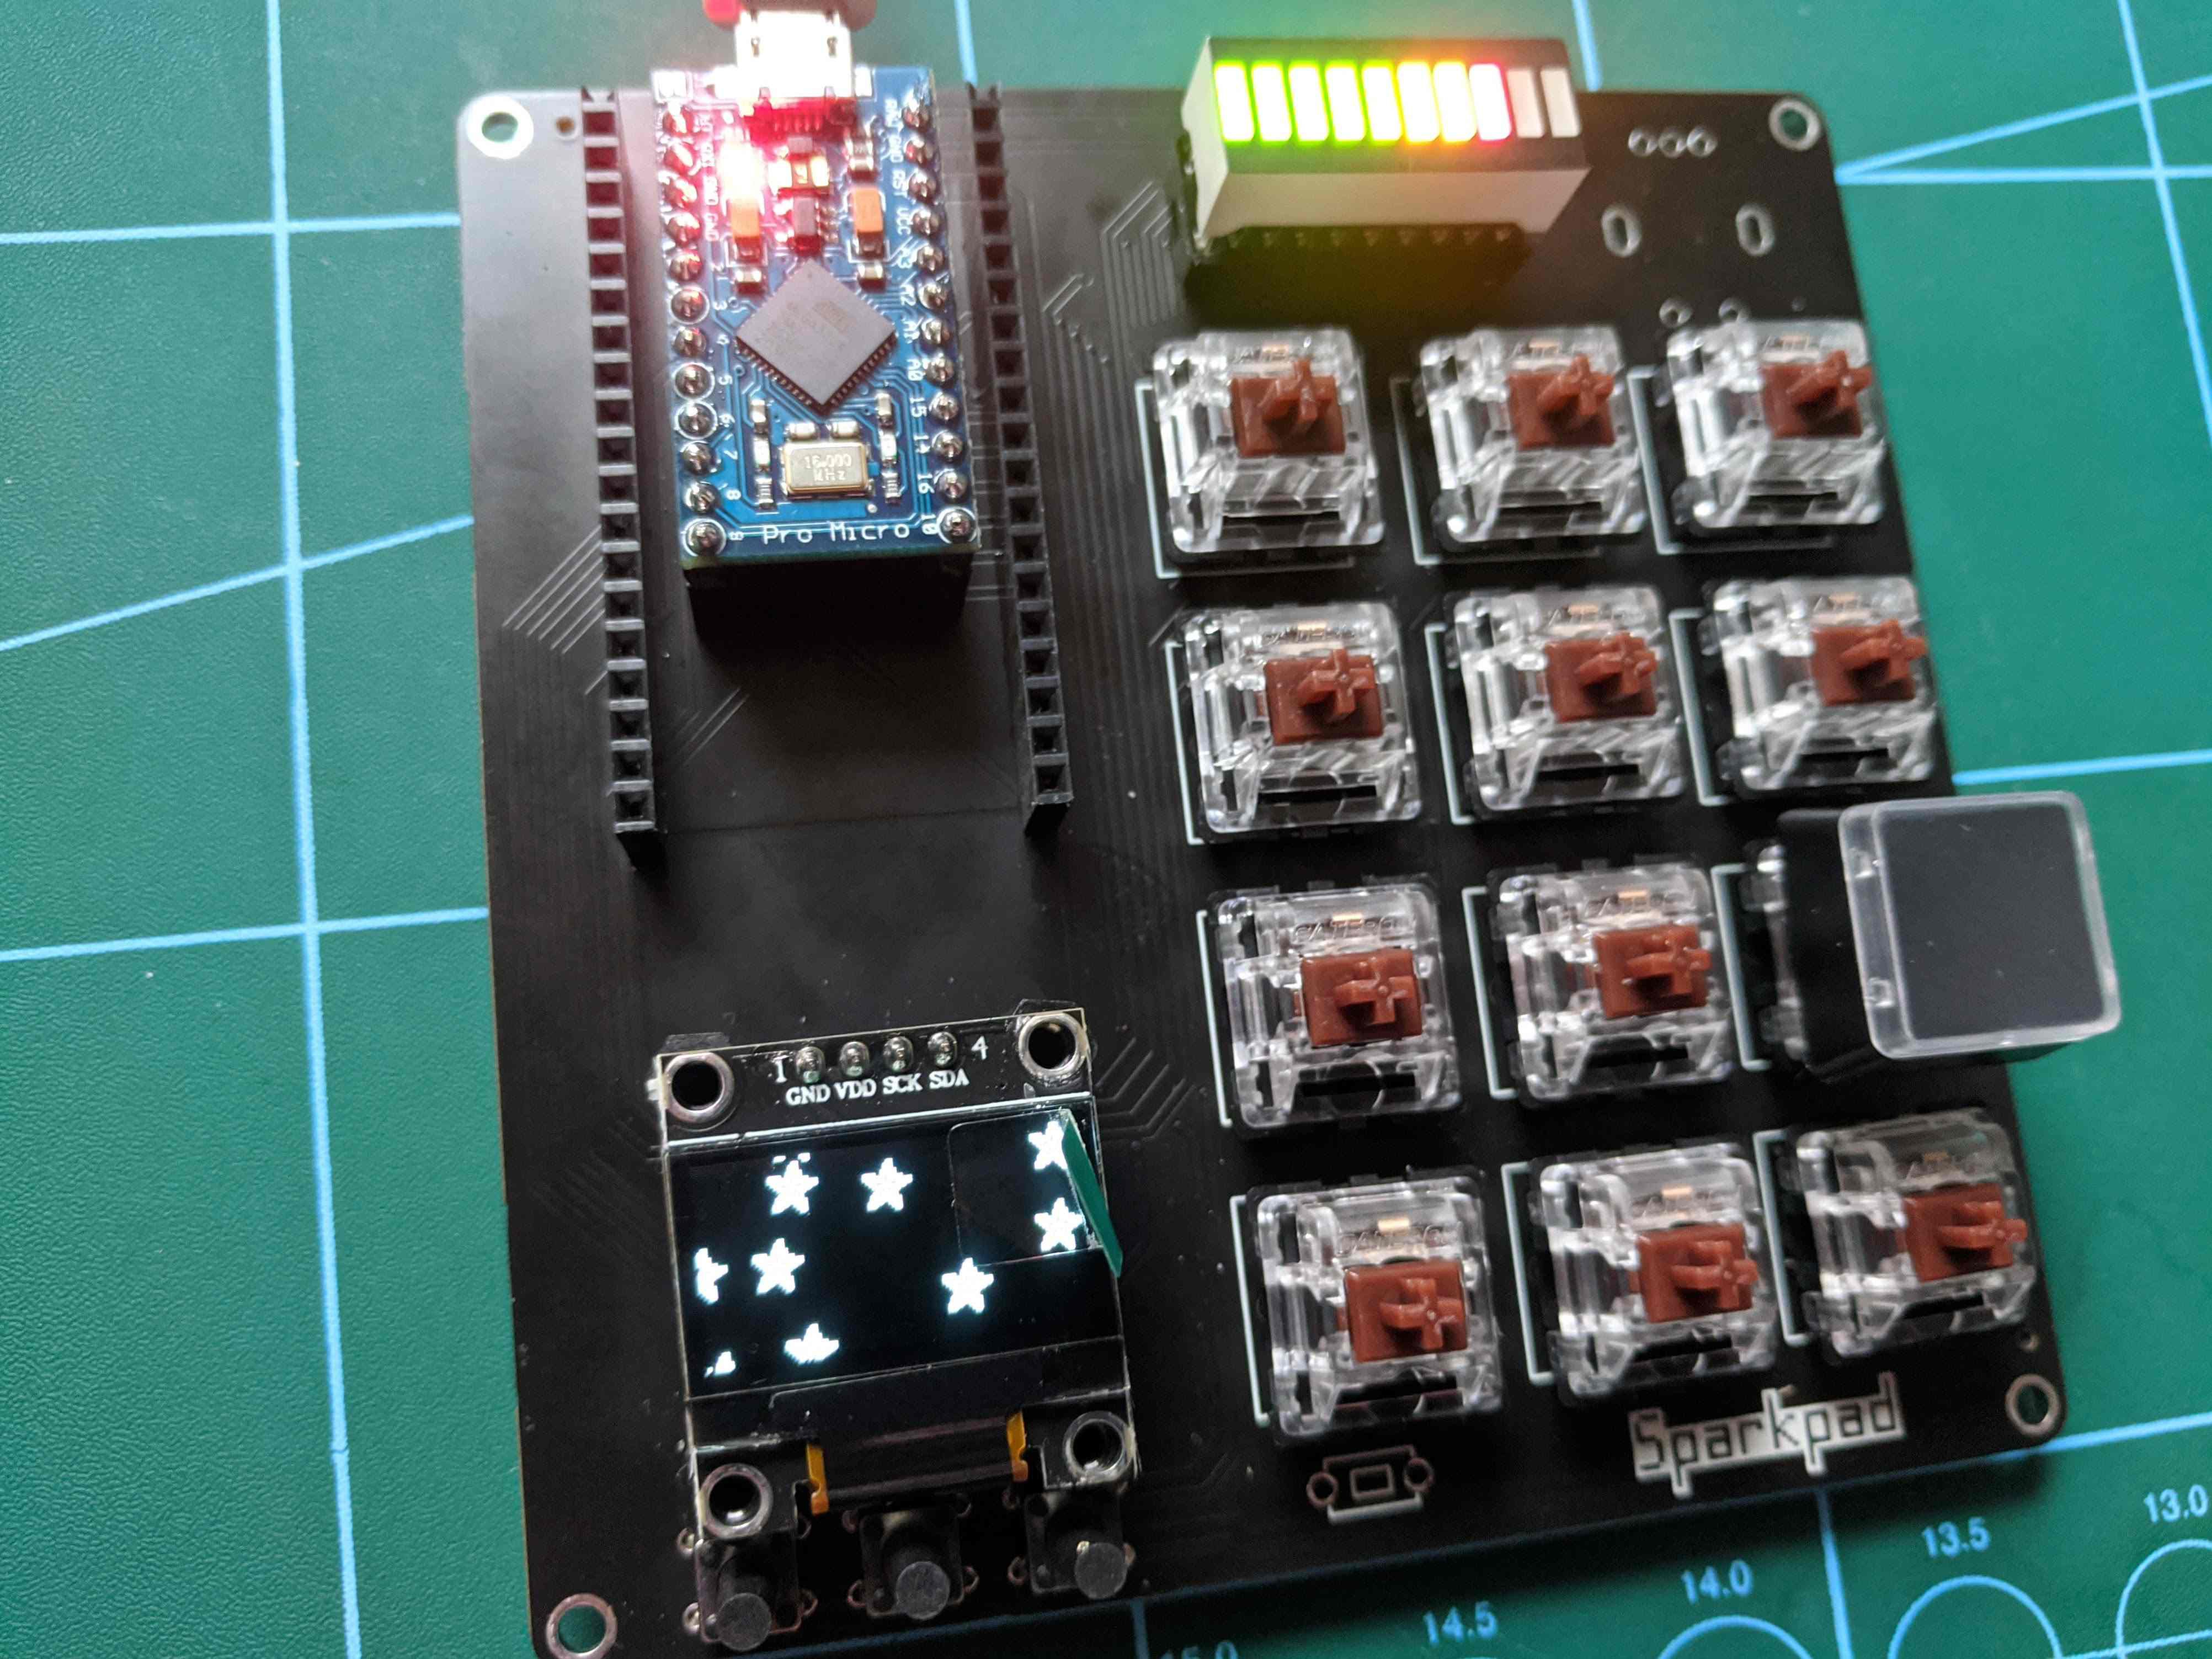
The best streamers keep their audience constantly engaged. They might be making quips and doing the funny voices that everyone expects them to do, but they’re also busy reading chat messages aloud and responding, managing different scenes and transitions, and so on. Many streamers use a type of macro keyboard called a stream deck to greatly improve the experience of juggling all those broadcasting balls.
Sure, there are dedicated commercial versions, but they’re kind of expensive. And what’s the fun in that, anyway? A stream deck is a great candidate for DIY because you can highly personalize the one you make yourself. Give it clicky switches, if that’s what your ears and fingers want. Or don’t. It’s your macro keyboard, after all.
[Patrick Thomas] and [James Wood] teamed up to build the perfect stream deck for [James]’ Twitch channel. We like the way they went about it, which was to start by assessing a macro pad kit and use what they learned from building and testing it to design their ideal stream deck. The current version supports both the Arduino Pro Micro and the ESP32. It has twelve key switches, a rotary encoder, an LED bar graph, and an OLED screen for choosing between the eight different color schemes.
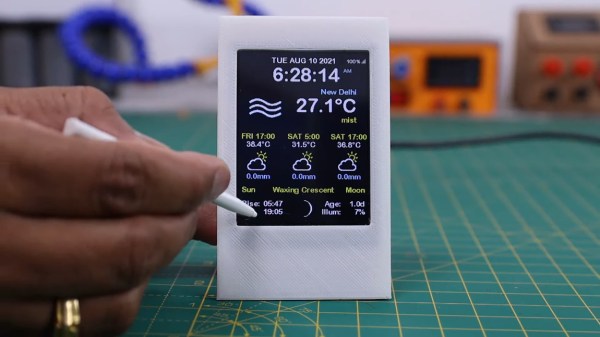
Weather is one of those things that seems to be endlessly interesting to hackers. We may decry the notion that weather can be accurately predicted two days out, much less seven, but if there’s an extended forecast available, by gosh we’re gonna take a gander at it.
So why pick up your phone or open a browser tab every time you want to check the temperature? If you’re so into it, you should build a desktop weather widget. [opengreenenergy] has written a great guide to a tidy build of this classic and oh-so-useful project that covers everything from the soldering to obtaining an API key. Inside is an ESP8266 and a 2.8″ touch screen display that shows localized conditions via Open Weather Map. The main screen shows the time, date, current weather, 7-day forecast, and the moon phase for each day, and subsequent screens go into further detail. It’s informative without being busy.
We love the streamlined look of the snap-fit enclosure. This may be a fairly simple project, but the build as designed is challenging due to the space constraints inside. Check out the video after the break, which features the venerable Stickvise.
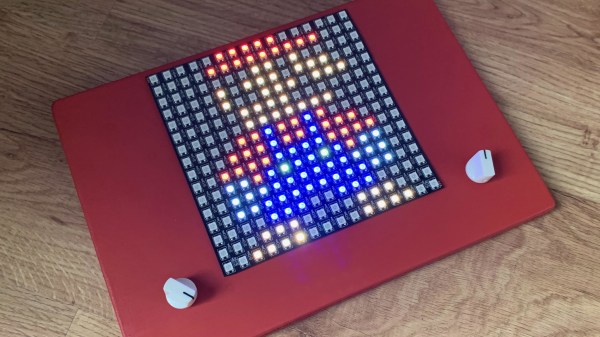
We never did crack open our Etch-a-Sketch, but we did scrape out a window large enough to really check out the mechanism inside. [MrLangford] is bringing the Etch-a-Sketch into the 21st century while at the same time, bringing an even bigger air of mystery, at least for the normies.
Instead of scraping aluminum powder off of plastic by driving a stylus on an x-y gantry with a pair of knobs, this bad boy uses rotary encoders to move the cursor around and put down squares of colored light. The familiar movements are there — the left knob moves the cursor left and right, and the right knob moves it up and down. But this wouldn’t be a 21st century toy without newfangled features. Push the left encoder down and it cycles through eight color choices, or push the right one down to go through them backwards. We hope one of the colors is setting it back to darkness in case you screw up. And while we’re dreaming up improvements, it would be awesome to add an accelerometer so you could shake it clear like a standard Etch-a-Sketch.
Inside the requisite red enclosure with white knobs are an Arduino Nano and a 16×16 RGB LED matrix. The enclosure is four sheets of 6mm MDF glued together, and we like the use of protoboard to distribute GND and 5 V in the name of keeping the thing slim.


![[deshipu]'s DIY keyboard with various center modules](https://hackaday.com/wp-content/uploads/2021/08/deʃhipu-Kamina.png)